 Here are some tips for getting nice punchy drums in your recordings. In the title, I specifically say recorded drums because these tips by Bjorgvin Benediktsson talk about treating the overheads, which mean the recorded sound of all the drums coming through a pair of microphones set up high and a god distance away from the drum kit to capture the whole of the kit rather than any individual drum. If you didn’t record the drums, but rather use MIDI drums or some other form of virtual drumming in your mix, you likely won’t have any overheads to treat.
Of course some computer drum programs out there are more sophisticated than others. The one that comes to mind for me is my new favorite drum program called Drum Experience (by Centipeak), which not only gives you samples of each drum at multiple velocities (each velocity is actually a different recording sample), but also gives you unparalleled samples of microphone feeds as well. For example, not only do you get overhead mics for a kit, but you also get the option of turning on or off the different mic feeds for every drum! Simply amazing.
But I digress. This is supposed to be about what to do in your multi-track software (or console if you’re old-school) to get a tight and punchy drum sound. The tips involve a sequence, such as treating the overheads first, and types of effects to apply (mostly EQ, compression) to overheads and individual drums.
Read Bjorgvin’s post here: http://www.audio-issues.com/music-mixing/how-to-mix-drums-rockstar/
virtual drumming
Update To Jamstix Virtual Drummer
The MIDI drum program called Jamstix, By Rayzoon is a really cool computer drum machine on steroids. I talk about it and the many cool features in this post – Virtual Drumming – Use Your Computer to Drum Without Drums. Today Rayzoon announced the update to Jamstix 3.5. One of the updates includes support for native 64-bit VST (for PC), which is perfect timing for me since I’m in the middle of a migration from 32-bit to 64-bit Windows.
Check out the rest of the details for the latest version here: http://www.rayzoon.com/jamstix3_upd.html
3 Keys To Killer Drum Tracks When You Don’t Have Any Drums
 Many musicians are acting as their own recording engineers, using computer-based home recording studios whose capabilities are ever-improving while their prices are ever-decreasing. These home recording studios are, more often than not, located in a spare bedroom. Trying to record an entire band along with drums can be challenging with a studio like this, assuming you HAVE a band and/or drummer. But what about the many home studio recording musicians who are running solo? What if you want to record a song with drums but you don’t have drums OR a drummer. Are you out of luck? Why, of course not. Virtual instruments, in this case virtual drums to the rescue again. Drum samples (actual recorded audio of drum hits) are widely available. But there are several tricks to building a drum track that sounds realistic, even with real drum samples. I’m going to share 3 of those vital tricks with you.
Build Your Own Drum Parts
There are virtual drumming programs out there that will automatically play the drums for you, sort of like the drum machines of old. But we’re not going to talk about those today. We’re going to build our own drum track so that we have ultimate control and flexibility, and get exactly the drum grooves and parts that we want. Plus this will give you the skill to add any type of percussion to a song very quickly at any time. For this example, I’m assuming we’re using a drum kit sample in a recording program that has MIDI functionality (for a review of what MIDI is, see our post MIDI Recording – What Is It And Why Is It Awesome?). Reaper springs to mind, but there are many other audio programs where MIDI is actually more of a primary function. Either way, the first thing we will need to do is load up a drum kit on one of our tracks. Start a new track and attach the virtual drums via whatever method your software uses. In Reaper, click the track’s “FX” button, which will give you a menu of plug-ins to choose from, including virtual instruments. Pick you drum program and then select your kit. Again, there are many virtual and MIDI drum plug-ins and programs out there. For this example I use StormDrum, by EastWest. Tell the track to use your MIDI keyboard as its input and you’ll have each drum in the kit mapped to a specific key on your keyboard.
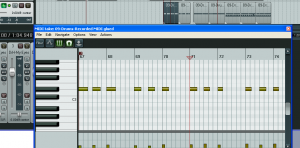
The next thing you need to do is make sure you establish a tempo for your song in the software and turn on the click track. This is important for keeping everything aligned. Next, go ahead and record 5-10 seconds of yourself playing some of the drums with your fingers on the keyboard. This will put a MIDI item in your track (as opposed to an audio item). Now double-click the MIDI item, and the MIDI editor window will open, which looks something like Figure 1. You can now add and drag notes around on the grid until you have a few measures of the beat you want. If you need more MIDI item space to work with, no problem. Just close the MIDI editor window, grab the right edge of the MIDI item with your mouse, and drag it to the right, extending its length as you go. You’ll notice that you can drag it as far as you want to the right, but little notches will repeatedly show up on the item. This is the original MIDI item repeating over and over again, the notches representing the end points, which continually loop as long as you stretch out the MIDI item. See Figure 2, where I stretched the item from about 8 seconds to 24 seconds.

Time For Some Glue and Make it Snappy
To avoid having anything sound off-beat, I recommend the use of two tools, Glue Items and Snap To. At this point in our example you have a longer bit of MIDI. The problem is that you can still only edit the original 8 second item in the MIDI editor, which will also effect every loop. Now it is time to employ probably my favorite of any tool in any recording software, Reaper’s Glue Items tool. Select the longer item (with the notches representing the loop end-points), right mouse-click and choose Glue Items, the notches will go away and you’ll have a non-looped, much longer MIDI item. Now if you go into the MIDI editor, you can delete what was the looped versions and you’ll have lots more MIDI space to add new drum parts. See Figure 3.

Now continue drawing in drum parts, high-hat, snare, kick, etc. in the MIDI editor, until your get a complete part, which may represent different sections of the song. Most songs are made up of drum “phrases” that may or may not repeat throughout the song, like Intro, Verse, Pre-Chorus, Chorus, Bridge, Ending for example. Each of these can be built up its own MIDI item, and then put into the drum track in sequence to create the entire song.
For any item that repeats lots of times, such as verse parts, you’ll need to make the item loop-able, so that you can simply drag it along the track to automatically create as many loops/repeats of the phrase as you have verses for that section of the song. We did the dragging part earlier just to create some blank MIDI space, but now that the drum part is complete, we actually want to keep the looped parts so we can make one part repeat many times with a drag of the mouse. The big difference this time is that you MUST define the proper beginning and ending points before looping.

So the first thing to do is make sure that snapping is turned on and that the grid on your screen represents beats and bars. Now drag the left side of the MIDI item until the start point is right on the measure where the part starts. Then do the same thing to the end of the phrase. Now you’ll need to check to see if it’s correct. Highlight the song from the beginning of the item to the end of it. Then tell Reaper to loop the playback of that section. See Figure 4. This usually takes a bit of trial-and-error. If it doesn’t sound correct the first time, simply drag the beginning or ending (usually the ending, in my experience) a bit to the left or right and try again until you get it right. Remember, it is vital that you have snapping turned on here so that the end-points will always be on a logical beat or beat division. Once you get it right, it’s Glue to the rescue again! Select the item, right-mouse-click and select Glue Items again. This will create a loop-able phrase of drums that you can drag, stretch, and/or paste to create as many instances of it as you need throughout the song. Do this for each section of the song and you have yourself a completed drum track.
Easy On the Perfection
During the first parts of this process I insisted you ensure the drum parts are right on the beat, and the loops are musically correct, using such tools as Glue Items and Snapping. But sometimes too much of a good thing is, well, not a good thing. Sampled drums are played by a computer, so virtual drumming can actually be a little too perfect. If you don’t tell the machine otherwise, it will play every drum hit at the exact same volume with the exact same energy, on the mathematically perfect rhythmic beat. The problem there is mainly that we’re used to hearing drums played by humans (not counting the 80s), who are incapable of such precision and perfection. So the machine-played drums will sound machine-y, too mechanical for good music. So we need to tell our computers to humanize the performance. What this means is that the drum hits will be randomly shifted in both volume and time just a teeny bit to make them sound more like a human played them.
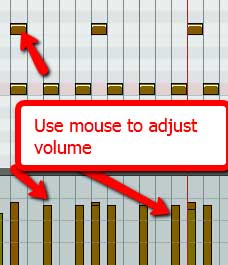
The volume and energy of drum strikes also need to vary in a specific way. For example, a drummer can make a snare drum sound like 3 or 4 different instruments just by how hard she hits the drum. Heck, Irish bodhrans can deliver dozens of different sounds. Certain rhythms rely on having emphasized and non-emphasized hits. So when you build your drum track, keep that in mind. You’ll frequently have to adjust these settings manually, which can be done in multiple ways in most midi programs. See Figure 5.
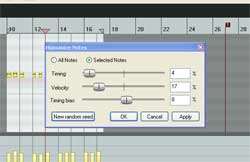
For subtle timing and velocity (another way of saying how hard a sample is struck) differences, you will want to do one or both of the following: make sure your MIDI keyboard’s touch sensitivity (where the sound is louder the harder you press) is turned on (if it has this capability). Then once the MIDI notes are recorded, use the Humanize function in the MIDI editor. See Figure 6.
Believe it or not there are lots of times, in certain genres of music, when a drum beat that is ever-so-slightly behind the beat can make it sound better to us musically. So it’s important for us to keep a little slack in the drum grid.
Killer Drums and No Drummer
So there you have it. It may take a little time, but if you want very realistic-sounding drum tracks without having any actual drums around, use virtual drums and employ 3 important keys:
- Build the drum parts yourself for maximum control and flexibility.
- Use the Glue Items and Snap To tools in Reaper to make it fast and easy to create musically correct rhythms and not have anything sound off-beat.
- Use the MIDI editor and tools such as the Humanize function to ensure the drums don’t sound too perfect, which would not sound natural to us in most musical genres.
Do this just a few times and you’ll be amazed at how quickly you can build up awesome sounding, killer drum tracks without having to have any actual drums. How cool is that?
Our latest home recording course (video tutorials) – The Newbies Guide To Audio Recording Awesomeness 2: Pro Recording With Reaper – has a 3-part lesson showing you how to use MIDI and virtual instruments, including drums. You even get some free drum hits to use with Reaper’s ReaDrums.
Home Recording Awesomeness – Virtual Instruments
 Professional sounding audio recording is not as dependent on money (for good gear, studio musicians, commercial studios, etc.) like it was for so many years.
Now you can produce pro audio right from your computer without having to spend much (or any) money at all. This new technology has also made it possible to record instruments for your music that you don’t actually have.
You can have drums, piano, trumpets, guitars, etc. playing in your song without knowing how to play these instruments or without having someone else play them. Sounds impossible, right? Well that’s the magic of virtual instruments.
Real Virtual Instruments
I’m sure you’re familiar with the typical sounds a computer plays when a MIDI file is launched (for a review of what MIDI is, see our article: MIDI Recording – What Is It And Why Is It Awesome?). These are computer-y sounding cheesy “instruments” that come built into most sound cards. Technically these are virtual instruments.
Let me state right up front that these are NOT the sounds I refer to when I say “virtual instrument.” Oh no. What I want you to know about is the host of real-sounding software instruments available to load up on your computer and then play with your MIDI keyboard (or depending on the software, your computer keyboard). If you can think of an instrument, odds are you can find a virtual version on-line somewhere.
What is the difference?

What is the difference between the cheesy sounds on your sound card and the virtual instruments I’m talking about? The major difference is that a virtual instrument can (usually does) sound indistinguishable from the “real” version of the instrument. At least to most people. Try this experiment (for which you won’t even need the keyboard). Find a simple MIDI file on the internet. They are everywhere, just type “MIDI file” into a search engine and download one for a tune you know. Nursery rhymes work well…just something simple. Double-click that file (MIDI files have a “.mid” extension) and listen to it play through your sound card’s piano sound.
Let’s Try It Right Now
Now we’ll listen to the same MIDI file played through a free virtual instrument. There are several types of virtual instruments out there, the most popular of which is probably a “VST” (virtual studio technology) type of instrument. To play one of those, we need to download something called a “VST host” from the web. There are several free ones to choose from (yup, type “free VST host” into a search engine). Try VSTHost or MiniHost.
A VST host is just a piece of software that can play VST virtual instruments. If you already have recording software such as Pro Tools or Reaper, you can play VST instruments within the software and won’t need a separate VST host.
Either way, once you have the host program installed, you’ll need to attach or “load” an instrument. For this let’s use a free VST instrument called “4Front Piano Module” (which you can download here: http://www.yohng.com/software/piano.html).
Then what?
Once that is downloaded, all you have to do is load the 4Front Piano from within your VST host program and you’re ready to rock. Import the MIDI file you played earlier on your sound card into the VST host (with the 4Front piano loaded up) and hit “play.”
Hopefully you’ll notice that the piano sound coming from the virtual instrument, 4Front Piano Module in this case, sounds vastly superior to when you heard it coming from your sound card’s factory instrument. And this was just a free instrument! For a few bucks, you can get an even better sounding VST piano to plug into your VST host and play that same MIDI file.
Want to hear the same notes on a different instrument? Trumpet, maybe? Or violin? Download some trumpet and violin VST instruments and try those in your host program. You can play that same MIDI file through any MIDI instrument you can find! The possibilities are just about endless.
What are some examples of virtual instruments?
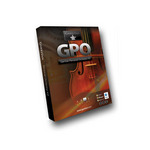
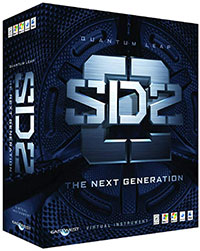
Some of the virtual instruments I have on my computer include: The Garritan Personal Orchestra, Spectrasonics Omnisphere, 4Front Piano, Storm Drum, and a few others.
Eventually you’ll learn to create your own MIDI files to play back through a virtual instrument, and then mix that instrument in with actual audio files you’ve recorded to create a rich ensemble. Use virtual bass guitar and virtual drums along with real electric guitar and real vocals to turn yourself into a rock band. Are you starting to see how this can be life-changing if you are a musician?
If you don’t already have a home music studio, this can be your start. If you do have one but didn’t know about virtual instruments, this will take your productions to a whole new level. There is not reason (at least no monetary reason, since the example here used only free stuff) to give this a try right now! You’ll be amazed and inspired. I know I was.
If you would like to learn more about MIDI and virtual instruments, check out our new tutorial video course The Newbies Guide To Audio Recording Awesomeness 2: Pro Recording With Reaper, which has a 3-part lesson (Lesson 11 – Intro to MIDI and Virtual Instruments) guiding you step-by-step through creating and playing virtual instruments.
VST Plugins – Add Effects and Virtual Instruments to Your Home Studio
 If you are not already with VST plugins, let me enlighten you at once. Your home studio software program probably came with at least some effects built-in, such as compression, EQ, or maybe a reverb effect. But sooner or later you’ll probably want to add to that initial collection of effects. Enter, VST, which stands for Virtual Studio Technology. It was invented by Steinberg, maker of excellent audio recording software and hardware, who hold the trademark for VST technology. But that’s not the stuff you want to know, is it?
VST Effect Plugins
The most common use of VST is to add effects to tracks in your DAW, or to add editing tools to your editor. 3rd-party developers sell these effect plugins for lots of different effects like chorus, flanger, delay, filters, EQ, compressors, limiters, noise reduction, tuning effects like Auto-Tune, just to name a very few. A search on B&H Pro Audio’s website for VST Effects brings up 73 different items! One reason to use these plugins rather than, or in addition to the built-in effects on your software is that a plugin developer has designed their product with nothing else in mind, so the quality of the resulting effect is likely to be much better than one of a collection in a bundle that was a bonus to your recording program. And as I already hinted at, the sheer variety and volume of selection is another reason to use VST plugins.
Virtual Instruments
I’ve discussed virtual instruments here many times. They give us the ability to add realistic sounding drums, horns, pianos, harps, violins (do I need to go on?), etc. to our recordings without having to actually have the physical instrument. Neither do we need to have a person to play said instrument. All we need is a MIDI keyboard. Heck, if our recording software has a MIDI editor (Reaper does;)), all we need to do is draw in MIDI notes and when we hit the “play” button, the MIDI data will play the instrument. A search on the B&H site for VSTi returned 31 different results. And several of these were not just single instruments but collections or packages of instruments. For example, the Garritan Virtual Marching Band VSTi contains dozens of instruments including individual and grouped trumpets, trombones, tubas, cornets, piccolos, oboes, clarinets, and the full range of drums and other percussion instruments you’d find in a drum line. This is just one package from one developer.
How To Use VST/VSTi
Installing a VST or VSTi will place a dll file on your computer (usually into a folder called “Steinberg/VST” even if you don’t have any Steinberg programs). Most recording programs search your directories for VST or VSTi files (dll type) when they open, so you probably won’t have to do anything. The effect or instrument will just be available to you once inside your DAW.
Most DAWs work the same way. For effects, you simply click on the “FX” (in Reaper) or similar button on a track control, and choose your VST effect. Then that effect will be applied to your audio.
For instruments, it’s pretty much the same except that the track will need to be a MIDI track. Then whatever notes the MIDI data play will be heard as played on the instrument you loaded up.
So that’s it in a nutshell. Adding professional effects or virtual instruments is fast and easy and can really raise the beam on the quality of your recordings.
Cheers!