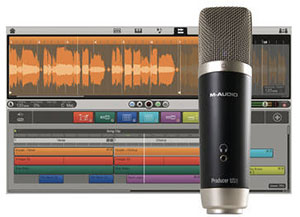
 Since NAMM (The National Association of Music Merchants (NAMM)) has just come to a close, we now know about all the newest gear – both software and hardware – for recording music in 2014. I wrote about a few offerings from Zoom (who make some awesome mobile recording devices) in my article last week – New Zoom Recording Products Just Announced At 2014 NAMM. There are so many cool things, but I thought I’d mention something specifically for home recording that is both awesome and very affordable – the M-Audio Vocal Studio USB Microphone Personal Recording Studio.
So what is it? It’s a package that contains the M-Audio Producer Microphone, which is a large capsule cardioid USB mic (comes with a USB cable and a desktop mic stand), and Ignite Music Creation software. The Ignite software works on both Mac and PC. It also comes with 275+ AIR instrument sounds, which are virtual instruments. Also, the software has “Smart MIDI Chord and Phrase Players,” which allow you to use MIDI preset patterns in modern genres that can assist in your compositions. You can read more details about these patterns, M-Audio’s Smart MIDI Chord and Phrase Players, and the Ignite software in general here: http://www.airmusictech.com/product/ignite.
Cost for the whole package: $99.95. That’s a pretty great deal for everything that you get!
CLICK HERE to purchase or to find out more.
usb mic
USB Mic Versus Condenser Mic And Interface For Home Recording
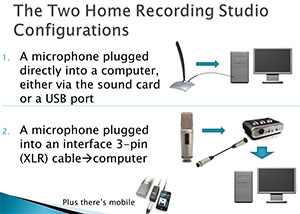 In part 3 of our 5-part post series, How To Build A Home Recording Studio, I mention two ways to set up a recording studio on your computer:
Configuration 1 is a microphone plugged directly into a computer. This can really only be done using either an old-style computer microphone – the kind with the 1/8th-inch plug that you can insert into a computer’s built-in sound card, or a USB microphone (which, as the name suggests, plugs directly into a computer through a USB port).
Configuration 2 is a condenser microphone plugged into an audio interface unit, which is then plugged into a computer, usually via USB.
I recently received a request from the Home Brew Audio YouTube Channel to provide a comparison of a recording made with configuration 1 versus a recording made with configuration 2. So I did just that. Both recordings below were made using Reaper recording software.
Configuration 1 Recording
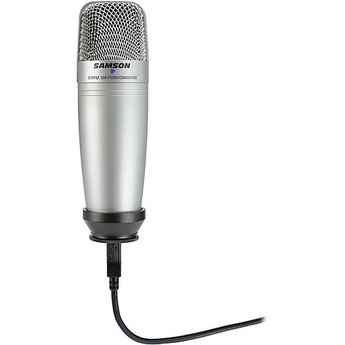
To demonstrate a configuration 1 recording, I used a Samson Q1U USB microphone plugged directly into one of my my Windows 7 computer’s USB ports. This is just a voice recording. Use headphones to get the full effect of the difference between these two recordings. Pay particular attention to the hissy background noise in the USB mic recording. Here is that recording:
Audio Player
Configuration 2 Recording
For the demo of configuration 2, I used a large diaphragm condenser mic – a Rode NT2-A, plugged into a Focusrite Scarlett 2i2 audio interface, which was plugged into my computer via USB. That recording is below:
Audio Player
When comparing the two, listen not only for the noise, but for the overall quality of the sound. Both recordings were normalized to the same average volume so that loudness would not be a factor. Also, neither sample received any noise reduction treatment.
Speaking of noise reduction, most USB mics benefit greatly from the application of noise reduction or removal effects. USB mics tend to have a steady hiss in the background, which is easily reduced without doing much, if any, harm to the audio. Just to demonstrate this, I added a 3rd recording. This one is the same audio used in the configuration 1 demo, using a Samson Q1U USB mic. But I’ve applied noise reduction using a built-in effect in Reaper called ReaFIR. See our article on using ReaFIR here – ReaFIR Madness – The Hidden Noise Reduction Tool in Reaper. Below is the USB mic with ReaFIR applied:
Audio Player
Notice how much better that audio sounds with some noise reduction? And it wasn’t some fancy (and costly) noise-reduction program. It was an effect that is built right into Reaper. If you don’t know much about Reaper, check out the details at their site here: http://reaper.fm. They have a 60-day free trial. Then when you want to buy (cuz you will;)), it’s only $60! Then if/when you start making $25 grand a year with it, you’ll want to pay for the commercial license, which is $225. But the software is the same! It’s based on the honor system. Yeah, I know. That’s pretty amazing.
So there is a short comparison of two home recording studio setups – one with a USB mic (configuration 1), and one with a condenser mic going through an audio interface which is plugged into the computer via USB.
What Is The Best Mic For Home Studio Recording Projects?
Microphones – Here is the other (very!) frequently asked question by folks new to recording at home. And I confess I asked it when I was just starting out. Though I do agree with the “it depends” part of the answer to a large degree, all the person asked for was “a clear mic” for under $300. The advice as basically this: you can either get a $300 mike (the AT and the AKG are about that), or you can use dynamic mics (the Shures) for about $100. Really? those are the only choices? See the Home Brew Audio answer at the end.
Q: I’m looking to buy a microphone for a home recording studio. I want a really clear mic for under $300. I’d love help from someone who has a good one, or knows one.
A: It really depends on what you want to record with it. What are you recording to? A good vocal mic you can use is Rode NT2-A, which is my “everyday mic”. It is it a large diaphragm condenser mic, so, it will need phantom power to make it work. You can also use it to record acoustic guitar, or just set it up in a room to record music.
Another good mic is the Audio-Technica At2035
Another good mic is the Shure sm57 and sm58. They are both dynamic mics so you don’t need phantom power. these are good study mics that you can use from vocals to guitar to drums.
All in all, its hard to record music with one mic, but you can do it. It’s better to have a couple mics set up so you can get better levels on what you want to record. Good luck.
Here is the Home Brew Audio answer:
While the two condenser mics mentioned above are good, they push or exceed the budget of the person asking the question. I don’t think the either of the Shure mics are particularly “clear” (something else the questioner asked for) for recording purposes (mainly because they are dynamic mics as opposed to condenser mics – see our article What Are The Different Types of Microphones? for a review of that).
the other budget issue for mics like the Audio-Technica At2035 or Rode NT2-A is that though they sound great, they need an audio interface like the Focusrite Scarlett Solo in order to plug them into your computer, adding another $100.
What I would recommend is one of the new crop of affordable-yet-clear sounding USB mics. The one I have and recommend for the price is the Samson Q2U for about $59. Not only is it cheaper than any of the mics mentioned in the answer above, but for PC audio recording it is definitely better than either of the Shure mics for clarity. You might do even better with some of the more expensive USB mics on the market too, such as the Samson C01U or Blue Yeti. At that point it is all down to budget.
Our two cents.
The Starter Home Recording Studio
 A very common question out there is “what do I need for a starter home recording studio?
This is a re-post of something that get asked all the time. It is a question asked on Yahoo! Answers several months ago, though some form of it seems to be asked and answered almost daily.
How Would I Make a Starter Home Recording Studio?
Below is a very interesting post from Yahoo Answers. As usual I am perplexed by the answers some folks give to folks who are obviously just starting out.
One person’s advice was to have the guy go spend well over $1,000 to get started. What?! CRAZINESS!
At the end of this post is my answer, which should be starting to get pretty familiar by now to the readers of this blog.
Q: If I want a to make a home recording studio, what will I need as a equipment? Also, what does this equipment do (the more technical things)? What stuff can I buy that is good but that is not too expensive?
(this question does not include instruments, just equipment) so don’t worry about that.
The (Questionable) Winning Answer
A: There are a couple different ways to approach this.
1) You buy an “all-in-one” system like the Roland VS stations. They cost about $2,500 on up for anything decent. The advantage is that they have everything you need to go from a mic to making a CD. The drawback is that they are not as flexible and difficult to upgrade (as in they are the only ones who offer upgrades and you may not like what they offer).
2) Next, you buy a computer system, that offers you the most flexibility, but can be more confusing. For a computer system you need a) A computer that can handle audio recording (Pentium IV or higher with 1G of ram or higher and lots of hard drive space, preferably two hard drives) b) An audio interface in which many come with the software to record. Some suggestions are Digidesign’s Mbox2 (ProTools) or Presonus Fire series. You can really go cheap with some interfaces, but it is up to you. c) You need a mic to get sound in and speakers to get sound out.
In regard to a computer system you can spend anywhere from $1000 on up. It depends on how many inputs you need and what software you want to run. If you want separate software the is meant to be really easy to use, I suggest Mackie’s Tracktion software. They also sell audio interfaces.
Those are the basics, you may want to consider these other items:
– Pop filter
– Studio monitors
– External hard drive (firewire preferred)
– Auralex foam for a vocal booth (or just record in your tub!)
Most of all – have fun!
Here is the Home Brew Audio answer:
First of all, DON’T spend more than $100 if you’re just starting out. Wacky huh? If you are just learning you can do all you need to (by which I mean learn multi-track recording, basic audio editing, and final production) with an average computer, any mic (even the cheap plastic computer mics will do).
So if you don’t have a mic, you can get a pc mic for about $5.00. The recording software is free (Audacity). That’s all you need for the learning part. As a matter of fact, you can do quite a lot with this equipment with a little skill and guidance. But I would stop short of saying you could produce pro quality audio at this price point.
Next, what price-point must you attain to actually produce pro quality audio? Meh, I’d say about $40-$50. Oh yes, you heard right. Just moving from a $5.00 mic to, say, this USB mic: The Samson Q2U will allow you (again with the right skills) to turn out audio quality that I would call “minimum professional level.”
If you want to learn some of these skills I mention quickly, come give our video tutorials a try at: Home Brew Audio Tutorials
Cheers!
Ken
VoiceOver Jobs: Where to Find Them and How to Get Them
 Voice over jobs are posted by the dozens every day on just one site. So there are probably hundreds or thousands available daily. Many of those won’t be available to the public, but the ones on the site I mentioned before definitely are. That site is Voices.Com. It’s free to sign up for a profile, and as soon as you do you get to start putting up samples of you voice recordings.
Making The Recordings
That last part might scare some people, but don’t let it put you off at all. If you have a computer, you won’t need to spend more than about $49 to start making professional sounding voice over recordings. And that’s only if you don’t already have a half-way decent mic. $59 is about the minimum price for a USB mic (such as the Samson Q2U) that can yield good quality audio. Then if you don’t have any voice recording software yet, simply download the free tracking and mixing program called Audacity. To figure out how to make recordings with Audacity, do an internet search for tutorials. Or you could check out the Home Brew Audio tutorials on Audacity here: Recording Tutorials.
Audition for The Voice Over Jobs
Once you have some demo recordings you can upload them to your Voices.com profile. But the real potential is in auditioning for open jobs. Voices.com will send you notices when voice over jobs get posted, and all you have to do is go to the listing for the job, find out what kind of voice-over they want, quote your price and send the recording in for your audition. Each job posting will have specific details, like what their budget range is (the minimum is $100), and what type of voice they need. The listing will also usually (I’d say 90 percent of the time) contain an attached script that will have parts of what the client is looking for. I highly recommend you record from that script for your audition. This is called a “custom” audition and will be much more targeted to what the client needs, which will increase your chances of getting the job. One thing to be careful of at this stage is protecting your recording. If a client is looking for just one paragraph for the entire job, and they provide that paragraph as the audition, anyone who reads the entire thing will have given the client what they need already. Less scrupulous folks can (and have) simply use the audition to fill their job without having to pay you. Preventing this is pretty easy. Either don’t read 100% of the script, or insert a “watermark” to make it impractical for the the audition to be used as a final product.
Getting the Jobs
Here is where knowing the reality of a situation can make the difference between success and failure. Before doing any of this, you should know that as with any acting job, voice over jobs are highly competitive. I would venture a guess that you will get a job about every 100 auditions. This sounds bad but really it isn’t. If you know it going in, you won’t be ready to throw in the towel when your 50th audition still has not yielded one job. Do at least 100 before even starting to get discouraged. The people who succeed in this business are the ones who are persistent and focused.
There are lots of tips on the web about how to make the best recordings for voice overs, how to increase you odds of getting voice over jobs, etc. One such source of advice is the Home Brew Audio website. However you decide to proceed, good luck in your new voice-over career!