 The click track is a tool in audio recording, especially for recording music, that allows a person to hear the tempo or timing information of project. For example, in Reaper (though this is pretty common for all recording software), if you want to listen to a click track while recording, you simply click (no pun intended) the little button in the tool bar that looks like a metronome.
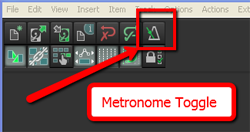 This will then play through the speakers and headphones when in Record or Play mode.
Yes, I see your hands up. I know what you’re going to ask. Yes, you absolutely must use headphones, with the speakers turned OFF (or muted) when recording to a click track. Also, you’ll want to use closed-back headphones if you can. Otherwise the sound of the click track will leak out of the headphones and straight into the mic while you’re recording.
Why even use a metronome/click track in the first place? Musicians recorded without one for decades. True. And I sometimes do record music without one. But most of the time I wish I hadn’t foregone the click-clack (actually it sounds more like “cleek-clock” to me, but I digress). This is due to the fact that I often wish to remove or add entire sections of a song after it is recorded. I also frequently copy and paste sections and maybe loop them. If I hadn’t recorded to a click track, these different bits and pieces of the song would all be at slightly different tempos, and trying to get them to work and play well together is murder. So if at all possible, I record music to a click.
Some people say they cannot record to a click because of how it sounds. Typically, the default sound of a metronome in recording software is sort of like a real metronome, only more annoying. It usually sounds like somebody is tapping a salad mixing bowl with a chop-stick. Not only is it irritating and sometimes hard to “groove” to, but the frequencies of the default click sounds are perfectly designed to explode out of headphones and stampede for the microphone, even closed-back ones sometimes.
So what to do? One solution is to replace the sound of the click with drum sounds, which are much more natural and musical sounding. There are two ways to do this.
First, in the Metronome Options (right-click on the Metronome button), you can replace the primary (downbeat) and secondary beat sounds with any audio file on your computer. If you have a drum, you could record a couple of hits and use those files. Or you can use any drum-hit sample you may have on your computer.
 The second option is to not use the metronome at all. That’s what I do. You simply create a new track (ctrl-T), change the Input to MIDI and insert a virtual instrument drum program using the FX button. Then simply record a measure or two of drum hits. I usually use a kick, hi-hat and snare. Edit the MIDI file (double-click on the item in the track) to make sure your hits are on the right beats. Then trim the MIDI item to make sure it is exactly one measure long and starts exactly on beat #1. Then all you have to do is drag the right edge of the MIDI item to the right (this loops it) for the length of the song.
When you’re done recording, you can simply delete the MIDI track if you want.
The reason this works is that both the metronome and any MIDI items in your project will automatically correspond to your project time (4/4, 3/4 etc.) and tempo (in beats per minute – BPM), which you set in Project Settings in Reaper.
So here are two ways to record you song to the right beat, and have it STAY on that beat all the way through. It’s definitely faster to just use the Metronome tool and its default clip-clop (or more like “cleep-clope” – are you getting the idea that I don’t like this sound?) sound. It doesn’t require you to create any tracks or deal with virtual instrument plug-ins, etc. On the other hand, with a little extra time spent up front, you can have a more natural and musical sound to keep time to.
By the way, our newest recording tutorial course – The Newbies Guide to Audio Recording Awesomeness 2: Pro Recording with Reaper – walks you step-by-step through this and many other awesome Reaper tips. To find out more about those Reaper tutorial videos, including taking a peek inside every lesson, CLICK HERE.
Happy pleep-plopping!
Ken
music recording software
Guitar Recordings For That Thing You Do Cover – Line 6 POD Farm
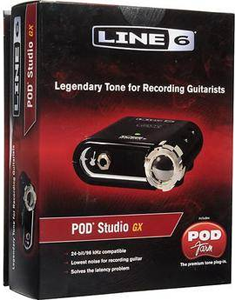 After putting up the audio and then the video for our cover recording of That Thing You Do, which are in the post Cover of “That Thing You Do” – Record a Rock Song on Your Computer, I have been asked numerous times about how I recorded the guitar parts. Did I use amps? If so, what amps did I use, and how did I mic them? The answer to whether or not I used an amp is “nope.” At least I didn’t use a physical guitar amplifier. It was all virtual amps from s software program called Pod Farm by Line 6. I used the hardware/software combination called the POD Studio GX.
All you do is hook up the little interface box like the one on the box to the left, to your computer via USB. Then you install the POD Farm software that comes with it, and you have access to a large variety of different guitar and bass amplifier models.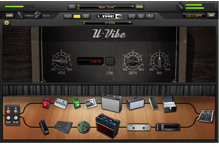 See the picture on the right for an example. When you select an amplifier model, POD Farm loads a picture of that amplifier, along with the controls for it and a stomp box effects chain into the screen. Line 6 describes the selection as containing and arsenal of vintage and modern amps, cabs, studio-standard effects, classic stompboxes and preamps.
So the way I used POD Farm to record the cover of That Thing You Do was to plug my guitar (a Carvin DC200) into the POD Studio interface box, and then launch POD Farm. In order to get that jangly beatle-esque sound, I selected the 1967 Class A-30 Top Boost as my amplifier, and a 2×12 1967 Class A-30 as the cab model.
 So how did I know to choose that amp and cab combination? The most common way to do it is to just experiment with all the different choices of guitar sounds you have available to you in POD Farm. But beware this method. If you’re anything like me you’ll spend all kinds of time playing with all the different sounds, and before you know it, you’ve blown 2 hours with a silly grin on your face. At least that is how my wife described my experience.
But ultimately I found the right tone by going to another Line 6 site called GuitarPort On-line, or GPO for short. This site, www.guitarport.com is pretty awesome. Not only do they have hundreds of lessons and guitar tabs for tons of popular songs, they also have performances for these songs using POD Farm tones, and links to download the exact tones used in their recordings right onto your computer where you can load them up in POD Farm. One little caveat here is that in order to listen to the performances and download the tones, you’ll need a version of POD Farm’s predecessor, called GearBox, which is free for download here: http://line6.com/software/. Just select “Gearbox” from the “all software” drop-down menu. NOTE: The link to download Gearbox directly from the GuitarPort site is not working as of Feb 6th, 2012. You definitely have to get it from the Line 6 link above.
Anyway, on the GuitarPort site, I found that they had a lesson/recording of All My Lovin’ by the Beatles. So I downloaded the tone for that with GearBox and then loaded up in POD Farm. Presto! Instant jangly 60s guitar sound. Very cool indeed.
Since I was recording in Reaper software, I set the audio device to the POD Studio interface, loaded up my All My Lovin’ tone pushed the “record” button, and simply played the guitar. I did that for tree guitar tracks in Reaper, one for the guitar on the left, one for the guitar on the right (the one that plays the little run-riff on the first parts of the verses), and one for the lead guitar.
Next I did the same basic (no pun intended) thing with the bass guitar. I plugged my Samick bass into the POD Studio interface, dialed up the Brit Pop 101 bass sound in POD Farm and did the same thing as with the guitars to create a bass track.
So that is how the guitars and bass were recorded for the That Thing You Do cover. I guarantee that if you are a guitar player, you will truly dig the Line 6 POD Farm, which now allows you to use any ASIO interface. That means you don’t have to have a Line 6 interface anymore to use the software, though they still recommend that you do. Plus, the interface boxes all come with POD Farm already bundled for you convenience.
So get yourself some POD Farm, but be warned that it can be habit-forming.
Cheers!
Ken
Cover of "That Thing You Do" – Record a Rock Song on Your Computer
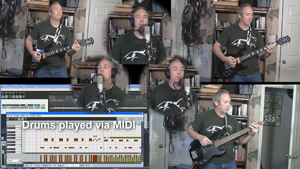 I just recorded a cover of the song, That Thing You Do, (written by Adam Schlesinger). And I recorded it from scratch on my computer-based home recording studio right here in a spare bedroom. The band consisted of me, me, me, me, me and me:-P. The reason I did it, besides just loving the song and always wanting to, was to demonstrate what kind of thing can be done in a very modest home recording studio.
Before I talk about how I did it and what equipment I used, take a listen to how it came out!
Audio Player
I intend to follow up with a more complete step-by-step how-to, along with a video tutorial later this week. But here are the basics.
Sound Sources
- Voices – All me (a twisted version of narcissism?). I double-tracked the lead vocal to get that Beatlesque sound. I also sang the two harmony parts and double-tracked each of them. So there are 6 voice tracks in all.
- Guitars – Carvin DC200, 1985 model. I used this same guitar for both guitar parts. If I had vintage Rickenbackers I would have used those, but you work with what you’ve got.
- Bass – A Samick LB-11 4-string bass guitar I bought used in 1995.
- Drums – All sampled drum sounds (meaning “I don’t have a drum kit”) from an acoustic kit in the virtual instrument software package called StormDrum, by EastWest.
How Was It Recorded?
I used Reaper software to record it all. I started with the drum track. I created a MIDI track and loaded StormDrum onto it as a virtual instrument. Then I listened very carefully to the original recording of the song from the movie soundtrack. That allowed me to build the drum part hit-by-hit using the MIDI editor in Reaper.
Next, I recorded the bass track by plugging my Samick into a Line 6 POD Studio GX, which is a little box you can plug electric guitars and basses into. The POD then attaches to your computer via USB, and you use the Line 6 software to choose amps and effects to get the right sound.
Then I recorded the electric guitar parts the same way as the bass. I recorded 2 parts/tracks, one panned to the left and played as the “rhythm guitar” part. The other guitar was panned to the right and played with the little riff happening during the verses.
And Finally…
Last but not least, I recorded the lead vocal. As I mentioned, I sang it once on one track, and then recorded it again (listening to the 1st in the headphones) on a second track to get that double-tracked sound. I did the same thing with the low harmony part and panned it to the left, and the high harmony part, panned to the right. All vocals were recorded with the Rode NT2-A microphone hooked up to the computer via a USB audio interface – the Focusrite Scarlett 2i2 interface box.
You can get started with a bundle I created for B&H Audio called The Home Recording Musician’s Starter Kit. CLICK HERE for more details on that.
Then I mixed and panned everything to make sure the sounds could all be heard and rendered (mixed down) the result into one audio file, which is what you heard above.
Check back here in a few days and you should find a bit more detail and a video.
Now go forth and record your own pop or rock songs!
Cheers,
Ken
How To Quickly and Accurately Cut, Copy or Paste Parts of a Song
 Whether you are recording your own music or working with a music file that already exists (usually a royalty free music clip for background music), there are many times when it is useful to cut, copy, and maybe paste sections of a song. Here are just a few of the more common reasons for needing to do that, just off the top of my head:
- Shorten or lengthen a song to make it fit a presentation, video or voice-over production
- Building a song by copying repetitive sections (entire bars or sets of bars) and pasting them
- Fixing a problem in a song you are recording (for me it’s usually guitar buzzing I use this for) by clipping the same chunk of music from another part of the song and replacing the problem section.
 When working with music files, it is important that any edits you make do not mess with the timing. Otherwise it will be jarring to the listener. If you want to slice up a song, say, to make it fit a video, you want it to sound seamless in terms of the beat of the song. One excellent tool for doing this is the snap tool. This is a pretty common tool for editing both audio and video. In the picture on the left is where to find the tool in Reaper.
Snap To
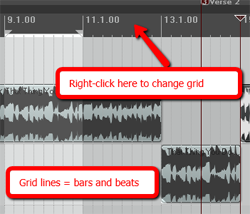 The idea of snapping is simple enough. It is a way to ensure the edges of an item can only be be moved and placed so that they align with a grid. In the case of audio, that grid is frequently bars and beats, though you can change the grid to be other things, like minutes and seconds, etc. For our purposes in this article, we want to make sure we use bars and beats. In Reaper (see picture on the left), simply right-mouse click in the band across the top of the screen to change the grid settings.
The next important thing is ensure the song is aligned with that grid. When you’re recording your own music, this is not an issue as long as you are recording to the metronome which you set in the song project settings. And I HIGHLY recommend that you do that if at all possible. It makes things much easier in the long run.
If you have imported a song already recorded, you will have to do a few things to get its beats on the grid of the audio software. You’ll have to do a little trial and error, first setting the correct time signature for the song, then using the metronome and experimenting with the beats-per-minute setting until the song matches. Ironically, you’ll want to make sure the snap tool is turned off while you do this, so you can freely drag the song on the track to line up the visible beats to the grid.
Fixing Example
Once the song is matched to the grid, you’re free to copy, cut and/or paste and have the result be musically correct. Let’s take an example of when you need to correct a mess-up in the middle of your song (like my guitar buzz).
1. Just go to another part of the song with the same guitar chord playing without a buzz, and select the beat or beats containing that section. Make absolutely certain that the snap tool is turned ON when you do this.
2. Next, you click in the selected section and right-mouse-click to open the drop-down menu and select “copy selected area of item.”
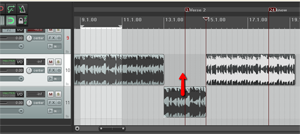
3. Now open a blank track underneath the song track (you can see this in action in the picture at the top left of the article). This isn’t strictly necessary, but I find it helps to line things up BEFORE pasting into the song, which can save you lots of time and headaches. Paste the bit you copied into the blank track right underneath the buzzing guitar part. You may have to drag it left or right to m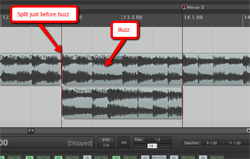 ake sure you line it up just right. Again, the snap tool needs to be ON at this point.
4. Next, click on the song at the beginning of the beat that has the guitar buzz and hit the “S” key on your keyboard to insert a split in the song file.
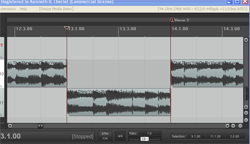 5. Now drag the left edge of the section with the guitar buzz in it to the right, creating a blank space where you will insert the part you are pasting. Things should now look like the picture to the left.
6. Now all you have to do is drag the pasted bit from the audio you pasted in the spare track up into the blank space. Having the snap tool on will ensure it doesn’t slip or slide to either side when doing this, which is a common problem when you don’t have snapping enabled.
7. The final step here is to make sure things sound smooth and seamless. Turn the snapping tool off (yes, OFF) and drag the edges of the new part you just pasted in a little left and right. Since cross-fading is turned on automatically in Reaper, this will allow the sounds to blend a little more smoothly. Otherwise the abrupt implanting of a different section might sound a bit jarring, creating clicks or pops at the borders. Cross-fading will help eliminate that problem.
And that’s it! It may sound a bit involved, but the entire process only takes about 30 seconds, which is usually a lot faster than having to play the part again.
Now you can use the same steps to remove parts from a song. Just select (with snapping turned ON) the part you want gone, hit the delete button on your keyboard and it’s gone. Now you can drag the part on the right back to join up with the song part on the left (closing the hole in the audio). Of course, if you had ripple-editing turned on, the part on the right would automatically be pulled to the left to join the two parts up.
If you want to make a song longer, just select a part of the song you want to repeat, usually a full measure, and paste it at the end of the song. Do this as many times as you need to in order to make the song as long as you need it to be.
Hopefully this simple tip of using the snap tool will help you cut, copy and paste bits of songs to your heart’s content.
Queen Harmony Demo
 What do you do when you don’t have anyone else to sing harmony with? You sing harmony with yourself!
Okay, what the heck is Ken talking about this time? Well, I was watching Glee a while back, and one of the songs in the show was the Queen song, Fat Bottomed Girls, which opens with a killer a capella harmony. I couldn’t get the song out of my head, so I decided to sing it (the intro anyway)…all 9 parts…myself…at the same time.
Normally one person can’t sing harmony with themselves, which is something I have wished for since high school. I think there ought to be a surgery that allows it:). Anyway, with a computer and a mic, you can be every person in a Glee Club! Listen to what it sounds like when one person sings 9 vocal tracks (each of 3 harmony parts sung 3 times) by clicking on the audio player below for the intro (just the intro, so don’t get all disappointed when the rest of the song doesn’t follow;)) to Fat Bottomed Girls as sung once again by me, myself and me 2.
Audio Player
Here’s how I did it.
1. I Opened Reaper Software
Reaper is my favorite tracking and mixing software (You can read more about it in this article I wrote about it – Why Reaper Rocks as a DAW). I started a new track, and then saved the project as “Fat Bottomed Girls.”
2. I Sang The Melody Part

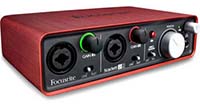
I sang all parts into a microphone called the Rode NT2-A, which is connected to my computer through an interface like the Focusrite Scarlett 2i2.
Unlike the “Carry on Wayward Son” demo I did, which only needed 6 voices, this song needed 9. It was still only 3 parts (the melody and two harmonies), but each one needed at least 3 voices on it. So I sang the melody once on the first track. Then I opened another track and sang it again while listening to the first one. Ditto for the 3rd pass.
Here is the audio for the melody:
| Audio Player |
3. I Sang The Middle Harmony Part
I repeated the above steps for the middle harmony part, requiring me to open up 3 more tracks in turn, singing the second harmony part on each one. I now had 6 tracks playing two harmony parts.
Here is the audio for the middle part:
| Audio Player |
4. I Sang The Low Harmony Part
And I just repeated the same steps for the last 3 tracks, singing the 3rd harmony part onto each track. I now had 9 tracks.
Here is the audio for the low part:
| Audio Player |
5. Mixing Down & Editing
The final steps were to tweak each track to make sure the timing and pitch of all parts were correct. Next, I panned the tracks across the stereo spectrum (like spreading 6 playing cards out in a fan). Then I made sure the volumes were all even and rendered/”mixed down” all the tracks to one stereo file.
6. Mastering
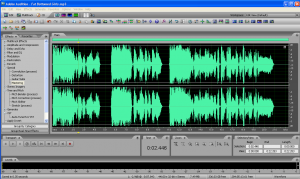
Finally, I opened the stereo file in Adobe Audition, my favorite audio editing software. I added a few effects like EQ and compression to the file, normalized it for good powerful volume, and Saved it as an mp3. Done.
I don’t know how many folks there are out there who dig vocal harmony as much as I do, but I know there are at least some. I don’t think The TV show, Glee would be as popular as it is otherwise. Who knows? I just think it’s cool to be able to sing harmony with yourself and turn yourself into your own glee club if you want to. You couldn’t do that when I was in high school.
If you’d like to learn more about how to record pro audio from your computer, visit Home Brew Audio frequently for our many articles and audio recording how-to tutorials.
Happy recording!
Ken