 When mixing a multi-track project, there comes a time when you’re “done” and ready to mix it down (often called “rendering” these days). For a review on what it means to mix something down, see our post here: What Does It Mean To Mix Down Audio? Anyway, you may have a song that is 20, 30, or even 40 tracks or more. During mix-down, the outputs of all of those tracks go into the master track, which then puts out the final stereo signal (usually an audio file like a wav).
Well this final “master” track, sometimes called the master buss, can have effects applied to it just like the individual tracks, except that any effect applied to the master track will affect everything – every track. For that reason, it is advisable to use any effect at that stage VERY sparingly. The only things I ever do to a master track are adjust the peak volume either by using the master fader control, or by applying a limiter effect to prevent any clipping or distortion in the final mix. Personally I never put any EQ or exciters, or any other tone-altering effect on the master track. I prefer to create a final mix with only the individual track effects applied. Then during the “mastering” stage (see our post What Does Mastering a Song Mean?), I’ll add whatever effects I think will improve the final audio (using audio editing software like Adobe Audition, which has excellent mastering tools. Another good choice is Sound Forge). If it doesn’t sound right, I can always undo the effect at that stage and try something different. But that is hard to do when you’ve already applied the effect to the file during the mix-down process.
Here is an article by Graham Cochrane about this whole idea: http://therecordingrevolution.com/2012/10/29/go-easy-on-the-mix-buss/
multi-track recording
Home Recording If You're Not Rich
 Home recording can be pro recording. Oh yes. Let’s say you realized you absolutely needed to start creating your own audio and need a home recording studio. Maybe you need narration for a video you’re making. Maybe you have to start podcasting or creating e-learning programs; or my favorite…maybe you’re a musician who really wants to make a CD or maybe just some demo recordings. Whatever the reason, many folks think they only have a few choices; hire a voice actor to record any narration you may need, go to a recording studio and narrate yourself, or buy expensive specialized equipment and learn to use it so you can set up and record from a home recording studio.
All of the options above are valid and effective. But they are not the only viable options, especially if you are short on time and/or money. Studio time is on average, about $40 per hour (on the low end!). If you ask your local music store guy what you’d need to start a home pc recording studio, he’s going to suggest starting with a budget of at least $500 just for the bare minimums. So what other choice do you have?
Honestly, I expect folks not to believe this because it sounds “too easy.” But the truth is that if you have a computer made in the last 10 years that has a sound card, and a microphone…even one of those plastic PC mics costing $5.00 or less, all you need is to download free audio software ( I recommend downloading a program called Audacity, which is open-source) and you’ll have yourself a home pc recording studio capable of multi-track recording and audio editing! I’d wager that a huge percentage of folks reading this can put the above collection together without spending one penny. Lots more will only have to shell out the $5.00 for the mic;).
Once you have the starter studio set-up, all you need is to learn audio recording. “Hah!” you may say. “I knew it couldn’t be that easy!” Oh but it is. I’ll show you right now.
First, you’ll need to plug your mic into your sound card’s pink input jack. This is usually located on the back of your computer next to the green jack where your speakers are probably plugged in. Then you just need to set up a couple of things in the software before you start. Open Audacity and go to Edit/Preferences to open the Audacity Preferences window. Put a tick in the box next to “Play other tracks while recording new one.” Then click “OK.” Next, go into the “Sounds and Devices” window from the Control Panel in Windows. The icon looks like a grey speaker. Go to the tab marked “Audio,” and in the section called “Sound recording,” click on the “volume” button. That will bring up the Windows Mixer.” Find the channel that says “Stereo Mix” or “Wav Out” (depends on what sound card you have), and put a tick in the “Mute” box on that channel. Just close the Windows Mixer and you’re ready to rock!
Now record yourself saying (or singing) something. First, press the button in audacity with the big red dot (the universal symbol for “record”) on it. An audio “track” will appear as if by magic. Start making sounds into the microphone. When you’re done, click the button in Audacity with the big yellow square (meaning “stop”). Go back to the start of the song by clicking on the button in Audacity with the double purple arrows pointing to the left. Now listen to what you just recorded. Done! Want to add another track to play simultaneously with your voice? Just click on the record button again and a second track will start recording underneath the first one. If you’re using the mic for that next track (as opposed to just putting some pre-recorded music or sound effects on it as background), you’ll want to make sure you unplug the speakers from their green jack on the sound card. Otherwise the mic will pick up what’s coming through the speakers as well as what you’re actually trying to put on track 2. In the latter case, you’ll probably want to plug some ear-buds or headphones (the kind used for mp3 players will work fine) into the green jack on the sound card so you can hear the first track while you record the second.
You just made a multi-track recording! It really is that easy. If you’d like a bit more of a detailed walk-through, just put your e-mail into the form at the top right of this page for some free starter video tutorials on recording audio with Audacity that explain these concepts so anyone can understand them. If you know you’re ready to get started now, check out our home recording tutorial courses here: https://www.homebrewaudio.com/tutorials/
Happy recording!
Moog Synthesizer Google Doodle A Multi-Track Recorder
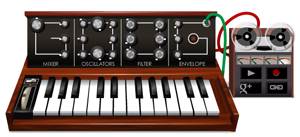 If you’ve seen Google today (May 23rd, 2012) you’ll have noticed that it is a keyboard with wires and some buttons. What you may not know is that this is a doodle of a Moog synthesizer, which was one of the first electronic musical instruments. Robert Moog is widely considered to be the inventor of the synthesizer, which is the foundation for the virtual instruments of today. You can read about Moog (pronounced like the magazine “Vogue”) at the link from Google’s doodle here.
You can play Google’s doodle version of the synthesizer with your computer keyboard not only by clicking on the piano-type keys on the screen, but also by adjusting a whole slew of synthesizer parameters. Just lick and drag on any of the knobs and you can change the sounds, volumes, mix, etc. So that’s really cool right there.
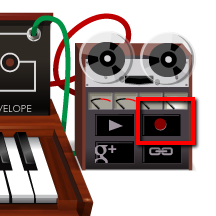 But how does this doodle relate to audio recording? Because it is a 4-track multi-track recorder, that’s why! ON the right of the synth (the thing with the keyboard and buttons) is an old-fashioned reel-to-reel tape recorder with 4 needle-type meters (one for each track). Just click on the 1st needle meter, click the red “record” button, and play you some notes on the synthesizer. Then hit “stop.” Then hit the “play” button and listen to your recording. Now click on the 2nd needle meter (arming it for recording), and record a 2nd part as you listen to the first thing you just recorded. When you listen to the playback this time you’ll hear BOTH of the parts you just recorded playing together. Change some of the sounds with the knobs and repeat the process for tracks 3 and 4, and voila! You’ve created a 4-track recording. You “over-dubbed” the 2nd, 3rd and 4th tracks.
This is a pretty incredible doodle, not only showing you some music and recording history, but also teaching you some core recording concepts such as multi-track recording and over-dubbing. And of course there is just the fact that it’s just plain fun to play with. I suspect lot of people will be spending a huge amount of time on a Google search page doing little search and lots of playing today.
Go check it out if you haven’t seen it yet: https://www.google.com/
Hearing Yourself While You Record Your Part
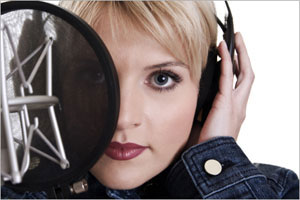 When a band records a song, the engineer needs to get the different instruments on different tracks in order to mix and edit everything properly. These days, when track-count is not an issue (due to computer recording – in the 1960s for example, The Beatles only had 4 tracks to work with most of the time!), it isn’t unusual to have 50 tracks or more, each with a different take for every musician in the band.
One common recording engineer complaint (all the singers are ducking right now) is that each musician wants to hear more of themselves and less over everyone else when recording. This can be good in that they can hear what they are doing better. But it can also be bad in that their performance, regardless of how technically excellent it may be by itself, may not work well in the context of the overall mix.
Here is an article that discusses this issue: http://www.prosoundweb.com/article/top_ways_to_help_musicians_hear_themselves/?utm_source=feedburner&utm_medium=feed#When:20:41:17Z
What is Ducking In Audio Recording?
 Ducking in audio recording is a technique for allowing a narrator’s voice to be heard clearly and consistently when there is other audio happening at the same time, such as background music. If nothing else, this is a rare example where the term actually describes, in plain English, what it accomplishes. Plus it’s fun to say.
So what does ducking mean anyway?
The way it works is pretty simple. Let’s say you have some background music for either a voice-over project or a video project that will have a narrator, and that this music will play at the same time as the narrator speaks. When the narrator is not speaking, the music should be clear and present – the main thing to listen to. But when the voice comes in, it should take over as the main audio, the background music becoming, well, background audio.
Sure, you can simply turn the music track volume down, but then when the voice goes away the music won’t be loud enough. You’ll have to turn it up again. This cycle will repeat as many times as the narrator stops speaking, which is a lot of work. Ick. I’m all in favor of reducing work. If only there were a way for the audio (or video) program to sense when the narrator is talking and when he/she is not, followed by the program automatically turning the music up when there is no vocal, and down again when there is. Guess what? There is! That’s what ducking is. The audio you want to be the primary thing, like the narrator’s voice, is made prominent because some other audio is “ducking” underneath it at key moments.
So how can I make my program do ducking?
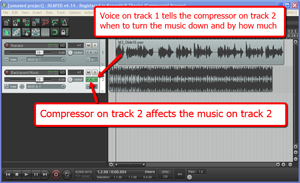 I’ll explain how to do it in Reaper, though the process is going to be the same in any multi-track audio program or video editor. There usually isn’t a tool called “ducking” in these programs since the technique uses a combination of tools working together. The main tool is compression (see our article Should You Use Compression In Audio Recording?), which is a tool that automatically turns audio down by a certain amount, but only when the volume gets loud enough to trigger it.
Usually you insert a compressor effect onto a track to control the audio on that track. So if you have a voice on track 1, and you put a compressor on track 1, the voice will trigger the compressor when its volume goes over a certain level or threshold that you set. Well the big difference with ducking is that the voice is still going to trigger the volume reduction actions of a compressor, but that compressor will be turning down the volume NOT of the voice, but of something else; in this case, a background music track. That means we have to put the compressor on the music track (say, track 2), but make it listen to track 1 for its instructions on when (and how much) to turn down the music. Pretty nifty huh? No? I lost you? Yeah, this kind of thing is much easier to explain with pictures. Take a look at the picture on the right. So it’s just a matter of having at least two tracks, putting a compressor on the one you want to get ducked, and feeding the output of the main audio (the voice) into that compressor.
Ducking in Reaper
In Reaper the first thing to do is put the compressor on the track to be ducked, in this case, track 2 with the music on. Simply click the FX button and choose the built-in compressor called ReaComp. Then close the FX window. You’ll be able to tell that the compressor is loaded up because the FX button will be green.
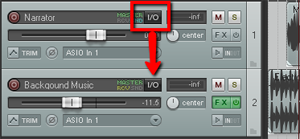 Next find the I/O (stands for “in/out”) button on the vocal track. See picture on the left. You’re going to click and drag that down to the I/O button on track 2. An I/O window will open with lots of scary-looking stuff on it. Leave everything the way it is except at the bottom where it says “1/2 => 1/2”. Just click the drop-down arrow next to the second “1/2” and change it to “3/4”. See the picture on the right.
 You have just set it up so that track 1 will send a signal to track 2. The next thing you need to do is click on the FX button in track 2 to open your compressor control. Now it’s time to tell the compressor NOT to listen to the music track for cues as to when to engage, but instead, listen to the voice on track 1. So in the compressor control window (see picture below and to the left). Find where it says “Detector Input” and use the drop-down arrow to change this from the default “Main Input L+R” to “Auxiliary Input L+R“. Now the compressor will change the volume settings of the music based on the fluctuations of the voice track. Pretty neat huh?
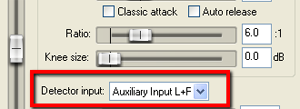 Now all you need to do adjust the compressor settings. You can experiment here by listening as you adjust. Start out with a Ratio setting between 4:1 and 6:1 and put the Threshold slider down to about -20 dB. One thing to be sure of before you do any of this is that the overall volume on the music track is already set to where you could hear the voice over it fairly well even without the ducking compressor. If the average volume of the music is so loud that the voice can’t even be heard to start with, ducking won’t help you much.
To make sure things are working properly, close the FX window and play your audio. Click the “S” (stands for “solo“) button on the music track to solo it. It ought to sound very odd, sort of choppy to you. This means it’s working. Now un-solo the music track and listen to how beautifully clear the voice is while the music is still very audible as well.
Use this knowledge for good.
Cheers!
