I recently wrote a 2-part article on fixing mistakes while recording (Quickly Fix Audio Recording Mistakes by Overdubbing), but not using the traditional punch-in/punch-out method. Punching where you set a point just before your mistake, and automatically (used to be an engineer doing it manually in the old days) the software starts recording over the mistake and continues recording on the same track,or punching out after the mistake if “patching” the mistake in an already-recorded track.
Rather than punch recording, I like to use a second track instead, basically overdubbing to fix my mistakes, especially when recording acoustic guitar. I like to preserve the original recording as much as possible and retain as much control as possible in the fix. I’m being medicated for this. Anyway…
Joe Gilder, from Home Studio Corner, explains in this video post, which you can see here: – http://www.homestudiocorner.com/footswitch-recording/ – how he does punch recording using a foot switch, giving him control from the microphone. He is using Presonus Studio One, along with the hardware fader and transport control unit, Presonus Faderport (which you can use with Reaper, BTW) and an M-Audio SP-2 Keyboard Sustain Pedal, which can plug into the back of the Faderport. With this, he can stop and start his DAW and punch in and out remotely.
Check out the video below:
multi-track recording
Mixing Contest by PureMix
 Mixing contest alert! PureMix is a site with audio recording, mixing and processing tutorial videos that make it sort of feel like you are working as a learning assistant to a professional studio engineer. Pretty cool stuff. You can check them out here: http://www.puremix.net/about-us.html.
This month and next (April and May 2013), in association with Sweetwater Pro Audio and Dangerous Music (makers of high-end audio gear), are doing something very cool and fun. They are holding a massive mixing contest! How would something like that work? Well, they provide some audio files and you mix them together and render your version. In this case, they are providing tracks from singer, Liza Colby Sound’s song “Oh Baby.” Then you have until June 1st to create your own mix of the song using the files you downloaded. Sounds like a blast!
The rule is that you cannot change the arrangement. In other words, you cannot add other instruments or sounds. Your job will be to put use just panning, volume and effects to blend/mix everything together, then mix it down (see our article What Does It Mean to Mix Down Audio?) to one audio file and upload it to your SoundCloud account (it’s free) and then submit your masterpiece by June 1st, 2013.
Sweetwater, online retailers of recording and musical gear and one of the sponsors of this contest, will be announcing the winners of the contest during their annual GearFest event on June 21st and 22nd.
There will be 16 top candidates announced on June 21st, who will all be awarded prizes ranging from $3,990 (pair of Focal Twin6 Be speakers) for first prize, all the way down to a $269 value for a one-year subscription to PureMix. In between are various microphones and other audio goodness. You’ll get a list as soon as you sign up.
I already entered, downloaded my files and loaded them up in my DAW (“digital audio workstation” – another way of saying “multi-track recording software”) of choice – Reaper. Of course you can use whatever DAW you wish, or you could do it the old fashioned way and use analog tape if you have the gear for it.
What are you waiting for? Go sign up here: http://www.puremix.net/gearfestmixingcontest
Quickly Fix Audio Recording Mistakes by Overdubbing, Part 2
 In part one of this article, I showed you how to use overdubbing to fix mistakes as you make them when recording in Reaper recording software – though the process is the same regardless of what program you use. The process is very similar if you discover mistakes after you’ve already finished recording a part. There are only a few additional things you have to do.
Fixing the mistakes after the fact
This method is also useful for when you discover short undesirable things in your recordings after you’ve completed them. For me, this is most often guitar string buzz, or a brief brain-fart where I hit the wrong chord just for a second before recovering.
I use this process when doing voice-over projects. It is especially useful for very long jobs like audio books. You don’t want to keep stopping and starting. So when you make a mistake, just let the recording continue move on. You’ll want to make a note of where the mistake occurred, however, so you can go quickly find them all when editing. One easy way to do this is to clap your hands, or snap your fingers (any loud quick sound) very close to the mic after your mistake. This will cause a spike in the audio waveform that is easy to spot.
Often I will simply re-record the part I messed up immediately after I make the error, and then move on. In this case there is no need to overdub. You can simply delete the mistake when editing afterward. See our post How To Finish Long Voice-Over Jobs Faster for the step-by-step on how to do this. Otherwise you’ll want to use the overdubbing method, which is almost exactly the same as the process to fix mistakes as you go, as described above.
Here are the steps:
- Find where the mistake happened in the audio.
- Put your cursor right before it occurs.
- Create a split in the recording (audio item). In Reaper, as in many other audio and video programs, the “S” key on your computer keyboard is the hot-key for Split. Otherwise, in Reaper just right-mouse-click and choose split items at cursor.
 Once you have the split, grab the leftmost (beginning) edge of the piece that has the mistake in it and drag to your right. This literally peels back the audio until the mistake is gone (note: this does not delete that audio! If you drag too far, simply drag the edge the other way to put it back. I love this non-destructive feature of editing in Reaper).
- Now you will have a gap in the audio where the mistake was. Simply create the new track under the original one just like in the steps above, being sure to disarm the old track and arm the new one.
- Place the cursor 5-10 seconds before the gap and start recording on the repair track until you are well past the gap in the original audio.
 Drag the edges of both ends of the repair audio until they correspond with the ends of the gap in the original audio.
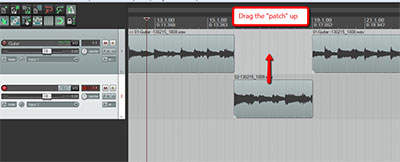
- Finally, drag the new audio up into the gap to patch it.
- Then as before, adjust the cross-fades at the seams to get smooth transitions.
In the old days it was often easier to simply record the part as many times as you had to (take 1, take 2…take 35!) until you got it right. Uggh. Both of the methods described here, made feasible by computer-based audio recording, will allow you to quickly create error-free recordings that sound natural.
Here is a video showing you the process I just described:
Good luck and happy recording!
The above video is an excerpt from The Newbies Guide To Audio Recording Awesomeness 2: Pro Recording With Reaper. For more information on the course…
Dynamics In The Mix
Live recordings often have so much more emotion than studio tracks. The dynamic changes in volume, or the very slight rushing or dragging of the tempo are ways for the band to express the music. By playing together, they are able to match this expression to end up with a great vibe on the track. A single musician playing in a studio may be matching his or her tempo and volume to other pre-recorded tracks, eliminating much of the dynamic sound from the recording. Recognize the importance of dynamics, and evaluate your recording process to see if you’re starting your recording sessions at a handicap.
You can read the full article here: http://www.prosoundweb.com/article/in_the_studio_band_individual_dynamics_and_putting_it_together_in_the_mix/
Quickly Fix Audio Recording Mistakes by Overdubbing
 Fixing mistakes while recording so that we can continue, rather than start over every time, can be a huge time-saver in the studio. It can also be a sanity-saver. The most common way to do this goes back to the analog tape recording days, and is called punching in/out. This means that we stop recording, and on the same track, record over the mistake and continue on.
But I find it much easier and faster (and who doesn’t like our good friends, easier and faster?:)) to use a process called overdubbing, which basically means recording the same part on another track, to do this instead. Computer recording – where we can SEE the audio, as well as hear it – has made overdubbing for something like this much easier than in the old days. I’ll show you how to use overdubbing to fix a mistake (or a guitar buzz, or dog sneezing, etc.) so you can continue recording quickly, leaving no sign that there was ever a mistake – seamless audio “patching.” I’ll use Reaper software, but the process is the same with any multitrack recording software (sometimes called a digital audio workstation, or DAW).
Few of us are capable of recording a performance perfectly from start to finish. Even if you often perform live, things change when you’re in the studio to actually record instrument or vocal parts. We’re bound to make mistakes. And If we’re talking about voice-over recording, especially long scripts like audio books, then it’s almost a given that you’ll have to stop somewhere to pick back up later. Rather than using the punch in/out method (which only uses a single track), we are going to start a second track underneath our main track. Also, there are two situations when this procedure works really well: 1. When your want to fix mistakes as they happen and have a perfect track when you’re done; and 2. When you don’t want to stop and start, but would rather go back and fix the mistakes after the part is recorded.
Fixing the mistakes as they happen
When recording a part that is being tracked to a tempo, as you would when recording a part for song, you almost have to stop when you make a mistake, fixing each as you go until you either finish recording the part, or make another mistake. This is because everything has to happen at a specific point on a timeline and it can be very hard to recover, and get back on track, after making a mistake. Also, if you’re like me, you’re brain knows you made a mistake and that knowledge can make it hard to focus for the rest of the recording.
So here is how it is done.
 Start recording your part on a track you’ve labeled “guitar” (or whatever). I’ll use a guitar part for this example. Begin recording until you make a mistake, or there was a noise, or whatever. Then stop the recording and save what you have on its track.
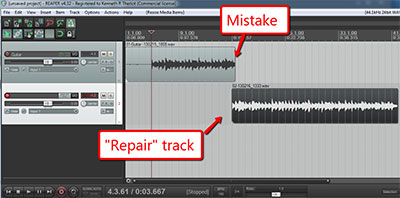
- Next, create a new track underneath the “guitar” track. This is where you will record your repair audio.
- Be sure to disarm (click on the little red button in the track control panel to turn it off) the guitar track so you don’t record over what you have.
- Then arm the second track (click the little red button to turn it on).
- Shorten the very end of the first part so you can’t hear the mistake (and in my case, a swear word or two:)) when recording on the “repair” track. It will almost certainly throw you off. In Reaper, you can simply click on the ending edge of the 1st guitar part and drag to the left until the mistake (and/or swear word) is gone.
- Now just put the cursor a few seconds in time before the new end of the guitar track. 5-10 seconds should be plenty to allow you to start playing along with the first part.
- Start recording again, listening to the guitar track recording in headphones. For the first few seconds, you’ll be playing along with the guitar track, and then it will drop away whi8le you continue to play and record. Keep recording until you finish, or until you make another mistake.
- Now drag the beginning edge (on the left) of the repair recording to the right (getting rid of the part that overlaps) until it corresponds with the end of the guitar track above it.
- Move the entire repair part up (click anywhere in the middle of the recorded part and drag) into the guitar track so that it picks up where the original leaves off.
- Make sure the new part overlaps the old part by just a couple milliseconds so you can used cross-fades to create a seamlessly smooth transition.
- Repeat until the part is done.
Here is a video showing the process, which will make it more clear if the above was at all confusing:
This was how to fix mistakes as they happen. In part 2 of this article, you’ll see an alternate way to use overdubbing to fix mistakes after you’ve recorded the entire track.
The above video is an excerpt from The Newbies Guide To Audio Recording Awesomeness 2: Pro Recording With Reaper. For more information on the course…