It’s such a blessing to know that there are so many articles out there these days that talk about how to get better at mixing our music. Of course, we are sorta partial to our own articles (click here for articles about equalization – otherwise known as EQ). But we don’t know everything (I know – shocker, right?). So we like to share stuff from others who know more, or different stuff. One example is this article from Music Tech which gives us the “20 Best EQ tips” Check it out here.
mixing
Some Mixing Alternatives In REAPER
Alex Wilkinson, a professional musician, talks about some mixing alternatives in REAPER. It is very educational along with some new workflow tips that you can learn. Here is the link to the video series from The Reaper Blog.
If you don’t know what Reaper is, but would like to learn pro recording techniques at a decidedly ridiculous (in a good way) budget level (Reaper costs $60!), you may be interested in our course: The Newbies Guide To Audio Recording Awesomeness 2: Pro Recording With Reaper.
Where Is The Track Volume Slider In Reaper 5?
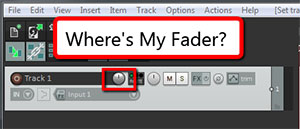 Are you wondering where the horizontal fader or “slider” control went when the Reaper 5 update came out? You’re not alone. The default control changed to a rotary knob in the latest version. When using the track panels along the left side, I find it a lot easier and somehow more intuitive to use the slider/fader. And the controls in the mixer view (vertical controls along the bottom of the screen) still have sliders for volume.
But I often don’t use the mixer controls at the bottom, since many of my projects don’t have a huge number of tracks. I like using the horizontal track control panels instead.
So how do we get the fader back?
It’s actually really easy. Whew!
- Just right-mouse-click over a bit of the blank gray area in the track control panel (in other words – not on any of the buttons or readouts). That will give you a pop-up menu.
- Hover over “Set track layout,” then hover over “Track Panel.”
- Then you’ll see a list of 19 layouts to choose from. Select “ac — Standard Media.”
- Rejoice in the return of your slider!
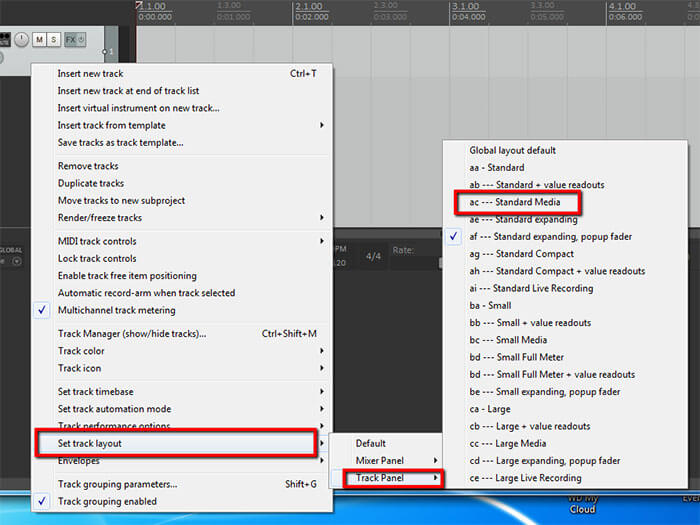
The answer is really easy, but as with so many things, it totally depends on having a little bit of knowledge. Well, that or looking in the manual. I did mention I was a guy, right?
Here is a video showing you how to do this step-by-step
http://homebrewaudio.wistia.com/medias/2eqhili2nx?embedType=async&videoWidth=700
So if you were wondering where your slider/fader went, and you didn’t know how to get it back, I hope this helps!
Cheers!
Ken
Are Your Home Studio Acoustics Ruining Your Mix?
The mixing down of a song is one of the most crucial stages of a recording. It’s the last thing you do before the song is finished and ready for the mastering engineer. Here is an article by Disc Makers explaining how it affects the sound of your final song. Read it here: http://blog.discmakers.com/2015/08/home-studio-acoustics-is-your-home-studio-control-room-killing-your-mixdown/
Be Careful Not To Slice Up All Your Tracks In Reaper
 Reaper (http://reaper.fm) is an incredible recording program that I use just about every day. But like any piece of software, it only does what you tell it to do. And over the years, I have made many mistakes that I hope I can keep you from making.
One of those mistakes was accidentally slicing up the audio on all my tracks when I only meant to apply slices to the audio in one track.
What Is A Slice?
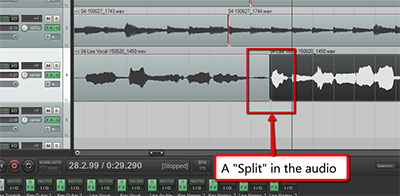
What I actually refer to is called a “Split.” If you have an audio file in a track, it is super easy to split it (into as many pieces as you need) wherever you want, just by placing your cursor and using the keyboard shortcut “S” ( And it’s non-destructive too. If you end up deleting one of the new pieces of audio, all you have to do is drag the edge of the audio item where you split it, and drag it back out to its original length. See Figure 1 to see what a split is.
To create the split in the picture, I clicked on the middle track, on the audio item, and put the cursor where I needed the split. But be careful!
If you use a lot of splits like I do (it’s handy for slicing up drum beats and moving them around), be very careful that before you hit that “S” key, you have selected/highlighted the audio on the track you’re working on! You need to actually click on the audio to do this, which I didn’t know at first. If you ONLY put the cursor where you want it, but no audio is selected (which can happen if you click where there is no audio – an empty part of a track, for example), you’ll end up creating a split at that point in time on every track with audio on it. See Figure 2 for what this would look like.
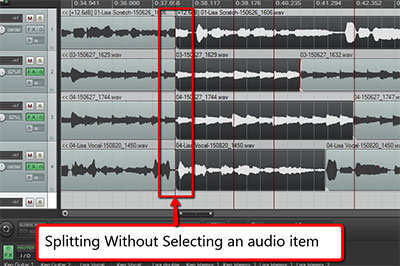
You can make matters even worse (like I did) if you don’t notice that you just put a slice across every track. Let’s say you have 4 tracks and you wanted to put 4 splits into, say, track 4. If you don’t select the audio in track 4 each time you execute the split, you will end up with a total of 16 slices instead of 4! Every track will have 4 splits.
You can end up with an awful mess on you hands if you don’t pay attention to this.
The ability to split an audio item is absolutely awesome. It is a fundamental tool in any audio project I do. You can move portions of audio forward or backward in time, fix timing mistakes music, edit dialogue/conversations, apply effects to one part of an item, etc. But with great power…..
So make sure you have the audio you want to split already selected (you’ll know because it will be highlighted) BEFORE you hit that “S” Key.