It can be difficult to stay focused when you hearing the same track for the tenth (or hundredth) time in a day. By keeping a few clear objective goals in mind, you can avoid overlooking some important aspects of the track. Even the simple things like whether or not you can understand the lyrics, or if the different parts of the mix can be heard clearly enough. It also doesn’t hurt to give it a rest for a day before coming back to hear the track with fresh ears.
You can read more tips here: http://audioundone.com/20_mixing_questions
mixing
Getting a Music Mix To Sound Good No Matter Where It's Played
A very common and serious problem for people recording and mixing music in home studios is that the recordings don’t sound the same on the big CD player/entertainment center as they do on iPod earphones, and different again in the car. This can be really frustrating when it sounded so great in the room where you mixed the music. I wrote an article about why this so often happens called Your Ears Are Lying to You – Why Your Song Sounds Great in Your Room, But Not in Your Car.
The big culprit is almost always a less-than-ideal acoustic situation in the mixing room. First, these rooms are usually coverted bedrooms, which are notoriously bad, acoustically. Their boxy shapes with flat and parallel walls create lots of havoc with sound waves, adding energy at some frequencies and removing energy from others. So if you add and subtract volume with EQ, it may sound great in that room, but terrible somewhere else. That’s because the EQ was compensating for the bad acoustics in the room.
Another problem for the home recordist is that monitor speakers are usually not that great either. Some folks don’t bother with them at all, mixing instead on headphones. Bad idea! Mixing and mastering in headphones is universally frowned upon because music sounds much different through the air than in headphones and again, you get a non-portable mix – one that won’t sound the same on different systems. Likewise using your computer speakers is not a good idea because if they are “good” speakers, they’ll have been designed to complement the sound, meaning they make the things sound better than they really are. If they are average computer speakers, they’ll simply be incapable of accurately reproducing accurate sound across the spectrum. So you need to invest in a decent pair of monitor speakers.
Lastly, a lack of knowledge about frequencies can create a poor mix. If you have taken care of the stuff above – treated the mixing room or designed an ideal space, and gotten good monitor speakers – most things will take care of themselves and you don’t need to be an expert in all the frequency and sound-y science. However, if you don’t or can’t have that awesome mixing space, having at least a rudimentary knowledge of that stuff, AND being very aware how the bad space can and will affect your mix, you can take measures to counteract the problems. In my case, I will make a mix and then take it downstairs with a notepad and write a lot of stuff down when listening on the “big” system. Then I’ll take the mix into the car and drive around doing the same thing. Though you should pull over when writing your notes:). Finally I take all the notes back to the mixing room and make corrections. Then I do the process all over again. Yes this takes longer, but it’s worth it, especially if you can’t afford to acoustically treat your room or buy good speakers.
Here is an article with several tips for treating and buying speakers and for mixing to create a portable mix.
http://www.loopblog.net/tutorials/music-production/studio-techniques/mixing-a-track-tips-getting-your-mix-to-translate-well/
Some Important Tips For Mixing Music
 There are as many tips for mixing music as there are people who mix music, but a few of these tips are common to just about anyone who has spent any significant time mixing. Joe Gilder just put out an article about the mixing lessons that were most significant to him in 2012, and not surprisingly, some of these universal mixing tips were on there.
One of the items on his list – the mix is slave to the recording – could be the most important lesson in his list, and was interestingly, the topic of the post I wrote yesterday – A Lack Of Passion In A Performance Can’t Be Fixed By Effects, But… which states that it is far better to get good tones, levels and performances while in the recording stage that it is to try to fix them in the mixing/editing stage.
Another of Joe’s tips is something I always, always, always (getting the idea?) do, and that is to test your mix on crappy speakers. In my case I usually do this in the car while driving around in traffic, where a good chunk of my audience will be listening to my music. The point of this is to ensure a portable mix, one that sounds good on any system it’s played on. If your mix has flaws, these crappy speakers will often highlight them better than your “good” speakers. This is doubly important if you do your mixing and mastering in a less-than-perfect acoustic space.
For the rest of the tips on Joe’s list, see his article here:
http://www.homestudiocorner.com/2012-lessons/
Making The Vocal Track Sit Well In The Mix
 I am always saying that knowledge trumps gear. It’s actually our motto at HBA. One of the many reasons for that is how easy it is to make a recording that sounds bad even with the most expensive gear. And one of the things I hear done incorrectly most often is mixing the lead vocal with the rest of the instruments in a song. It is very easy to make the vocal stand out too much or allow it to be overpowered by those instruments. Creating space for the lead vocal so that it can be properly heard and understood while simultaneously allowing the drums, guitars, bass, piano, etc. to be head as well can be quite a trick.
There are several methods we use to make this happen, including compression to create a more even vocal level, and ducking (see our article – What is Ducking In Audio Recording? for a review of that technique) to sort of push everything else to the background ONLY when the singer is singing.
There are automated effects (FX) that do these things for us, but very often you can get a more natural and cleaner result by using volume envelopes to manually increase or decrease the level of certain phrases and words on a vocal track. It can take a lot (and I do mean a lot – like an hour or more sometimes for one track) of extra time to do it this way. But the result is usually worth it, especially for control junkies like me:).
In the video below, by Russ at AIR Users Blog, he shows us a technique that is a version of ducking, except that it’s done manually by riding the fader to create editable changes in the volume envelope of the instrument submix track. Riding the fader is a time-honored technique that we used a lot in the days before computer audio recording. IT basically means keeping your fingers on the fader of a track and moving it up and down over the duration of the song. It will make more sense in the video below:
Creating Subgroups In Reaper and Pro Tools
 I just watched a video tutorial showing how to create instrument subgroups in Pro Tools. I was very pleased to see (in a petty kind of way) how much easier it is to do the same thing in Reaper;). But first, a bit of an explanation.
What is an instrument subgroup?
If you have 10 or 11 tracks of drums (one for the kick, one for the snare, one for the hat, and so on) in your song mix, it might be really handy once you get the relative mix of the drums just right (the volumes of the kick, snare, hat, etc. working well with each other) to control the volume of ALL the drums with just one volume slider when working to get the volume of the drums to work well with the rest of the tracks (vocals, guitar, bass, etc.). Well that’s exactly what a subgroup does. You set it up so that all the drums feed into a single new stereo track that you can call “Drums,” and then when you move any control on that new Drum track, it will affect ALL the drums. And it isn’t just the volume you can control this way. You can apply effects like reverb or compression or EQ to the Drum subgroup track, and those effects will be applied to all the drums. So now, not only can you control all the drums with just the controls on a single track, but you can save load on your computer’s CPU, since the effect is loaded only once (for the Drums subgroup track), rather than 11 times – once fore each individual drum track. And an added benefit is that you can make the drums sound more cohesive by putting them all through the same effect with the same settings.
Creating a subgroup in Reaper

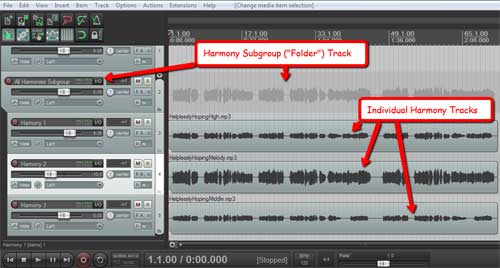
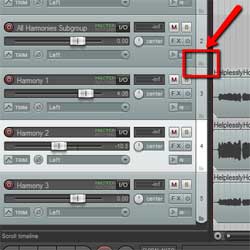
Let’s start with 3 harmony vocal tracks that you’d like to control with just a single subgroup track. Just create a new track above the 3 harmony tracks like in the picture on the top left. In the bottom right corner of the new, blank soon-to-be subgroup track (called a “Folder” track in Reaper) you’ll see a little folder-shaped icon. See Figure 2. All you have to do is click on that little folder button and it’s done! Every track underneath it gets indented to indicate that they are now inside that folder track, so to speak, and you can now control the volume and everything else – mute, solo, effects, etc.) of all the harmony tracks with just that one new subgroup/folder track.
One thing to be aware of here is that if you have other tracks below/after the harmony tracks that are not harmonies, tracks you don’t want in the folder, then you’ll need to click the folder icon (bottom left of the track control panel) for the last harmony track to tell Reaper that it’s the last track you want in the folder. This is because as I mentioned earlier, clicking the folder icon indents (incorporates into the folder) all the tracks below/after it be default.
Creating a subgroup in Pro Tools
In Pro Tools you still need to create a new track, and tell Pro Tools . Then you have to tell Pro Tools to use “aux (auxiliary) input.” Then you have to select an input for the new track, a “bus” input. Then you have to change the outputs of all the drum tracks (can do this at once by selecting them all) to the bus you used as the input for the subgroup track. You can see all this in the video below from PureMix. By the way, this video shows color coding of tracks. You can also do this in Reaper, which I show you how to do in my article here: Color Coding Tracks To Organize Your Mix