If your recording software (digital audio workstation or DAW, for short) has MIDI capability (such as Reaper, Pro Tools, Ableton Live, Cubase, etc.), then you can create your own drum kits using single-hit drum samples – virtual drumming fun! You basically have a customizable drum machine in your computer. But the sound of those drums will only be as good as the drum samples played by the MIDI notes. So having a good collection of drum hits is a good thing. Sample Magic recently released Drum Hits, which contains more than 1,300 individual high-quality recordings of kicks, snares, cymbals, percussion, hats, etc.
Find out more here: http://www.samplemagic.com/details/120/drum-hits
midi
Home Recording For Non-Engineers – It’s Not Hard Or Expensive
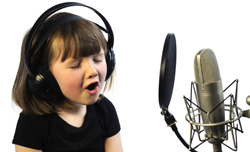 “Home recording for non-engineers” is just my way of saying that it does not have to be hard or expensive for just about anyone to do it.
Now, before I jump into the wonders of home audio recording, allow me to state up front.
I have a Bachelor of Science degree and a Masters degree. I mention this to you not because I’m trying to brag or anything. Why am I telling you this? I only mention it because….wait for it…..reading about audio recording STILL makes my brain hurt!
Why Is It So Hard To Understand?
I’ve been doing it for, well let’s just say more than 2 decades and leave it at that. It’s how I make a living. And usually, whenever I see some tutorial on the web or an article in a trade magazine about audio recording, my eyes start to laze over and I feel like I’m going to slip into a coma. What gives?!
I got to thinking that if I react this way, how must it feel for someone who is just starting out with home audio recording? Someone who doesn’t have enough money to go to recording school or enough time, or both must rely on the mercy of book, article, and tutorial writers to gain their knowledge. And unless you just happen to be an electrical engineer or a music major (preferably both…apparently), one look at most of the literature on how to get started in home recording will probably put you off your lunch.
Audio Recording Is Easier Than You Think
I happen to believe that home recording is much, much, much, much (getting the idea?) easier to understand than most experts make it out to be. If you follow the brief instructions I’m about to give you, you’ll be able to make an audio recording in the next few minutes! This assumes you have a computer and something to use as a microphone, even one of those plastic PC mics will do. If you don’t have the mic yet, then tack on the time it’ll take you to dash to the store and pick one up for $5.00 or so. Ready?
- Download and install the open-source (free!) program called “Audacity” from their website at Sourceforge. If you just put “Audacity” software into Google, you’ll find it. (update: if you don’t mind paying $60 for incredible software, try Reaper in place of Audacity).
- Find the little hole with a pink circle around it on your computer sound card. It should be right next to the little hole with a green circle where your speakers are probably plugged in. Plug the microphone into the pink hole. (Update: Though this tip is still valid, you can get much better quality by using a USB mic – especially one like the $75 Samson C01U)
- Open Audacity or Reaper.
- Click on the button with the big red circle on it (that means “record”).
- Put the microphone close to your lips and talk into it.
- Click the button in Audacity with the large square on it to “stop” the recording (or the smaller Stop button on the bottom left of Reaper).
Is that It?
That’s it! You just made a recording and didn’t need a degree in math or engineering to do it.
Is there a lot more to learn? Uh-huh. Can it be taught as easily as the above? Yup, I think so. So if you’re looking for guidance on setting up a home recording studio, whether you want to do voice-overs, narrate an audio book, produce a podcast, or record music, don’t frustrate yourself trying to decipher the “how-to” articles and tutorials out there that are hyped up on jargon and “engineer-ese.” Find the ones that make it easy and fun.
They are out there – well most of them are here:). Good luck and have fun!
Oh, and if you’d like to get an idea of what our courses are like, click below to get some free videos to see how great they are (if we do say so ourselves):).
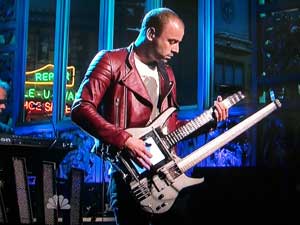
Instrument Muse Played On Saturday Night Live – Status Graphite Bass With Kitara?
 Updating this post because I’m watching Late Night With Stephen Colbert on July 20th, 2017. Chris was still playing the same instrument I wrote about back in 2012. Here is what I wrote about it back then.
If you saw Muse on Saturday Night Live (Oct 7th, 2012) playing the song, Madness (see video here: http://www.nbc.com/saturday-night-live/video/muse-madness/1419951/), you may have noticed the bass player, Chris Wolstenholme, playing a very strange looking instrument that looked like a bass guitar with a back-lit touch screen which he used to play the notes. It was a combination Misa Kitara Digital Guitar Synth Controller on the top and Status Graphite S2-Classic headless bass guitar put together like a double neck guitar.
Misa (misadigital.com) even has the music video for Madness which shows Chris playing JUST the Misa Kitara (not the mashup with the Status bass). So we know for sure that Misa acknowledges the use of the Kitara on the song. And since Chris has a signature series bass with Status Graphite, we can be pretty darned sure his combo instrument on Saturday Night Live was, in fact, made up of a Misa Kitara and Status Graphite S2. Update in 2017 – apparently the Kitara has been replaced with the “Tri-Bass Digital.”
What the Kitara touchscreen thingy is doing is acting as a combination synthesizer and MIDI controller. There are internal synth sounds that you can select through the synthesizer engine. And then you can apply any number of digital effects to those sounds. The “fretboard” on the neck of the Kitara has no strings, but rather 24 frets, each with a row of 6 buttons, each corresponding to a specific note. The default is that each note is what it would be on a guitar. But you can change those up however you like.
As a MIDI controller, you can connect any MIDI instrument or sound source you have to the Kitara, and trigger them with it, controlling your MIDI gear with the Kitara.
Both Misa and Status Graphite are being very tight-lipped about the dual instrument used by Muse on SNL, probably either because the instrument combo was cobbled together after-market, or is otherwise not available for purchase.
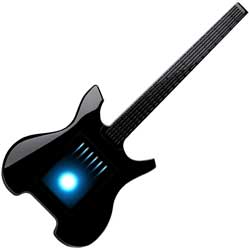
If you want a Kitara for your very own (minus the bass guitar hanging off the bottom;)), you may need to check on eBay for a used one, since they are apparently not being made anymore. For the Misa Tri-Bass Digital, check herefor details or to buy one.
Find out more about Status Graphite here: http://www.status-graphite.com/
And below are some more instruments used by Muse

Audio Fanzine Picks The Top 10 Products of Musikmesse 2012
 Musikmesse is a huge fair/expo/trade-show focusing on all things to do with music, from creating it to recording or performing it. This year’s Musikmesse was held in Frankfurt, Germany and just wrapped. The folks at Audio Fanzine (an awesome site for folks with a home recording studio) had boots on the ground for the festivities and have compiled a list of the top 10 products on exhibit this year.
Among the winners on this list are:
Alesis IO Mix – This is my favorite of their picks; a piece of hardware you insert your iPad into, turning it into a 4-track portable studio with mic inputs, mixer, and everything. This thing is unbelievable. I want one NOW. Unfortunately, it isn’t available to the public yet. but be sure to check back here often because I will let you know when you can get one for yourself.
The other products on their list are:
- Rotodrum
- Seelake AudioStation
- Rupert Neve 5059 Satellite
- Steinberg Nuendo Live
- Clavia Nord Electro 4D
- Zynaptiq Unveil
- Jupiter 50
- Bogner Pedals
- Pioneer RMX 1000
Check out the details about htese cool products here: http://en.audiofanzine.com/audio-music-gear/editorial/articles/best-of-musikmesse-2012.html
Cover of "That Thing You Do" – Record a Rock Song on Your Computer
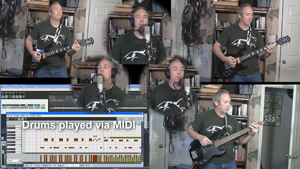 I just recorded a cover of the song, That Thing You Do, (written by Adam Schlesinger). And I recorded it from scratch on my computer-based home recording studio right here in a spare bedroom. The band consisted of me, me, me, me, me and me:-P. The reason I did it, besides just loving the song and always wanting to, was to demonstrate what kind of thing can be done in a very modest home recording studio.
Before I talk about how I did it and what equipment I used, take a listen to how it came out!
Audio Player
I intend to follow up with a more complete step-by-step how-to, along with a video tutorial later this week. But here are the basics.
Sound Sources
- Voices – All me (a twisted version of narcissism?). I double-tracked the lead vocal to get that Beatlesque sound. I also sang the two harmony parts and double-tracked each of them. So there are 6 voice tracks in all.
- Guitars – Carvin DC200, 1985 model. I used this same guitar for both guitar parts. If I had vintage Rickenbackers I would have used those, but you work with what you’ve got.
- Bass – A Samick LB-11 4-string bass guitar I bought used in 1995.
- Drums – All sampled drum sounds (meaning “I don’t have a drum kit”) from an acoustic kit in the virtual instrument software package called StormDrum, by EastWest.
How Was It Recorded?
I used Reaper software to record it all. I started with the drum track. I created a MIDI track and loaded StormDrum onto it as a virtual instrument. Then I listened very carefully to the original recording of the song from the movie soundtrack. That allowed me to build the drum part hit-by-hit using the MIDI editor in Reaper.
Next, I recorded the bass track by plugging my Samick into a Line 6 POD Studio GX, which is a little box you can plug electric guitars and basses into. The POD then attaches to your computer via USB, and you use the Line 6 software to choose amps and effects to get the right sound.
Then I recorded the electric guitar parts the same way as the bass. I recorded 2 parts/tracks, one panned to the left and played as the “rhythm guitar” part. The other guitar was panned to the right and played with the little riff happening during the verses.
And Finally…
Last but not least, I recorded the lead vocal. As I mentioned, I sang it once on one track, and then recorded it again (listening to the 1st in the headphones) on a second track to get that double-tracked sound. I did the same thing with the low harmony part and panned it to the left, and the high harmony part, panned to the right. All vocals were recorded with the Rode NT2-A microphone hooked up to the computer via a USB audio interface – the Focusrite Scarlett 2i2 interface box.
You can get started with a bundle I created for B&H Audio called The Home Recording Musician’s Starter Kit. CLICK HERE for more details on that.
Then I mixed and panned everything to make sure the sounds could all be heard and rendered (mixed down) the result into one audio file, which is what you heard above.
Check back here in a few days and you should find a bit more detail and a video.
Now go forth and record your own pop or rock songs!
Cheers,
Ken
