The lead vocal is usually the central focal-point of a recording, especially when you’re talking about singer/songwriter type songs where the arrangement is pretty intimate. Besides the voice, you may have a piano or an acoustic guitar and nothing else. So it’s really important to get the best vocal sound you can.
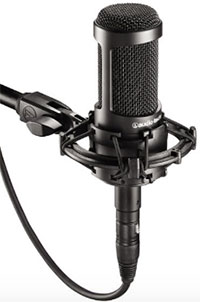
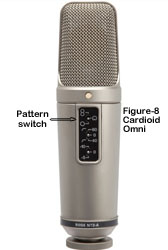
Part of that equation is the microphone. For example, the most common advice is to use a large diaphragm condenser microphone like the Rode NT2-A or the Audio-Technica AT2035. But sometimes a mic that sounds good on one person’s voice will not sound great on someone else. You often have to find the right mic for the right person.
There are other considerations as well. This article addresses issues such as who will do the singing (if you’re a better songwriter than singer then it might not be you!), what recording space will be used to track the singer, and how to best monitor the session. Check it out here:
http://www.recordingmag.com/resources/resourceDetail/247.html
microphones
How To Build A Home Recording Studio: Part 3 – Microphones And Interface
This is part 3 in our How to Build a Home Recording Studio series that shows you how to set up a computer-based studio capable of recording pro-quality audio. In part 2, we talked about how to prevent and/or reduce noise. That is the biggest enemy of great sounding audio. Today let’s address step #2 of computer recording basics. That is the part where sound is converted to little ones and zeros (digital audio) by a sound card/interface.
Changing Regular Sound To “Computer” Sound
To record on a computer, you have to change/convert audio into “digital” audio that those computers can understand. The poor quality of audio conversion is the main reason the $5 plastic PC mic going into a sound card is not the best idea for a studio set-up. The microphone is very limited in how accurate it can be since the components are small and cheap and tend to be oversensitive to certain sounds (p-pops and rumble and other low frequency stuff), and not sensitive enough to others. Then comes the fact that the converters built in to integrated sound cards of most computers are of poor quality. Then to top it all off, integrated sound cards pick up a lot of electrical noise from the motherboard.
USB Mics
The best first step then is to avoid having to plug a microphone into an integrated sound card. The fastest and most inexpensive way to do that is to use a USB microphone, which will have digital converters built right into it, making for better quality conversion and avoiding much of the computer noise. And since the converters are built in, you won’t need a separate audio interface, which is usually at least $100 and is another piece of gear (usually a small box) to deal with.
But not all USB mics are good for creating pro audio. The small headset USB mics (~$25) are still quite small and have a lot of the same accuracy and frequency response limitations as other non-USB pc mics. But for not much more money than the headsets, you can get larger, more accurate USB mic like the Samson Q2U for $59.
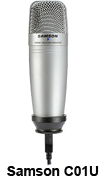
This “upgrade” is where you move into the realm of professional quality audio – improving your sound greatly by moving from the tiny USB headset mics to larger USB mics. You can then incrementally improve sound quality – your next upgrade – by moving to a large diaphragm condenser USB mic like the Samson C01U ($80). Prices go up from there for LDC type USB mics, from the popular Blue Yeti for $130, to around $200 for the MXL UR-1 USB Ribbon Mic.
I find that even with the larger USB mics you still get a low-level hiss, usually so low you can only hear it in headphones, but still a bit more than you’d want to have if you were sending a voice-over job to a client. But noise reduction programs usually can fix this quite well.
Time vs Money
That brings up another point about audio quality. With the basic knowledge we’ve been talking about, you can get top-notch audio quality from inexpensive gear, but it may take more time than if you had the expensive gear. Having to run noise reduction on everything is one example. This is fine, though, for most people as they frequently have more time available than cash. For most people, a large USB mic will give them as much audio quality as they will ever need.
Then as you can afford to, you can upgrade your studio in increments — BUT only if you need to! You should definitely try to let your need drive your buying decisions so you only end up with what you need. This will save you lots of time and money. It is all too common for people to end up buying lots of gear they don’t know how to use, and that they really don’t need, just because a sales person told them to.
So that’s Home Recording Studio Configuration #1 – A microphone plugged directly into a computer.
Home Recording Studio Configuration #2
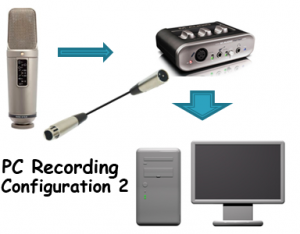
If you wish to move into the realm of great audio quality, you need to consider moving to home recording studio configuration #2 (a microphone plugged into an interface or other 3rd-party device designed to accept a standard 3-pin (XLR) microphone cable). This set-up will set the stage for getting the best audio quality possible. Even the highest-end computer-based studios use some form of this configuration.
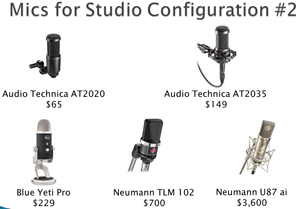
Microphones for Configuration #2
Without going into a huge dissertation on microphone types I’m going to mention the two main kinds of microphones, dynamic mics and condenser mics. Here is what you need to know: for recording, use a condenser microphone. Of course there are exceptions to every rule, but in general dynamic mics are best for live performance and certain types of recording, like guitar amps and drums. Condensers, especially large diaphragm condensers, are best for recording the human voice. Let’s take a look at a few examples.
Large Diaphragm Condensers (LDC)
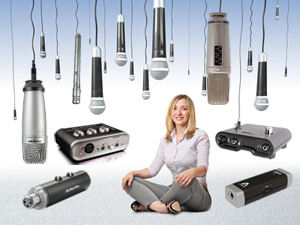
Here are just a few examples of many available large diaphragm condenser (LDC) mics out there. As you can see in the picture on the left, prices start below $100 and can go pretty darned high into the thousands. The cheaper LDCs are still going to sound pretty darned good if what you’ve been using is a USB headset mic or other tiny computer mic.
But the reason why there is such a range of prices is that, as I said in part 1 of this series, the more expensive mics can and do produce better quality than the cheaper ones for a variety of reasons, internal components and manufacturing specs being two biggies. Cheap LDCs often are less accurate and may sound harsh and thin in the middle to high frequencies. Also, features such as multiple pattern (cardioid/figure-8/omni), bass roll-off, and pad switches will make a mic more expensive. The good news is that you can upgrade your studio with better mics in increments of $50 – $100 at a time.
The ones that are a bit more expensive but worth it
I currently use a Rode NT2-A as my main microphone, which runs about $399 and has all 3 of the switch options I mentioned above. Its little sibling, the NT1-A, which has none of the switches (default pickup pattern is cardioid), costs significantly less at $229. The latter also has sounds slightly different (some say not quite as good) as well. Another good choice is the Audio-Technica AT2035, which is only about $150. I reviewed that one (with audio samples) here: Review of the Audio-Technica AT2035 Microphone.
One of these days I’ll probably step up to one of the Neumann LDCs, such as the TLM 102 or TLM 103. Neumann microphones are some of the best available, and as you can see from the picture above, the price reflects that.
Keep in mind that these are standard (not USB) mics with 3-pin XLR connectors, so they will need to be plugged into an interface of some kind to both amplify the signal and convert analog sound to digital audio. Speaking of which…
The Interface for Configuration #2
Audio interface units, such as the Avid Fast Track (see picture on left) costing $99, typically accept microphone (XLR) inputs, and usually instrument inputs as well. The Fast Track only has 1 input though, so can only record one thing at a time.
Interfaces like these do two main things. They amplify microphone signals using what is called a “preamp” (short for pre-amplifier), and they convert sound into digital audio by means of the analog-to-digital converters built into them. They also come with something called “phantom power” which is required for condenser mics.
Combine one of these interfaces with a standard (non-USB) large diaphragm condenser mic and the result is crystal clear, very detailed and accurate audio. You can put together an entry-level Configuration #2 studio for under $200 (not including the stands and other accessories. Even the extreme high-end recording setups will use some version of the mic-infterface-computer configuration. For example, a high-end studio using a Neumann U-87 mic ($3,100) and Pro Tools HD Interface with 16 inputs ($4,995) set-up will cost around $8,100.
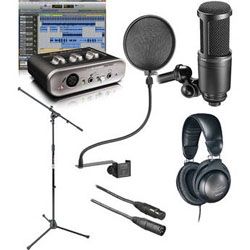
Most folks will find that even the least expensive setups (~$300) will be good enough for anything they’ll ever want to do. B&H Photo-Video-Audio took Ken’s suggestions to create the “home recording starter bundle.” It uses Configuration #2, and costs just$229.95 (US). B&H even offers free shipping on it. Click here to check it out.
That’s it for part 3 of the How To Build a Home Recording Studio series. In part 4 we will discuss the software.
See you then!
Ken
Easy Home Recording Basics – The PC Home Recording Studio
Home recording can be an easy, entertaining and rewarding pursuit. You can create professional audio for your music, podcasts, videos, voice-overs, etc. Only a few years back, studio quality recordings were only possible in expensive studios with thousands of clams worth of equipment.
But now, anyone can do it right on your home computer. There are some basics to be absorbed, though. First what do you need? You can spend a ton of cash on gear that you don’t really need. I recommend that if you’re just starting out, you don’t buy any of it. The least expensive and easiest way to get studio-quality recordings is with a computer that was made in the past…say…10 years (this being 2010). This will be your PC recording studio.
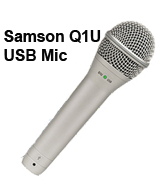
You’ll also need a microphone (or “mic” for short). If you’re just starting out, you can learn all the techniques for creating pro-audio with just a plastic PC mic. I poo you not! Pretty soon you’ll want better sound, and a usb mic for about 49 bucks (like the Samson Q1U) will be a huge jump in quality. Over time, you can upgrade incrementally…if you need to.
Then you want to take a look at software. I like to use multi-track recording program (sometimes called a digital audio workstation or DAW) and a sound editing program. But most DAWs will allow you to do everything you need without having additional software just for editing (an on-going topic of debate;)). Anyway, you’ll be able to find software for free that compares well in quality with the big and dear brand names. I recommend trying Audacity, which coincidentally, is BOTH a multi-track recorder and sound editor in one. It’s absolutely free and can be downloaded from the open source playground Sourceforge. Personally, I use Reaper.
After you have your software, do some recording save it as mp3 or wav format, then put your earphones on and turn the volume up. Listen for hisses and clicks in the final version, and notice how far you have got to turn it to get it loud. If there are plenty of hisses and clicks, this is sometimes known as a ‘dirty’ or ‘noisy’ recording. Hear me now and believe me later…NOISE IS PUBLIC ENEMY #1! And it is always with us. Many programs will edit out the noise, but when they do they can also adversely affect the over-all quality. Why? Because in editing out the noise, it also filters out part of the signal…the stuff you WANT! The less noise you have to deal with, the better noise-reduction programs work. I know that sounds obvious, but look at it this way. Noise reduction can completely eliminate soft, low-volume noise without leaving any audible yuckiness. But as the percentage of noise in the audio goes up, the yuckiness that is left behind gets worse and worse.
That is the reason why it is so vital to try and get as clean a recording as possible the 1st time around! Prevention is the key. See my article on fighting noise (https://www.homebrewaudio.com/fastest-way-to-improve-audio-on-pc-recording-studio)for more information on that. One reason I recommend starting out with a $5.00 PC mic is that by learning to get the least amount of noise from that thing, you’ll know how to get the best out of every mic you ever use after that. For now, you can help yourself out by getting the mic as close to the sound source as possible, and trying to record in as quiet a space as possible.
Once you have recorded your audio, listen to it in head phones, ear-buds, or on speakers. Actually, do all 3 and notice the difference. After that just save the audio as either an mp3 or wav file (there are lots of sound formats, but those 2 are just the most common). Use the mp3 for audio you want to put on the web. Use the wav for burning CDs on your computer, or for adding audio to video, etc.
Learn much, much more in the articles and tutorials here at Home Brew Audio. Teaching audio recording in a way that makes sense to everyone is our goal.
Sennheiser MKH 416 Shotgun Microphone Review
We normally think of shotgun mics as “movie mics” – the things that sound crew folks hang over people’s heads with those long boom poles when shooting video. and though they are awesome for that job, did you know they were also highly prized as voice-over mics? Either way, I want one:). My Star Rating –
[This review of the Sennheiser 416 shotgun mic originally appeared here in 2013. But I thought I would update it a bit in the wake of all the microphone reviews I’ve been doing in 2019. I still want one of these, BTW:). But I ended up buying an Electro-Voice RE20 (another one I was reviewing for B&H) for my voiceover purposes until then.]
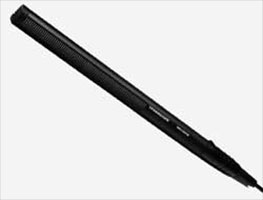
I had the privilege of testing out the Sennheiser MKH 416 microphone recently. What can I say? This mic has been described as the desert island mic by many. It’s so well known and well-liked that it goes by other nicknames too, like “The L.A. Mic” and “The Movie Mic.” Around the internet you see words like gold, the one, amazing, industry standard, and staple crop up over and over again.
So what is this thing that makes it so great?
Well you’ve probably heard audio through it before if you’ve ever watched a movie – or television. It is a standard in the film and TV industries, often used outdoors for news casts and interviews as well as location shoots. It is also used a lot in the voice-over world because not only does it make voices sound awesome, but it helps them cut through background sound effects and music. Many a movie trailer has been recorded with a 416. The next time you hear “In a world where……” etc, chances are that was recorded with a 416.
Also in this review I tested the Rycote Softie Windshield on the Sennheiser for an outdoor video test on a windy day.
So, enough of the gushing – gimme details. Yes, I heard you. OK, here is the skinny.
The Sennheiser MKH 416 is a short shotgun mic. That means that it is ultra-directional, picking up audio that is in front of it really well at longer distances than a standard condenser mic. We’ve heard of the cardioid pickup pattern. This mic has a hypercardioid pattern, which rejects sound coming from behind it in about a 120-degree field. The 416 is also different from regular condensers in that it uses something called RF biasing rather than the more common DC-biasing. You can read the technical details of this in this article, but RF (radio frequency, btw) biasing has some benefits, such as that the mic becomes less sensitive to moisture ( a good thing in an expensive mic commonly used outdoors), has a wider frequency response, and is extremely low noise levels.
Other features?
Other awesome features of the 416 make it nearly indestructible (not that I put that to the test with the review mic:)), less sensitive to plosives (p-pops), and less sensitive to the proximity effect, which is that thing where the low bass frequencies get more hyped the closer the mic gets to the source. Voice-over folks may think, “hey I like it when my voice sounds deeper when I get close to the mic.” My answer to that is that with this mic, you don’t need to rely on the proximity effect because the 416 picks up the lows of a human voice incredibly well already.
Use as a VoiceOver Mic
The 416 is fast becoming one of the most popular microphones in the voiceover industry, which has traditionally been dominated by large diaphragm condenser mics (LDC). I’ve already mentioned one of the reasons for that – you can spend less time worrying about p-pops, though in my testing, I still needed a pop-filter for the plosives. Another reason that the 416 can be a little further away from your mouth without picking up room sound noise. Plus it is lighter and much skinnier than your typical LDC. Both of those things can help when you’re reading a script while recording. But ultimately the real reason this mic is terrific as a voice mic is that it simply sounds incredible.
Shotgun Shootout
I compared the Sennheiser MKH 416 against my mainstay, the Rode NT2-A large diaphragm condenser, recording a short bit of voice-over copy. I was really impressed with how much better the Sennheiser sounded than the Rode – and THAT has never happened to me. Sure, I’ve never tested a $999 mic against my $399 Rode, but to date I have never recorded another mic that sounded better than my beloved Rode. There is a first time for everything. The Sennheiser made my voice sound rich, detailed, deep and punchy all in one aural experience of awesome. I now know why people call it the desert island mic.
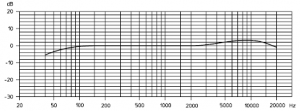
Be careful of the 5 dB bump starting at 4Khz
I did notice in the first test that the 416 produced a little more sibilance (the high hissy “ssssss” frequencies) than I normally like. Then I remembered that I have a bit of EQ permanently set on my preamp to reduce the lows and increase the highs. I did that because the Rode sounded a bit heavy in the low end without it. So I bypassed the EQ on the preamp and that took care of the sibilance issue with the 416. I did notice in the pamphlet that comes with the 416 that it is designed with a 5 dB “bump” in the high frequencies starting around 4 KHz. See the frequency response graph on the right.
Below are the two audio samples, first with the Rode, then with the Sennheiser.
VoiceOver On the Rode NT2-A
RodeNT2-A Sample
VoiceOver On the Sennheiser MKH 416
Sennheiser MKH416 Sample
Outside Test In The Wind
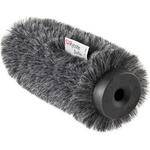
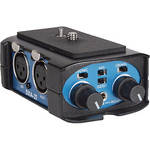
As I stated above, the 416’s most common use is in the film, TV and electronic news gathering (ENG) fields. I recorded a few different videos, one with just the built-in mic of my Canon Vixia HD Camcorder, and then three different shots with the 416 hooked up to the camera (one of the reasons I went with the Canon Vixia is that it has an external mic input) using a BeachTek DXA-2T Camcorder XLR Mic Adapter (see our review of the DXA here). First was the video with the 416 naked, without a windshield of any kind. Next I put on the foam windshield that comes with the mic. Then I thought I’d test a 3rd-party windshield (the fuzzy “dead-cat” kind) called the Rycote Softie Windshield (standard 19-22 mm hole size).
Results in the wind
The first result was that The shotgun was on a mic stand right next to the camera in this test, so the audio in all video clips below was recorded on mics that were the same distance away from my noggin.
The audio would have been truly awesome if we had a 3rd person holding the mic on the end of a boom pole (sometimes called a fish pole) mic holder with the mic just above my head and out-of-frame, pointing down at my mouth. I’ll do that test another day.
Now for the test against the wind. In video 1 (just the camcorder mic), you’ll notice the wind is extremely loud and the voice audio is thin and distant. In video 2, using the shotgun mic instead of just the on-board camera mic, the audio quality of the voice was MUCH better. But because there was no windshield of any kind, the wind was still pretty loud. For video 3 using the foam windshield that came with the mic, the wind noise was noticeably less of a problem. For final video we used the Rycote Softie Windshield. And though there was a pretty significant breeze, it was amazingly quiet.
Only the built-in camcorder mic (not shotgun mic attached)
With Sennheiser 416 shotgun mic attached, but without a windshield
Sennheiser attached with included foam wind shield attached
Sennheiser attached with Rycote Softie Windshield attached
Summary
The Sennheiser MKH 416 shotgun mic is – how shall I put this – officially freaking awesome! Sadly, I have to return mine since it was on loan from B&H Photo-Video-Audio. Otherwise it would be my primary mic for all my voice-over and video work. It does cost $999, and as soon as the piggy bank gets heavy enough, to quote Mike Meyers, “it will be mine – oh yes – it will be mine.” Also the Rycote Softie Windshield worked magic at reducing wind noise for outdoor video use.
As long as I am quoting my favorite movies, here’s one from Ferris Beuller applied to the 416. “if you have the means, I highly recommend picking one up.“
[Update: B&H has “hands-on review” of this wonderful mic. Check that out here.]
Cheers!
Ken
My Review Of The Blue Spark Digital USB And iOS Microphone
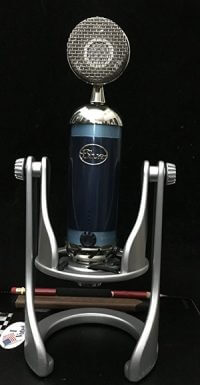
I just had a chance to review the Blue Spark Digital USB microphone, which is not only a standard USB mic, but also works with your iPad or iPhone (as long as they are of a generation that uses the lightning cable connection).
The Blue Spark Digital is a large diaphragm condenser type mic. That makes it a good choice for such things as vocals and acoustic guitars, among other things. The mic has a multi-function knob on the front which allows you to control BOTH the headphone volume from the mic (yes, you can monitor the audio from the mic itself with the headphone jack that is a part of the mic cable), AND the input level of your audio*.
By default, the LED lights are blue, which indicate the knob controls headphone volume. But if you press down and hold the knob for 3 seconds, the lights turn red, meaning that the knob now controls input level. This knob has a third function as well. If you press down briefly on the knob, it acts as a mute button. Pressing it again un-mutes it.
USB Mic Gain Controls In General
* When using USB mics with gain control knobs on the front, it is REALLY easy (too easy) to have the gain up too loud and end up with distorted sound. It isn’t as bad when recording, since you have visual clues in the recording software (like the meter going into the red).
But I’ve heard way too many distorted voices come through on web conferences, Skype calls, and webinars where folks are not given immediate feedback on whether their audio is distorting or not. In those non-recording cases, it is vital that you check the audio testing tool usually available in Skype, Google Hangouts, GoToWebinar, etc. Okay, back to our regularly scheduled review:).
Overall Impressions
The Spark Digital is an attractive and interesting looking mic. Its unusual shape is consistent with other microphones in the Blue lineup, such as the Bottle tube, and Baby Bottle and Bluebird mics. The Spark Digital comes with a desk stand that includes a shock mount, which is great.
But unlike the standard Blue Spark mic (NOT a USB microphone), the Spark Digital does NOT come with a pop filter, which is odd because this mic simply cannot be used for vocals without pop filter, since it is extremely sensitive to plosives and generates impressive (in a bad way) p-pops without a filter/screen to help prevent them. So if you plan to use this mic for vocals you’ll need to buy a pop filter separately. You can use a standard filter attached to a separate mic stand, which is what I did for the review (a bit unwieldy), or you can get the pop filter designed for Blue mics – “Blue The Pop Universal Wire Mesh Windscreen.”
Hard to Use On A Desk
Something else that I don’t like about most USB mics is that they are designed to sit on a desk, which is fine for some folks. But this seriously limits flexibility when using the mic. Lots of people (that may or may not include me:-P) like to put their mics on a standard mic stand so they can stand up while recording or place the mic at any height and any angle, especially useful when recording instruments. There is an adapter for the Blue Spark though, that will work with the Spark Digital as well. But you also have to buy it separately. It’s the Blue S3 SHOCK, which costs about 98 bucks.
Without that mic stand mount, you’ll be stuck with the desk stand that comes with the Spark digital, which is unique in shape and function. But it’s really awkward to handle and I had a super hard time trying to get the mic screwed into the mount. That was really frustrating. If I were going to use this mic in my studio full time, I would absolutely purchase the extra mic stand mount and pop filter.
The Tests
I did several recordings with the Spark Digital, using USB and an iPhone 6S. The mic has two modes – Normal mode and Focus mode. Blue describes Focus mode as enhancing “clarity and detail.” There is a tiny black switch on the back of the mic for toggling between these two modes. Another of my quibbles with the mic was that the rubber cap to this switch popped off after only the 2nd time I switched it. But it was easy enough to pop back on. Anyway….
How Does It Sound?
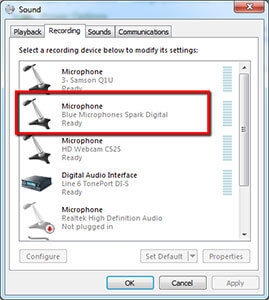
The real test of a mic is how it sounds. And this one sounds pretty darned good. The mic comes with two cables – one for a standard USB connection to a computer, and the other has a lightning connector for use with iPads or iPhones. To test the USB capability I plugged the mic into my windows 7 machine. Windows recognized it immediately, so the plug-and-play works well. See figure 2. Even with the gain knob on the mic turned all the way down, the mic was still too loud for recording into Reaper (my audio recording program). I needed to lower the level in the Windows Audio Device screen to about 50%.
P-Pop-A-Looza
After that was taken care of, I recorded the first pass of some spoken voice-over type stuff with NO pop filter. I expected the p-pops to be bad, but wow were they loud – so loud, in fact that even with recording levels super low, the p-pops were so loud that they clipped/distorted. Below is that audio. [note: P-pops were NOT edited in any way, which is why in some cases, the volume may seem low on the voice where no plosives appear (because the p-pop itself was so loud that it exceeded input limits)].
I recommend using headphones when listening to the below audio, in order to hear the subtle details.
Windows 7 USB Recording No Pop Filter (normal mode)
Windows 7 USB Recording No Pop Filter (Focus mode)
Things got considerably better in the p-pop department when I used a standard pop-filter on a separate mic stand (since there is no way to attach one to the included desk stand):
Windows 7 USB Recording With Pop Filter (normal mode)
Windows 7 USB Recording With Pop Filter (Focus mode)
Next, I wanted to compare the audio quality with another USB mic, one that costs a lot less at $45, the Samson Q1U. Here is what that sounded like. Can you tell the difference? Of course the Samson does not work with iOS:).
Samson Q1U – No Pop Filter
Samson Q1U – With Pop Filter
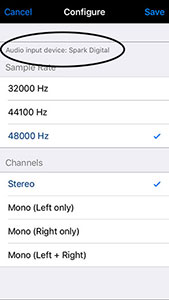
Next it was time to do the iOS tests. I used the iPhone 6S. The Spark Digital is recognized by most iOS recording apps (Garage Band, Cubasis, Auria, Rode Rec, etc.). I used the Rode Rec app, which immediately recognized the Spark Digital once plugged in via the lightning connector. See Figure 3.
The iOS Audio Results (everything will have a pop filter from now on)
Spark Digital Through iPhone 6S in Normal Mode
Spark Digital Through iPhone 6S in Focus Mode
Finally, I thought it would be a good comparison to hear what the same voice-over would sound like recorded directly into the iPhone, using its own internal microphone.
Just the iPhone
In my opinion, the “iPhone only” (using just the iPhone mic and not the Spark) recording was pretty bad when compared to the Spark Digital through the iPhone. This is great news for anyone wanting to record pro audio with just an iPhone or iPad. That allows you to record on-the-go without hefting power supplies, external audio interface boxes and a laptop computer with you.
In Summary
At the heart of it, this mic is definitely worth its nearly $170 cost, if for no other reason than it works so well with an iPad or iPhone in addition to being a good quality USB mic. Personally, I thought the sound quality was very good – in the realm of :pro quality” audio. I especially like that the noise level – the hiss usually apparent in USB mics seemed lower than most other USB mics.
I really didn’t notice much of a difference between the Normal and Focus modes. Your mileage may vary.
I did have a few quibbles, which were primarily logistical and had little-or-nothing to do with the audio quality. And you’re DEFINITELY going to want a pop filter for vocals. But otherwise I think you’ll be quite happy with the sound you can get with the Spark Digital.
I don’t think it will replace my Rode NT2-A or my new EV RE20, but then both of those mics require an investment of close to $500 each, whereas the Spark Digital is only $170 (which could go up to about $300 if you buy the mount and pop filter). So the comparison isn’t really fair.
Overall, this mic sounds really good, and would be perfect for anyone who needs to be on the go and record with their iPad or iPhone as well as a laptop.
CLICK HERE to find out more or to buy one of your own.
If you’re interested in more details, including the technical specs and some of the specific models of iOS products supported, etc. CLICK HERE to go to the Blue site.