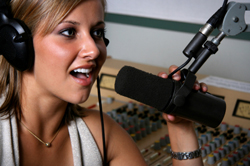
 There are lots of folks who set up their home recording studios simply to do voice-overs. One of the first questions they ask is “what voice-over equipment do I need?” This post and the article at the end will answer that question thoroughly.
One of the best uses of a home recording studio is to produce voice-overs. That’s because, as opposed to a full-blown music production studio, you won’t need as much gear (so you won’t need to spend as much) or as much space in order to produce high-end professional results.
In the article below, you’ll learn about the equipment you are going to need for a top-notch pro voice-over studio, including an explanation of the different kinds of microphones, how to connect them to your computer, how you can use voice-overs (podcasts, video narration, etc.), and tips on everything you’ll need from hardware (mics, interfaces, software, out-board gear, etc.). If you still have any questions after reading this article, please post them in a comment at the end of this post and I will address them immediately.
So if you’re ready to take it all in, read the full article here.
microphones
Directional and Omnidirectional Microphones – What Are They Good For?
 Do yo have a directional microphone or an omnidirectional microphone? Are you even certain? The directionality of a microphone, that is, whether it picks up audio best from the front only, or from all around it (or some other pattern of pick-up) is frequently called the polar pattern of a mic. To get the best sound from a microphone, it’s important to understand the different polar patterns and how to use them properly. Polar patterns are also sometimes known as pick-up patterns, because their function is to ‘pick up’ the sound. There are three main polar patterns and each serves a different purpose.
Cardioid
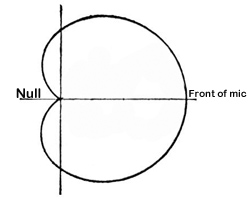 This is among the most common polar patterns that you will encounter. Meaning ‘heart-shaped’, this type of pattern will give you a good pickup to the front, with a lesser amount to the sides, and a good sound rejection to the back. Cardioids are also known as “directional” mics since they only pick up audio from one direction.
One of the main features (benefit sometimes and curse other times) of cardioids is that they can create a “proximity effect.” As the source gets closer, the audio sound will be “bassier.” You should be aware of this if you want to make your audio sound a bit deeper, especially for voiceover actors. Though sometimes you may want less bass in the audio. Knowing that you have a cardioid mic, you might be able to fix the tone just by getting further from the mic (but beware of letting more bad room sound in if you do this!) instead of futzing with EQ or other editing tools in your gear. Sometimes the simplest solution is the best.
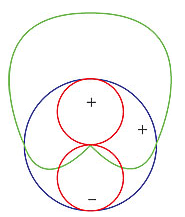 Cardioid polar patterns are recommended for most vocal applications, recordings and live recordings. It is suitable for venues where the recording environment’s acoustics are good, but less than perfect. This is because a cardioid rejects audio from behind it, so if you have reflections or other potentially unpleasant audio coming from behind the mic, its effect will be minimal. Sometimes the area behind a cardioid mic is called the “null” because it is sort of an audio no-mans-land. See picture on the right.
Hypercardioid microphones take the concept of cardioids one step further. It records from the front, and rejects everything to 120 degrees to the back. These work very well for on-stage live performances and live recordings that are in difficult or far-away situations.
Omni
Also called Omnidirectional, this type of polar pattern picks up sound equally around the microphone. These are meant to sound very natural and open are well suited environments that have good acoustics. They are also great in recording situations where natural, open sounds are the goal. And obviously, the main use for an omni mic would be when you want record sound from several different directions. One example of this would be if you had, say, a barbershop quartet in the studio. They could gather around the mic and each voice would be picked up equally. Setting up an omni in the middle of an acoustic group of musicians like a small classical string combo, bluegrass group, etc., is also a good use.
The biggest difference between omni microphones and cardioid microphones is that omni does not give the proximity effect. Omni polar pattern microphones are generally not recommended for live sound, as they can be prone to feedback issues, but they are great in recording studios, where the environment can be better controlled.
Figure-8
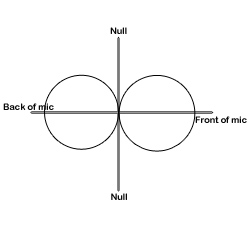 Also known as bidirectional, this polar pattern microphone will pick up sound equally from both sides of the microphone. This also means that the nulls for a figure-8 pattern are on either side, as indicated in the picture on the left.
You’ll find that the majority of ribbon microphones are configured as figure-8s. They are commonly used in mid-size recording studios. They can be sensitive, and so are not recommended for high SPL or harsh environments. They are, however, best suited for acoustic instruments, and for live recordings of jazz and acoustic groups. They are also often used for drum overheads.
Another use for a bidirectional mic is for when recording an acoustic guitar player who is also a singer. The mic can be set up so that one side is facing up at the singer’s head and the other side facing down toward the guitar.
Yet another really cool use of a figure-8 microphone is in combination with a cardioid mic to perform a stereo recording technique called mid-side (MS) stereo recording.
Mics with switchable polar patterns
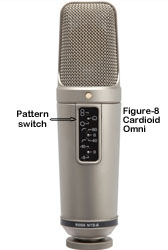
If you cannot afford to own at least one microphone that can give you all three of these patterns, you can get a mic that is capable of doing all these patterns. You just flip a switch and your mic goes from cardioid to figure-8 or omni. This is the route I took since I rarely have need of the other patterns, but definitely want the capability for those special times. The mic I use for this is called the Rode NT2-A. Take a look at the picture on the right.
Knowing which microphone polar pattern to use in each situation will ensure you get the sound you want, every single time. A basic understanding of the main types of polar patterns will help to unravel the mystery of some of this technology and give you professional quality results.
Acoustic Guitar Mic
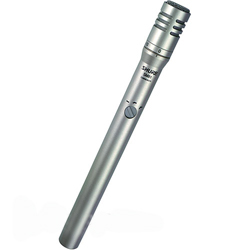
I see and hear this question quite a lot: what do you use for an acoustic guitar mic? That’s a great question, especially for people like me whose primary instrument is acoustic guitar. I suppose the first question to ask back is to find out if the question refers to playing live or to recording. Trying to make an acoustic guitar heard on stage, especially if playing with an entire rock band, AND having it still sound decent, is another article by itself. For this article, I’ll just be talking about what mics are best to use when recording an acoustic guitar.
Condenser or Dynamic?
First off, let’s just forget about using dynamic mics for recording acoustic guitars (for a reminder of what a dynamic mic is versus a condenser mic, see our post here: What Is the Difference Between Condenser and Dynamic Microphones?). These instruments are capable of producing sound across a wide portion of the “hear-able” (by humans) spectrum, namely 20 Hz to 20,000 Hz. Acoustic guitars also produce different types of sound, from the obvious strumming of the strings to using the wooden body as a drum, knocking and slapping it with your hand. Add to that the variations on each of the above, such as whether the strings are strummed with a pick (from thin to thick – each gives a different sound) or with the thumb or fingers; or if picked rather than strummed, was that done using plastic finger picks or just the fingers? Was there a lot, a little, or no fingernail involvement? Then there is the style of music. Is it loud or soft? Is it rock or classical?
With so much variation in types of sound and expression, condenser mics are typically used for recording acoustic guitar. The main reasons for this are that condenser mics are better at picking up the high frequencies that acoustic guitars can produce, and they’re better at capturing “transients” (meaning very fast changes in level), which acoustic guitars also create in abundance, in the audio. Dynamic mics are better for electric guitar amps, which don’t produce as much transient detail.
Large or Small?
Whether to use a large diaphragm condenser (sometimes referred to by the acronym, “LDC”) or a small-diaphragm condenser mic is not as obvious. You may just want to experiment here. Personally, I’ve been using a small-diaphragm condenser mic, specifically the Shure SM81, for as long as I can remember to record all my acoustic guitar parts. I love how my guitars sound when recorded with one of these. I usually just put the microphone about 8-12 inches away from guitar, pointing at around the 12 fret, and hit the “record” button.
There are, of course, several different ways to record an acoustic guitar even once you’ve decide on what microphone to use. You can record with just one microphone to a mono track. Many folks like to record in stereo using two mics, each going to its own track. Even if you decide to record in stereo, there are several ways to do this. All these recording techniques for acoustic guitar make up a topic for an article all its own.
So to sum things up, I recommend using a small diaphragm condenser microphone, such as the Shure SM81, as your acoustic guitar mic of choice. However, a large diaphragm condenser mic can be a great choice as well. Your mileage may vary.
Cheers,
Ken
Home Studio Microphone and Interface Questions Answered
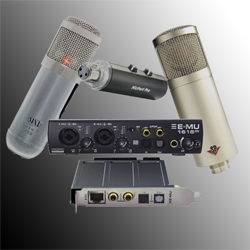 I received an e-mail this weekend asking for feedback on a few questions regarding a few specific home studio microphones and interfaces. Below is the text of the e-mail followed by my answer back to the individual who asked.
Question: Hey Ken, I have a question I thought only you could yield a pro and honest answer to. What wold you recommend between the MXL VO: 1-A from the Harlan Hogan sig. series and the Studio Projects C1?
For the audio interface, Centrance MicPort Pro, Firewire Solo, or EMU 0204? Any light shed on this subject would help a lot.
I am getting too much underlying hissing noise in my Samson C01U USB mic. I need to upgrade to a different set-up that is of higher quality, but not break the bank.
Your opinion is appreciated.
Thank You,
Brian
Answer: Hi Brian. Here are my 2-pence.
Between the MXL VO 1a from HH and the Studio Projects C1, I’d recommend going with the C1. I base this on 2 things. First, there have been some questions about the quality control with the MXL. It’s a good mic but the factory seems to be inconsistent in that some mics a really good and others are less so. That’s a concern. (see the review on this here). Secondly, Recording Magazine has been giving outstanding reviews to Studio Projects mics for the past couple of years.
On the interface question, a lot depends on your budget.
- The EMU is so much better than the other two options as to be a no-brainer if you can afford the $449 for it. Its quality is top-notch and you get a nice number of inputs (16).
- The Firewire Solo is not a good choice because it relies on old (firewire) technology and has been discontinued by most retailers.
- The Centrance MicPort Pro is a different animal altogether. Because it is not an interface “box”, but rather a small tube that will fit in your pocket (though that may not be recommended:)), it provides great flexibility and portability. And it costs a lot less than the EMU.
To answer your question about the C01U – The internal converter only allows for 16-bit recording, which will result in a higher noise floor (more hiss) than 24-bit conversion. The guts of this particular mic allow you to reduce that hiss if you increase the level of the signal to “as loud as possible.” For example, if you are recording vocals make sure to be quite close to the mic and record at as high a level as possible without distorting and that will help. However, if you really would like to avoid the hiss in the first place, you’ll need to try a converter that can record at 24 bits. Either of the interface options you asked about above will give you this if you use a non-usb mic, like either of the mics you asked about above. If you would like to continue going the USB mic route, check out the MXL Studio 24, which should give you considerably less hiss. That one costs $149.99.
So here are the options in front of you to really upgrade from just using the C01U going directly into your computer:
- Upgrade to the MXL Studio 24 for less noise: $149.99
- Get a Studio Projects C1 along with a Centrance MicPort Pro: $399.94
- Get a Studio Projects C1 along with an EMU 1616M: $698.95
I hope that helps!
Cheers!
Ken
Multiple Mics and The Ravages of Time
So much of capturing sound in our home studio recording efforts comes down to time. We get close to the microphone perhaps to help reduce room sound, trying to win the race against the reflected versions of our voices that have bounced off the walls.
Maybe we make a copy in our multi-track software of something we recorded with a single microphone – intending to delay one version by 30 milliseconds so we can pan both copies left and right to create fake stereo. This is only possible by manipulating time-related stuff, the relative positions of our two tracks to each other with respect to time.
All too often, copies of sounds we want to record enter our recordings without our permission, blending unpleasantly with their fellows, rendering the effects of college wave mechanics and bringing terms like constructive- and destructive-interference back into our brains. Amends can be made by moving stuff around, filtering, raising or lowering volumes at targeted frequencies, or any number of other remedies.
Such is the subject of the article below. Use more than one microphone to record something and you risk any or all of the wave-mechanic-y problematic symptoms on a heretofore unheard of level.
http://www.homerecordingshow.com/2011/11/show-141-multi-mic-time-aligning-and-aes-convention-recap/?utm_source=feedburner&utm_medium=feed&utm_campaign=Feed%3A+homerecordingshow+%28The+Home+Recording+Show%29