This post was originally published in 2012. But given that this month is the 50th anniversary of the Beatles coming to America and playing on the Ed Sullivan Show, I thought I would revive it this February.
I’ve been a student of recording and mixing for almost 3 decades. In that time the standard “rules” for mixing music have been pretty universal. If not for the fact that I got into it a mere 15 or so years after The Beatles broke up, I would have thought these mixing rules had been around forever. Certain things like panning the kick drum, bass guitar and lead vocal to the dead center of the mix (in other words, not panning them at all), and balancing the stereo field with guitars, pianos, harmonies and other instruments placed across the sound stage so we hear them spread out left-to-right, were things that “everybody knows.” But they’ve only known them since about 1970 or so.
But I’ve been listening to a lot of Beatles music in the past few weeks. Thank you iTunes and Apple Records (no relation) for finally coming to a sane agreement to make their music available for download! When I was a kid I didn’t notice that things were a bit wonky on the records I had. Maybe I had original recordings where they were in mono (nothing panned left or right), I really don’t know. And since my brother took all my records decades ago, I can’t check – not that I am bitter.
But in listening to The Beatles these past few weeks I became acutely aware of how hard it was to listen to at times. I mainly listened while driving in the car (…”yes I’m gonna be a star” – sorry), so when songs had all the drums panned to the left channel and a lead vocal coming from the right channel all the way over in the passenger side door, I couldn’t fully enjoy the music because part of my brain was trying to hear the lead vocal and another part was freaking out about how “wrong” the mix was.
I thought I had remembered that the whole concept of stereo was new in the 1960s, at least for use in pop records, and that The Beatles were early pioneers and tried all manner of wacky mixing. But it turns out only part of that was true – the part about stereo being new. George Martin and crew produced everything (at least before the days of The White Album and Abbey Road ca 1968/1969) for mono, and that is the way they sound the best. The early recordings, up until 1964, were recorded on “twin-track” tape. So the instruments all went on one track, and the vocals went on the other. That makes sense if two tracks is all you have. It lets you mix it so that the vocals and instruments blend and balance properly. Those songs were optimized for mono and how they were meant to be heard. It wasn’t until 1966 or so that George Martin and crew decided to remix a bunch of songs for stereo, without the involvement of The Beatles themselves.
So when the early recordings prior to Rubber Soul were changed for stereo, the only choice they had was to put instruments on the left channel and voices on the right, leaving a kind of sonic hole in the middle. This sounds really odd to our post-1960s ears. But even when they started recording on 4-tracks start with Rubber Soul, they didn’t change the instruments-to-the-left and voices-to-the-right tactic except for a few exceptions where a guitar might show up in the right channel, or a harmony might be panned to the left.
Almost nobody in The Beatles’ primary listening audience (teenagers) at the time owned stereo record players. They were all listening on what they called “monaural” or “monophonic” players. So when George Martin was experimenting with stereo mixes, he wasn’t too worried about ruining anything because he knew very few people would ever actually hear the stereo versions. But as is often the case with technology, stereos became common around 1970, so those “stereo” versions were out in the world for better or worse. In the 1980s, George Martin did some much needed remixing to improve the stereo mixes, and they are better now. Things are spread more evenly across the stereo sound-stage. But he still only had 4 tracks to work with, so not every instrument or voice is on its own track. The drums, for example, are still all mixed to the left because they were all on a single track.
All this got me thinking about how quickly things become standard and rules become universal and in some cases, inviolate. But there were no stereo mixing rules just a few decades ago. The things we consider to be “correct” are not age-old wisdom as I was treating them. On the one hand it’s a good thing. It makes it easy to teach people how do do things. On the other hand, it can stifle creativity. What seems right and proper in the audio recording industry today may turn out to be “wrong” 20 years from now.
The Beatles changed a lot of those rules in the 60s in other areas, like recording backwards music, doubling lead vocals and guitar leads, applying more treble than the engineer said was correct on Nowhere Man, and the list goes on. So while we are recording, let’s remember that rules are often made to be broken in the name of creativity. Who knows? You may end up writing the new rules.
harmony
Vocal Harmony Experiments
 One of the main reasons I got into recording audio was frustration that none of my friends seemed to know what harmonies were – even if they could sing quite well. So I decided the only way to sing cool harmonies was to do it with myself. I had an old cassette tape recorder with a tiny crappy mic on it. And my brother had a boom-box that could play cassette tapes. This was long before the days of portable CD players, and certainly long, LONG before the advent of mp3 players.
So I sand the melody of This Boy, by the Beatles, onto my tape recorder. Then I ejected the tape and put it into my brother’s boom box, placing a new cassette tape into my tape recorder. Then I played back the part I just sang from the boom box, recording it onto my recorder while singing George’s harmony. Then I took THAT tape out of my recorder, stuck it into the boom box, and put the other tape back into the recorder and pressed “play” on the boom box while recording it onto my recorder and singing Paul’s part. Voila! 3-part harmony with myself. It was like magic – pure, hissy (boy was there a lot of tape hiss noise!) vocal harmony magic.
Well, I messed with all the technology through the years and in 2013, we have wonderfully quiet, high-quality recording tech at our fingertips for just a few bucks. I’ve been doing harmony with that tech on this site. Below are some of the examples of what you can do now.
Our courses – The Newbies Guide To Audio Recording Awesomeness 1: The Basics With Audacity, and The Newbies Guide To Audio Recording Awesomeness 2: Pro Recording With Reaper, both show you step-by-step how to sing harmony with yourself. Also, see the article whose link is at the bottom of the page with one of the first articles we ever published – Sing Harmony With Yourself – Learn How to Record Your Voice on Your PC and Sing Along With It!
1. Fat Bottomed Girls (Queen) – From The Article: How To Be Your Own Glee Club – Queen Harmony Demo
Audio Player2. Carry On Wayward Son (Kansas) – From the Article: Kansas Harmony Step-By-Step
Audio Player3. Helplessly Hoping (Crosby, Stills and Nash) – This one is a video and is the entire song!
4. Sing Harmony With Yourself – See The Article https://www.homebrewaudio.com/sing-harmony-with-yourself-learn-how-to-record-your-voice-on-your-pc-and-sing-along-with-it/.
Overdubbing With Goals In Mind
Overdubbing can add subtle nuance to a track, or it can turn a single vocalist into a thick, rich harmony. When setting out to record tracks for overdubbing, try to have some specific goals in mind for the session. This goal-oriented approach helps everyone working on the track stay focused and motivated. It can also help to improve the overall quality of your recordings.
You can read more tips about overdubbing sessions here: http://www.prosoundweb.com/article/in_the_studio_the_overdub_checklist/
Creating Subgroups In Reaper and Pro Tools
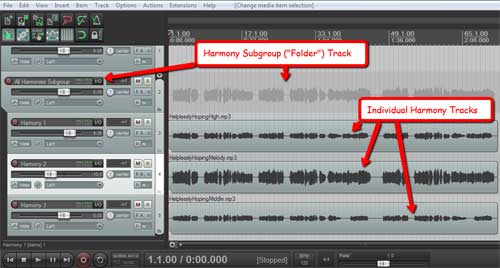 I just watched a video tutorial showing how to create instrument subgroups in Pro Tools. I was very pleased to see (in a petty kind of way) how much easier it is to do the same thing in Reaper;). But first, a bit of an explanation.
What is an instrument subgroup?
If you have 10 or 11 tracks of drums (one for the kick, one for the snare, one for the hat, and so on) in your song mix, it might be really handy once you get the relative mix of the drums just right (the volumes of the kick, snare, hat, etc. working well with each other) to control the volume of ALL the drums with just one volume slider when working to get the volume of the drums to work well with the rest of the tracks (vocals, guitar, bass, etc.). Well that’s exactly what a subgroup does. You set it up so that all the drums feed into a single new stereo track that you can call “Drums,” and then when you move any control on that new Drum track, it will affect ALL the drums. And it isn’t just the volume you can control this way. You can apply effects like reverb or compression or EQ to the Drum subgroup track, and those effects will be applied to all the drums. So now, not only can you control all the drums with just the controls on a single track, but you can save load on your computer’s CPU, since the effect is loaded only once (for the Drums subgroup track), rather than 11 times – once fore each individual drum track. And an added benefit is that you can make the drums sound more cohesive by putting them all through the same effect with the same settings.
Creating a subgroup in Reaper
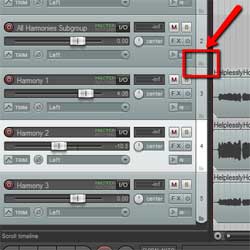
Let’s start with 3 harmony vocal tracks that you’d like to control with just a single subgroup track. Just create a new track above the 3 harmony tracks like in the picture on the top left. In the bottom right corner of the new, blank soon-to-be subgroup track (called a “Folder” track in Reaper) you’ll see a little folder-shaped icon. See Figure 2. All you have to do is click on that little folder button and it’s done! Every track underneath it gets indented to indicate that they are now inside that folder track, so to speak, and you can now control the volume and everything else – mute, solo, effects, etc.) of all the harmony tracks with just that one new subgroup/folder track.
One thing to be aware of here is that if you have other tracks below/after the harmony tracks that are not harmonies, tracks you don’t want in the folder, then you’ll need to click the folder icon (bottom left of the track control panel) for the last harmony track to tell Reaper that it’s the last track you want in the folder. This is because as I mentioned earlier, clicking the folder icon indents (incorporates into the folder) all the tracks below/after it be default.
Creating a subgroup in Pro Tools
In Pro Tools you still need to create a new track, and tell Pro Tools . Then you have to tell Pro Tools to use “aux (auxiliary) input.” Then you have to select an input for the new track, a “bus” input. Then you have to change the outputs of all the drum tracks (can do this at once by selecting them all) to the bus you used as the input for the subgroup track. You can see all this in the video below from PureMix. By the way, this video shows color coding of tracks. You can also do this in Reaper, which I show you how to do in my article here: Color Coding Tracks To Organize Your Mix
Kansas "Carry On Wayward Son" Harmony: Step-By-Step
Okay, so here is how I recorded the introduction to Kansas’ “Carry on Wayward Son” with just me, myself and I (meaning it was just my voice singing all the parts).
First, take a listen to how it came out:
 1. I opened my audio recording software, Reaper (see my post on Reaper here) on my computer.
2. I hit the “Record” button in Reaper and sang the melody (the high part:)) into the microphone, which was a Rode NT2-A. The mic was connected to the computer via an audio interface box like the Focusrite Scarlett 2i2.
3. When I finished singing that high part, I inserted another track in Reaper (ctrl-T) and sang that part again, giving me two tracks of my voice singing the same thing.
4. I inserted a 3rd & 4th track and repeated steps 1-2, but singing the middle vocal harmony part.
5. I inserted a 5th and 6th track and repeated steps 1-2, but singing the low vocal harmony part, “low” being extremely relative in this case;).
6. I edited each of the 6 tracks with my audio editing software, called Adobe Audition. Editing consisted of getting rid of “p-pops” and various other mouth-y noises, as well as making sure none of the notes were off-pitch.
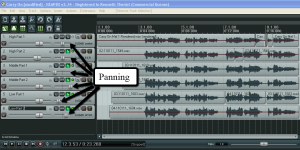
7. Back in Reaper, I panned each track to a specific place in the “stereo spectrum,” which is a fancy way of saying “somewhere between your left ear and your right ear.” both high parts were in the center (right in front of you, between your eyes (actually they were 5% left and 5% right, but they’ll sound like they’re coming from right in front of you). The two middle parts were panned 100% left (“hard left”) and 100% right (yup, “hard right”) respectively. If listened to by themselves it would sound like one was coming from your left and the other coming from your right. The low parts were panned 53% left and right, respectively. These would sound like they were between the guy singing the high part and the guy singing the middle part, kinda like 6 guys were spread out in front of you on a stage. See the figure 1.
8. The next step was to make sure each part was the right volume, not too loud and not to quiet. That’s called mixing, and you do it by adjusting the volume slider on each track so all the sounds work and play well together.
9. Next I added a reverb effect to the “master” channel.
10. I rendered (called “mixing down” in the old days) the project audio down to one stereo file, which I saved as an mp3, and voila.
Look for lots of other home recording tips in the many articles posted here at Home Brew Audio. We’ve also got video tutorials and the eBook How To Build A Home Recording Studio.
Ta for now!
Ken
