 One of the coolest things about computer-based home recording studios is the wide-open world of virtual instruments. And of all the different kinds of instruments we can play via MIDI on our computers, drums are probably the most used. And why not? You can have a drum track on your song without even touching a drum. Technically you don’t even have to know how to play drums (though I think it helps a LOT if you can) in order to have them in your recordings. And perhaps the biggest benefit for my wife – I don’t have to make all the racket in the house that a drum kit would create. This is also a plus if you live in an apartment and drums would generate neighbor complaints. One of the down-sides to all this is that it’s actually fun to play drums for real! But finding a place for the kit to live is hard if you don’t have a lot of space in your house. Plus, even though it’s a lot of fun to play drums, recording them is typically not easy.
In order to record live drums, not only do you have to have a kit (space issues), and a drummer good enough to be on your recording, you have to have a bunch of additional microphones. For example, the kick drum needs a certain kind of mic (like an AKG D 112, for example) that is very different from the snare drum (typically a Shure SM57 or two), which is very different from what you’d need for overheads (2 large diaphragm condensers like the Rode NT2-A). So by using virtual drums, you’re saving yourself a lot of money for mics if nothing else.
So what is virtual drumming anyway? Well, if you’re recording a song, you can load up a software plug-in/program (into your multi-track recording software like Reaper), which contains recorded samples of actual drums (usually – though there are synthesized drum programs as well), and have your computer play these drums via MIDI. It’s like having a drum machine inside your computer.
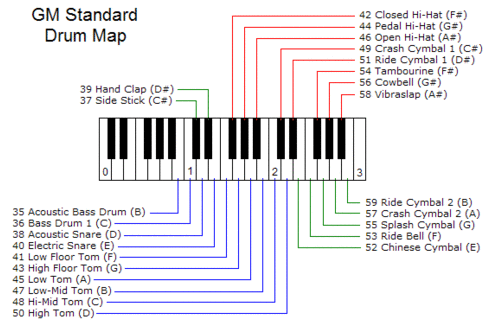
There are several different ways you can build a drum part. For those of us who are control junkies, you can do it like me. I like to build my tracks one measure at a time using my MIDI keyboard (I use a Korg controller). Drum programs (I like to use StormDrum by EastWest) will typically assign each drum in a kit to a specific key on a MIDI keyboard. See Figure 1. I will turn on the metronome in Reaper to keep me on the right tempo, and play, say, the kick (bass) drum part for a measure or two by simply playing the “C” key on my keyboard. Then I’ll do the same for the snare drum part, using the “D” and “E” keys (note: sampled drum programs typically deviate from the GM standard mapping by putting 2 different snare hits, left hand and right hand, on the “D” and “E” keys to allow your to play them like you had a drum stick in each hand. This allows for much more realistic sounding drums). I will repeat the above procedures for high-hat, toms and symbols until I have my song’s drum part composed for the entire song.
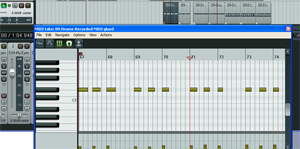
One of the greatest things about MIDI is that you’re not recording audio. You’re recording “on” and “off” messages (along with some additional information like how hard you hit the drum, volume, etc.), so it is super easy to correct the beats if you were a little ahead or behind or hit the wrong drum, when you played them on your keyboard. You just go into Reaper’s MIDI editor (See Figure 2) and drag a bar left or right (for timing) or up/down, which changes the note/drum being struck. By the way, I go into more detail on this in our first article on virtual drumming if you’d like to dig into this a bit more.
So that is one way to do virtual drumming, which is admittedly a bit time-consuming. Here’s another way to it that is definitely faster. There’s a program called Jamstix that has a sort of artificial intelligence. You load the program on a track in Reaper, open it up, and then select a type of drum kit. There are multiple genres, like R&B, Rock, Jazz and Latin), and several different kit-types within each genre. For example, the Rock genre contains such variations as Big Kit, Classic, Deep Loose, Deep Modern, Dry, Fat, Boom, etc. Once the kit is loaded, you can select a preset song like “12-Bar blues,” “808 Hip Hop,” “Metal,” etc. and voila! Just hit “play” in Reaper and the drums will start playing at whatever tempo you have set in Reaper currently. Jamstix use modules (Intro, Verse, Pre-Chorus, Chorus, Bridge, Middle-8, Drum Solo, Silence, Link, Breakdown, and Ending) to build songs. You can build your own songs (especially great for composing) or use the presets by selecting modules and putting them in whatever order you want. Of course you can also customize your songs in detail if you wish. Jamstix is awesome.
There are lots of methods in between loading up preset songs and building your own beat-by-beat. And there are lots of different programs you can use for this. Different drum programs will have different ways to do your virtual drumming.
Here are a few other quite popular drum programs that are known to work well with Reaper:
– Toontrack EZ-Drummer – Virtual Drum Module Plug-In
– Addictive Drums – Complete Drum Production Studio
– FXpansion BFD – Software Instrument for Acoustic Drums
(added on Nov 4th, 2012) – My new favorite drum program – Drum Experience
So there are some ways you can use virtual drumming to put drums onto your recordings without actually possessing a single actual, physical drum. With the quality of recorded drum samples available today, a large percentage of folks listening to your recordings won’t be able to tell that your “drums” aren’t real. This is a great time to have a home recording studio:).
Happy (virtual) drumming!
good recordings on a budget
Acoustic Treatment – A Neccessity Always?
Oh don’t get me started on this topic. OK, I started it…fair enough. Let’s just say this is one of those things that is oft-talked about and rarely done, or at least rarely done “correctly.” I think there is a fair bit of “naked emperor” around this topic, but that’s likely to start a firefight. Let’s just say it (NOT having any acoustic treatment, that is) hasn’t stopped me getting any voice over jobs.
Anyway, here’s an article talking about it that you don’t need a science degree to understand.
http://theproaudiofiles.com/when-acoustic-treatment-doesnt-matter
Home Recording Studio Tips
 We want to be your home recording studio headquarters. I started Home Brew Audio to be a one-stop shop for learning how to record and produce professional audio on your home computer. And I want everyone to understand that they can do this without having to pay lots of money or attend a recording school.
The truth is that in this day and age it’s cheaper and easier than you probably ever imagined.
Find out all you need to know about recording music (like your own demos, CDs) or voice overs (audio books, podcasts, video narration, etc.) or any other kind of audio you can think of, right here in the pages and posts of Home Brew Audio.
We have hundreds of articles available for you to peruse for free. Look over in the side-bar and either search for a key word (top, right of the screen) or use the drop-down menu for post categories half-way down the side-bar.
In addition, we have video tutorial lessons available. The Newbies Guide to Audio Recording Awesomeness video tutorial course ($37), which starts you at a budget of $0 (yep, that’s ZERO dollars) for recording gear. When you’re done with that, move on to The Newbies Guide to Audio Recording Awesomeness 2: Pro Recording With Reaper for $47. Or buy them both together for $67 here.
If you’re not sure you’re ready to buy anything just yet, you can get the first several videos in The Newbies Guide course free of charge. See the banner at the bottom of this post for more on that. You’ll get the first several videos from both modules (Audacity and Reaper software). Plus you’ll get all the latest information we think will be valuable to you in your recording efforts (no filling up your email inbox, in other words:)).
See you around campus!
Cheers,
Ken Theriot
The Key To Pro Audio In a Home Recording Studio
 Lots of people think it is hard, or at least expensive, to get professional sounding audio when recording in a home recording studio. A big part of our mission at Home Brew Audio is to disabuse people of that notion. I’ve been reading a lot of Q&As on the interwebs about how to record good, professional level audio on home computers. People usually ask questions to which there are no simple answers, such as “what is the best microphone to use?”, or “which recording software is the best?” I usually have to preface any answers to questions like that with “it depends on…”
The 2 things I hear most often in what I would scientifically call crappy audio are:
- Distortion, and
- Room noise
- Distortion – This is when something in the “audio chain” (everything between your voice and when the audio gets recorded) is too loud for the hardware. Oddly, this is more often a problem for folks with higher-end gear with more things that can go wrong. The fix: test levels BEFORE you record and make sure you’re not getting that fuzzed-out, unpleasant distorted audio sound. Ideally there should be meters showing you these levels. The key is to stay out of the red.
- Room Noise – This is by far the most common issue, and by far the easiest to fix. If you’re recording at home, you almost certainly have a less than ideal (my way of saying “bad”) sounding room. The fastest and cheapest (and best to my mind, especially if you’re mainly recording voice narration) way to prevent this problem is simply to get close to the mic, as in like 5 inches or less. This allows your voice to be center stage and the echos of your voice that have bounced off the walls to be mostly kicked-to-the-curb. The more distance there is between your lips and the mic, the more the echos take the center stage position and the more echo-y and far-away sounding your voice will sound in the recording. By the way, I encourage you NOT to try to “fix” your room by plastering foam all over your walls. That can do more harm than good if you’re not an acoustician.
So there you have it. This is one more example of our motto, knowledge trumps gear, in action. Basically you can move from bad or amateur-sounding audio to professional sounding audio by turning some knobs or sliding some sliders (avoiding distortion) and/or getting closer to the mic. That’s it! Give these remedies a try before you decide you absolutely need to spend a couple hundred bucks on a new mic or some other gear in order to sound professional.
Good luck!
Ken
Studio Monitor Speakers – Do You Need Them?
 A big question in home recording is whether you need studio monitor speakers, or if you can get by with just headphones. As with so many things, the answer is “it depends.” I know, I know; you want to know what it depends on. Well, I’d say it depends mainly on whether or not you record music or mainly voice overs. Here’s why.
When recording music, you will typically have several tracks of music with different kinds of sounds such as voices, pianos, guitars, drums, bass, and so on. The sound-stage starts to get a bit crowded and the individual sounds start stepping all over each other’s frequencies. I don’t know about you, but I hate it when my frequencies get stomped on. Seriously though, this frequency competition is a big issue in recording and mixing audio. In a perfect world, all you would have to do is turn the volume controls up or down for each track of music in order to hear as much of each instrument as you want to hear. Many people think this is all there is to mixing, hence the name right? WRONG! Silly mortals. In this imperfect world of ours, we are forced to use our stupid lying ears (see the article: Your Ears Are Lying to You – Why Your Song Sounds Great in Your Room, But Not in Your Car for an explanation) in rooms that randomly seem to turn up certain frequencies and turn down others just by their mere size and dimension (see: Getting a Good Mix With Cheap Monitor Speakers). Add to that the fact that monitor speakers themselves can cause some more inaccuracies in the audio. At the end of the day, the more elements (tracks, instruments, etc.) in a mix, the more things can go wrong.
So what is the answer to the original question? Wait, what WAS the question? Oh yeah, should we use monitor speakers in our home studios? I’m going to say “yes” for music recording purposes. When recording music, it seems that listening to music “through the air” (as opposed to in headphones) helps us hear things much more accurately than listening in headphones. Many is the time that I have thought something sounded AWESOME in the headphones, only to want to run and hide when played on loudspeakers. Try it for yourself. In my particular case I can recommend Event Tuned Reference 8s, since those are what I use.
On the other hand, if you are going to stick to voice recording, possibly with the odd bit of pre-recorded program music thrown in, I don’t think monitor speakers are nearly as necessary. In fact, if you lack the space or budget, you can probably do just as well without them. Get yourself some headphones, such as the Sennheiser HD-280s and you should be able to record and produce professional audio with no trouble at all.
So in a nutshell, my advice is to definitely use studio monitor speakers if you plan to record music. But if you plan to limit your recording to voice over productions, you can likely do without speakers as long as you have a pair of decent headphones.
Happy Recording!
Ken