Information is great, and so is doing something right the first time (a stitch in time…). But be careful that you’re not so caught up in reading and learning that you never actually do anything. Your first recording may not be spectacular. It may even be spectacularly terrible. But who cares? Get out whatever recording equipment you have (I’ll bet your phone can record audio/video) and get started. You may find your no-budget recordings are enough motivation to make some small investments in recording gear.
You can read about one home-recording musician’s experience here: http://www.grownupbandgeek.com/tag/home-recording-studio/
good recordings on a budget
Getting The Most For Your Money With Equipment Investments
No longer are we restricted by a huge barrier to entry for audio recording. It’s still possible (and in some cases necessary) to spend thousands upon thousands of dollars on gear, but today you can get started with just a few dedicated purchases. Start with a computer that’s up for the job. Software tends to be designed for the “average” computer, and hardware has made some tremendous leaps recently. The latest-and-greatest laptop might last you quite a while, but it’s far from a necessity. If you’re on a relatively recent version of your operating system, you may even be able to get by without buying a new computer. Add on some software and a quality mic and you’re well on your way to music production.
You can read more about getting started on a budget here: http://www.audio-issues.com/home-recording-studio/recording-equipment-for-less-money
Review of IK Multimedia’s iRig Microphone For iPhone, iPad, and iPod Touch
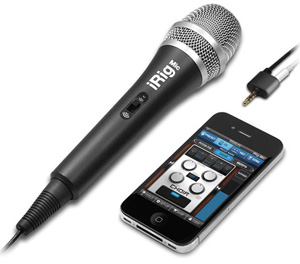
Home recording is our thing at Home Brew Audio. And in that capacity we are making it our mission to spread the word that professional sounding audio is do-able for just about anyone. The technology leaps in the past few years make professional audio recording affordable to pretty much everyone with a computer and microphone. That’s what we’ve been saying. But IK Multimedia is challenging even the need for a computer now! We’re still a bit shell-shocked about their new products for iPhone, iPad, and iPod Touch. These include the iRig Mic, iRig AmpliTube electric guitar/bass adapter, and the iKlip microphone stand adapter for the iPad. Today we’re going to talk about the iRig Mic.
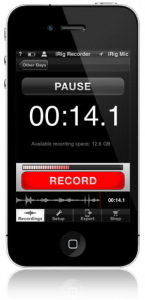
So what is the iRig Mic? It is a condenser microphone that you can plug into your iPhone, iPad or iPod Touch. So you don’t even need a computer to record good quality audio. You can download free apps to you device to use as your recording studio software. You’ll want to get the iRig Recorder Free and VocaLive Free apps immediately. The iRig Recorder is an incredible app that lets you record AND edit or process audio right from your device. The recording format is 16-bit 44.1 kHz uncompressed, another way of saying “CD quality,” which is amazing for a set-up of this size.
The mic has a 3-position (low, medium and high) sensitivity setting switch that allows you some control over the input volume being sent to
your device. You should leave this setting in the middle (medium sensitivity) as a default. If your source audio is too faint, you can move the switch up. Likewise, you’ll want to move it to the low-sensitivity setting if the source audio is very loud. In addition to these settings, the app itself has input and output level settings you can adjust so that your levels are just right. You’ll definitely want to test this before each recording session. Once all that is set up, you simply point the mic at whatever you are recording and tap the large and prominent “RECORD” button on your device. Tap it again when you’re done recording.
The iRig Recorder will then store your recorded file on your device. At this point, you can apply any number of processing effects (available as in-app purchases for just a few bucks apiece) such as volume and tone optimization, compression, EQ, noise reduction and pitch/timing adjustment. Of course, you’re also free to simply export the audio and then edit it on your computer if you have recording software to do that with.
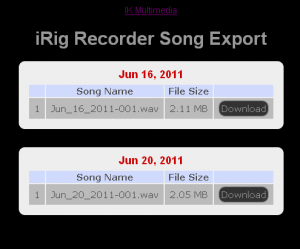
How do you get the audio from your device onto your computer? Get this. You have a choice of posting the audio onto a webiste via Wi-Fi so you can download it, e-mail it to yourself, iTunes file sharing, FTP upload of SoundCloud (the social audio-sharing site). I used the Wi-Fi option for my test of a voice recording. This particular option is available once you grab the Hi-Quality Wav Processor app for $2.00. Then once you tap the Wi-Fi button, you are presented with a web ip address. Simply type that into a browser and you’ll be presented with screen allowing you do play or download (via the right-mouse-click/save link as action) the wav file to your computer. Easy-peasy-lemon-squeezy!
You can then do what you want with your audio, such as import it into a recording program, put a music track beside it, and voila! You have a voice-over ready to go. For my test I did not add any background music since I wanted you to hear it as clearly as possible. Here is the result:
Since I am a voice over actor and frequently hire other voice over actors, I can tell you that the quality of this audio is very competitive with the best results in a typical audition, and is a good deal better than a good percentage of audios in any given audition. But I am a big believer in the proof of the pudding being in the eating, so I’m putting the audio right here for you to listen to. Don’t take it from me. You be the judge.
[jwplayer config=”Custom Audio Player” mediaid=”4023″]
I mentioned another app earlier called VocaLive, which is geared more toward music, as it has several effects and tools specifically for singers. As with the iRig Recorder, many of the VocaLive tools are available as in-app purchases from the iTunes App Store. The free version of VocaLive comes with a reverb effect, along with tools such as a metronome, a vocal “trainer,” and voice cancel, which allows you to sing along with your iPod song library. Here are some of the other available apps:
- Doubler
- De-Esser
- Choir
- PitchFix
- Morph
- Delay
- Chorus
- Compressor
- Parametric EQ
- Envelope Filter
- Phazer
- Four-Track Recorder
Each of these effects is only $2.99! Let me say that again. Each of these effects is only $2.99! What? I know. It’s freakin’ mind-boggling. The Four-Track Recorder, which adds multi-track recording functionality to VocaLive, is a bit more expensive at $4.99. It’s too bad you can’t hear the sarcasm in my voice when I say “expensive.” To put this in perspective, when I bought my first 4-track tape recorder it cost me over $500.00 clams! With that app you can import any song into VocaLive and record yourself singing along with it, add harmony or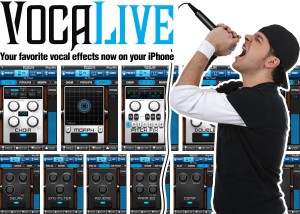 other music tracks, etc.
Okay, so to test the VocaLive out I recorded just a few lines of myself singing. It’s just one voice with no backing tracks and only the reverb app applied. Obviously you have the option to treat your voice with any of the above effects as well. As I said in the iRig Recorder review, I am a big believer in the proof of the pudding being in the eating, so again I’m putting the audio right here for you to listen to. You be the judge.
[jwplayer config=”Custom Audio Player” mediaid=”4026″]
That was just the bare minimum! Not only can you add any of the effects mentioned above, but as with the iRig Recorder, you can export your audio, though in a slightly different way. You have the options of: File Sharing (sends to iTunes), e-mail, and Song (puts a wav version into the VocaLive Player). It exports only in m4a format, which is the iPod format. I did not see an option for a Hi-Quality Wav Processor app as with the iRig Recorder. I simply e-mailed my file to myself. This isn’t a huge problem for most folks, since the audio is the same quality as pretty much everything you hear in iTunes. But you should be aware that “m4a” is a “lossy” audio format like you get with other data-compressed files like aac and mp3. But I defy any but the most trained ears out there to reliably tell the difference between wav and mp3 files in 2011. So for use in the real world, this is hardly much of an issue at all.
Whew! So welcome to the future. IK Multimedia are charting new territory here with the iRig Mic and their other iOS products and apps. If someone had shown this to me 10 years ago I probably would have keeled over from shock. That is how amazing the iRig products are. Will they eliminate the need for a computer if you want to produce professional quality audio on the go or from home? For some people, absolutely yes! For those folks who need 12+ tracks and complex routing or midi applications, or those who need big-screen sound-track or audiophile level production capability, you may want to hang onto your computer rigs, at least for now. But if you’re a song-writer, a voice-over actor, podcaster, audio-blogger or otherwise have simply a basic need to produce professional sounding audio quickly and conveniently, wherever you are, get the iRig as soon as you can.
The iRig Mic sells for a street price of about $47. This basically means that if you have an iPhone, iPad or iPod Touch, you can have multi-track recording studio with a suite of effects and tools for between $47 and about $70, once you add in the price of the other apps you’ll want to download.
To see more details and/or to purchase your own iRig Mic, CLICK HERE.
Find out more about these products here:
iRig Mic: Ikmultimedia.com/irigmic
iRig Recorder: Ikmultimedia.com/irigrecorder
VocaLive: Ikmultimedia.com/vocalive
Cheers!
Ken
ps- The demo song I sang part of for the review is from “The Bluest Eyes in Texas,” by Tim DuBois, Dave Robbins and Van Stephenson.
What Does Compression Mean In Audio Recording?
A very common question I see is “should I use compression in audio recording?” The best answer to this question is, as is so often the case, “Do you need compression in your recordings?”
Let’s start with a workable definition of compression in the audio recording sense. When you lower the volume of only SOME of your audio, usually the bits that are clearly louder than most of the rest of the audio you’re working with, you are “compressing” that audio. You would do this in order to allow you to raise the average loudness of the entire audio file.
How Can I Compress My Audio?
Now, this can be done manually, by which I mean you could open your audio in an editor, seek out all the areas where the wave forms (I like to use the term “blobs” instead) are loudest, then turn those bits down. But that can get REALLY tedious and time consuming. So to automate this process, a machine (nowadays done with software) called a “compressor” was invented. This allowed folks who really knew what they were doing to more quickly manipulate volume and loudness dynamics. The dark side of the situation, though, was that it allowed folks who were less expert to mess up their audio, and do it much faster and more efficiently than ever.
Compressor Settings?
There are all kinds of settings on a compressor that are better discussed in other articles. For a good idea of what those are, see my article and video – Vocal Compression Using Reaper’s ReaComp Effect Plugin.
For the moment I’d like to focus on a visual explanation of basic compression, since I strongly believe that those who use compressors to mess up their audio (usually without actually WANTING to mess up their audio) do it because they don’t have a really good grasp on what compression really is. This should help.
Lets Just Focus on What Compression Is
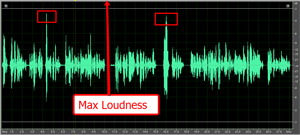
Take a look at figure 1, which is a voice narration file. I’ve boxed off the two loudest peaks.
If I tried to turn up the volume of this audio, all of the audio, including the 2 peaks, would “get bigger.” But there is a problem here. Do you see it? Look at the label in the picture pointing to Max Loudness. If any of the audio wave forms (blobs) get pushed beyond that border line the arrow is pointing to, you get nasty, awful digital distortion. Suffice it to say that the border line represents the upper boundary you must not cross.
Knowing that, it should be easier to see why you can’t turn the loudness up very far before the peaks hit that boundary. And when that happens, none of the rest of the audio can get any louder either. See figure 3 to see what would happen if we told our editor to turn the file up until the loudest bit hit the upper boundary. There wasn’t a lot of change was there?
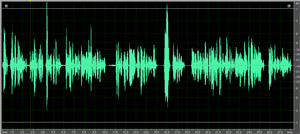
The blobs didn’t get much bigger (louder) did they? Oh no, whatever shall we do?
How about if we turn DOWN the level of JUST those two peaks? Let’s do that. Now take a look at figure 3 to see what our new file looks like. Notice that the
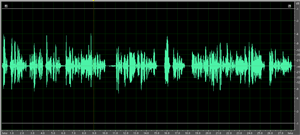
average level of the audio blobs is much more even now? THAT is what compression is for. Now that we don’t have just a couple of pesky peaks preventing us from turning our audio up without it distorting, we can raise the average level much higher, resulting in louder audio across the entire file. If we now tell our editor to raise the level of the loudest peak to maximum loudness (raising the rest of the audio by the same amount), we get figure 4. Compare
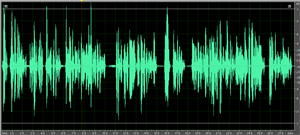
the picture in figure 4 with the one in figure 2. You will notice that blobs in figure 4 are much wider/bigger than the ones in figure 2 across the board.
Being able to increase the overall loudness level of your audio is just one benefit of compression, and perhaps its most common goal. when used wisely, this can also add punch and “up-frontness” to your audio. But don’t forget what compression actually accomplished for us BEFORE we were able to turn it up. It evened out the overall levels first, which gives a more consistent listening level to the user.
How Compression Would Help When Watching TV
I’ve often wished I had an audio compressor attached to my television for this very reason. Have you ever been watching a movie where the action scenes were so loud that you had to turn the volume down on the TV, only to find that now the talking parts are too quiet? Then you have to turn the TV back up to hear those parts. You end up turning the volume up and down throughout the show.
What about when the commercials on TV are much louder than the show itself? Don’t you wish you had a compressor to even out the volume so that it automatically turned the commercials down to the same level as your TV show?
I mentioned earlier that people frequently mess up their audio by over-use or incorrect use of compression. The most common problem is with music.
If you compress it too much, say, in order to make your mix louder than everyone else’s, you risk sucking out the dynamic range of the music. Changes in levels are important to the emotion of music. Over-compressing can flatten things so much that there is no more emotional flow to the music. That can also make it sound unnatural.
Also, compressors tend to impart certain sonic strangeness to audio when over-done, such as increasing sibilance (the sort of hissy sounds you hear when someone uses the letter “S”) in vocals, or audio “pumping” which is when the compressor is rapidly clamping down on loud audio and then letting up on quiet parts over and over.
So Should I or Shouldn’t I?
So back to the original question. “Should I use compression in audio recording?” Now that you understand what compression is, you can answer your own question. Do you want to even out the loudness of your audio? Then compression can help you. Do you want to raise the overall loudness of your audio without distorting? Compression can help you. Do you want to add some punch and ‘in-your-faceness” to a voice over? Compression can help. Just make sure you remember that it is really easy to overdo compression if you’re not careful.
Now go forth and squash your audio responsibly.
Ken
ps – Since this article was written, there have been several more posts that have to do with compression in some way. Since you’re now thinking about compression, you might be interested in learning more about it. See our other articles on compression here:
Using Multi-Band Compression
Home Recording: Singing As Loud As You Want
Compression For Punch and Presence
The Home Recording Musicians Starter Bundle
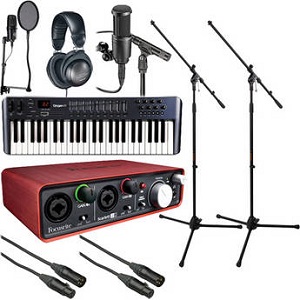
Recently I announced the creation of the Home Recording Starter Kit, which was a bundle of essential recording equipment put together in coordination with B&H Photo-Video-Audio. It is composed of the minimum gear needed at the lowest price to allow anyone to start recording professional audio on their computer. That first bundle – priced at $261.95 – is good for anyone, but especially suited to those doing mostly voice over recording, including video narration, podcasts, etc.
Now I want to tell you about another starter bundle aimed at musicians, also assembled by B&H to my specifications.
These bundles are great because they save you lots of time and money. For instance, the items in the new musicians bundle, if purchased individually, would cost a total of $529.79. And then there is the shipping. But the kit only costs $429.99, you save about a hundred bucks for the gear, and B&H offers free shipping (in the US). How cool is that?
So here is that second bundle, which is more geared (no pun intended) toward musicians – The Focusrite Home Recording Musicians Starter Kit. The primary differences are the addition of an extra microphone for recording acoustic guitar and other instruments, and a MIDI keyboard for playing virtual instruments. Of course there are two mic cables and stands, and the interface accepts two microphones simultaneously. Below are the details:
 The Home Recording Musician’s Starter Bundle ($449.95)
- Focusrite Scarlett 2i2 USB Audio Interface
- Audio-Technica AT2041SP Cardioid Condenser Studio Microphone Package (includes 2 studio condenser mics: the AT2020 for vocals and the AT2021 small-diaphragm condenser for instruments)
- 2 xKopul Studio Elite 4000 Series 3-Pin XLR Male to 3-Pin XLR Female Audio Cable (10′)
- 2 x Auray Tripod-Boom Mic Stand
- Audio-Technica ATH-M20 – Closed-Back Headphone
- Auray Nylon Round Pop Filter with Gooseneck (6.6″)
- M-Audio Oxygen 49 -USB MIDI Controller