 You’ve heard it before. It’s a common effect on lead vocals in pop music and has been for many year. I’m referring to the effect that makes the vocal sound like it’s coming through a telephone line. In fact, when I think of this effect the first song that pops into my head is the song by ELO called, interestingly enough, Telephone Line. Other uses for the effect that are common include making the drums sound like they are being played over a phone line at the beginning of the song and then opening up the sound later in the song to the full thing.
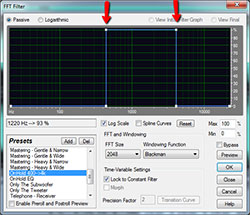 The way this is achieved is by severely limiting the frequencies that are audible on the target track to a very narrow range in the “mids” – between about 400 Hz and 4 KHz. See the picture on the right. You can use an EQ for this, or you can use frequency filters like the one in the picture in Adobe Audition called an FFT filter. FFT stands for Fast Fourier Transform, which you can learn more about here – http://en.wikipedia.org/wiki/Fast_Fourier_transform. In the Adobe Audition FFT filter, the preset is called “OnHold 400–>4K,” the “on-hold” part being a reference to being on the phone.
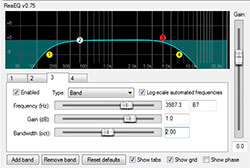 In Reaper, you can just add the ReaEQ equalizer effect that comes with the program, and change bands 1 and 4 to high-pass and low-pass, respectively, in the Type drop-down menu. Then drag the band circles until #2 is at 400 Hz and #3 is at 4KHz. Easy-peesy-lemon-squeezy!
BTW,in yet another attempt to confuse you the term high-pass filter actually means that you are preventing the low frequencies (those to the left of the target frequency) from being heard and only allowing the frequencies that are higher than that to “pass” through the filter. So you’ll usually find a high-pass-filter set up in the low frequencies (in the Reaper pic, band #1 is a high-pass filter, but it is located on the left of the spectrum – the low part). And the opposite is true for a low-pass filter. So in reality you could call a high-pass filter a “low-cut filter” and a low-pass filter a “high-cut” filter. I always have to do a mental translation in my head anyway. Sheesh. But there you have it.
Now you know how to create that phone effect in your recordings.
By the way, if you want to learn more about Reaper recording software, check out our latest recording tutorial course The Newbies Guide To Audio Recording Awesomeness 2: Pro Recording With Reaper.
frequency
What To Do About Muffled Vocals – Improve Voice Clarity
 When a vocal recording sounds muffled, like the singer/speaker has a box over his/her head, that’s usually NOT what we want. So what do we do about muffled vocals? In other words, how do we improve voice clarity?
If we can prevent the sound of muffled vocals to begin with, that would be ideal. You can get that vocal clarity by making sure you record with a decent microphone in a decent space.
For example, one thing you should NOT do is record in a closet. People often use closets as make-shift vocal booths, but unless you really know what you’re doing, you’ll just end up making your voice sound “boxy” and muffled.
Use the right microphone?
This can be caused by a number of different things, such as not using the correct mic for the singer (yes, some mics that sound awesome on one person may not sound good on someone else).
Generally speaking, the best kind of microphone for recording clear sounding vocals is a large-diaphragm condenser microphone. One good example of an excellent large diaphragm condenser mic is an Audio-Technica AT2035. You can find my review of that mic here: Review of the Audio-Technica AT2035 Microphone.
The wrong mic
Sometimes, you get a muffled vocal sound by using a common live-performance mic like a Shure SM58. That is a great mic for live stuff, but usually not so great for recording.
Don’t record with effects
Do not apply effects while you are recording! Some people you plug the mic into a “channel strip” or other piece of hardware to apply effects (EQ, reverb, tube emulation, mic modeling, to name a few). Don’t do this, or you will be stuck with those effects in the recording. If you find that one or more of these recorded effects is causing the voice to sound muffled, then there isn’t much you can do.
If you want to apply effects to your vocals, do it AFTER you have the clean voice recorded so you can adjust after the fact.
What to do if the vocal is already recorded?
How can you improve vocal clarity in a vocal recording? When recorded vocals sound muffled, it’s usually because there is too much energy in the lower frequencies. For a really good quick lesson on what a frequency is, see our post: Good Equalization and Frequency Basics.
You can use a tool called EQ (short for equalization) to clean things up. Before we talk about how to do that though, take a look at the video below from the article I mentioned above:
Using EQ to improve voice clarity
Now that you know what I mean when I talk about frequencies, you’ll understand when I say that muffled vocals usually have too much bass and/or low-mid frequencies. So with an EQ effect (in Reaper, I just put the built-in ReaEQ onto the voice track), start by filtering out frequencies below 80Hz. You might even try 100Hz.
Next, reduce (turn down) frequencies in the range between 140Hz and 400Hz. Turn that down by about 3-5 dB to start. That should do the trick.
I don’t normally recommend adding (turning up the volume) energy anywhere on the EQ to fix a problem since that can cause more problems than it fixes. Reducing is regarded as being much more effective and usually does the trick. But if those reductions don’t get you the clarity you want, CAREFULLY experiment with increasing some of the higher frequencies.
Try a small boost (start with 3dB) those in the 1-3 KHz area first. Humans are particularly sensitive to sound in this frequency range, so a small bump can help clear up a voice.
Another range to try boosting is the 9-10 KHz area. This can add a bit of sparkle or air to a voice.
Let’s review
If your vocals sound muffled in your recordings, you can fix this by:
- Preventing the muffled sound by recording without effects, in an open space (i.e. NOT a closet) with a good microphone, and
- If the voice is already recorded, apply some EQ to the vocal track. Just reducing the low and low-mid frequencies should do the trick. But if not, try boosting just a touch in a few of the higher frequencies.
Good Equalization and Frequency Basics
 Equalization, or EQ for short, is a fundamental concept in audio recording, live sound, or simply listening to audio. For a primer on what it is, see our article What is Equalization, Usually Called EQ? In order to best understand EQ, it is important that you understand frequencies. Sound is made up of sound waves which are created by air molecules vibrating – moving back and forth.
The Absolute Basics
A frequency is how fast those air molecules are vibrating, which is measured by how many times they move back and forth, in one second. If the air molecules move back and then forth one time in one second, it has made one cycle, and it took one second to do it. So that particular example has a frequency of one cycle-per-second.
A long time ago, someone decided that a cycle-per-second would be called a Hertz after Heinrich Hertz, the guy who proved the existence of electromagnetic waves. So in our example of air molecules moving back and forth one time per second, its frequency would be one Hertz. And since Hertz is abbreviated as Hz, we say the frequency of that wave is 1Hz.
This Video Will Help Explain Hz and Frequency Stuff
When air molecules vibrate they make noise. Humans can’t hear that sound though until the frequency gets up to at least 20 cycles per second – 20Hz. And we (people) can continue to hear these vibrations as fast as 20,000 cycles per second, at least theoretically. 1,000 Hz is usually abbreviated as 1KHz. So the range of human hearing is described as 20Hz-to-20Khz.
An equalizer (EQ) is basically a whole bunch of volume knobs, each targeting a specific frequency. Since certain types of sounds exist at certain predictable frequencies (for example, a human voice is strongest at about 3KHz), we can use an EQ to boost or turn down the volume of just the frequencies we want. I so wish I’d known about this when I was in a rock band and our PA was always feeding back. The only thing we knew to do was turn everything down with the master volume control until it stopped. If I’d known that the horrible feedback squeal only occurs at very narrow frequencies, we could have used an EQ to ONLY turn down the frequencies where the feedback was happening and left everything else as loud as we wanted – which, for a bunch of guys in a rock band was pretty loud:).
Here is an article about equalizers and frequency that is subtitled The More You Know, The Better It Sounds. The article goes into a lot of detail and technial specs of what EQ is and how you can use equalizers to fix problems and improve audio. If you want a deep dive into this topic, you can check it out here: http://www.dak.com/reviews/tutorial_frequencies.cf
Getting a Music Mix To Sound Good No Matter Where It's Played
A very common and serious problem for people recording and mixing music in home studios is that the recordings don’t sound the same on the big CD player/entertainment center as they do on iPod earphones, and different again in the car. This can be really frustrating when it sounded so great in the room where you mixed the music. I wrote an article about why this so often happens called Your Ears Are Lying to You – Why Your Song Sounds Great in Your Room, But Not in Your Car.
The big culprit is almost always a less-than-ideal acoustic situation in the mixing room. First, these rooms are usually coverted bedrooms, which are notoriously bad, acoustically. Their boxy shapes with flat and parallel walls create lots of havoc with sound waves, adding energy at some frequencies and removing energy from others. So if you add and subtract volume with EQ, it may sound great in that room, but terrible somewhere else. That’s because the EQ was compensating for the bad acoustics in the room.
Another problem for the home recordist is that monitor speakers are usually not that great either. Some folks don’t bother with them at all, mixing instead on headphones. Bad idea! Mixing and mastering in headphones is universally frowned upon because music sounds much different through the air than in headphones and again, you get a non-portable mix – one that won’t sound the same on different systems. Likewise using your computer speakers is not a good idea because if they are “good” speakers, they’ll have been designed to complement the sound, meaning they make the things sound better than they really are. If they are average computer speakers, they’ll simply be incapable of accurately reproducing accurate sound across the spectrum. So you need to invest in a decent pair of monitor speakers.
Lastly, a lack of knowledge about frequencies can create a poor mix. If you have taken care of the stuff above – treated the mixing room or designed an ideal space, and gotten good monitor speakers – most things will take care of themselves and you don’t need to be an expert in all the frequency and sound-y science. However, if you don’t or can’t have that awesome mixing space, having at least a rudimentary knowledge of that stuff, AND being very aware how the bad space can and will affect your mix, you can take measures to counteract the problems. In my case, I will make a mix and then take it downstairs with a notepad and write a lot of stuff down when listening on the “big” system. Then I’ll take the mix into the car and drive around doing the same thing. Though you should pull over when writing your notes:). Finally I take all the notes back to the mixing room and make corrections. Then I do the process all over again. Yes this takes longer, but it’s worth it, especially if you can’t afford to acoustically treat your room or buy good speakers.
Here is an article with several tips for treating and buying speakers and for mixing to create a portable mix.
http://www.loopblog.net/tutorials/music-production/studio-techniques/mixing-a-track-tips-getting-your-mix-to-translate-well/
Mythbusters Test The Haunted Hum On The Halloween Episode
 The Mythbusters (Discovery Channel TV show) entered the world of audio during their Halloween special by testing the haunted hum or fear frequency. It is often said, as in a famous UK experiment that infrasonic audio – that is audio below the frequency of 20 Hz – can make people feel odd, anxious, uneasy, nervous or frightened if they don’t perceive the sound consciously. In fact infrasonic sound is thought by some to be the basis for people supposedly experiencing supernatural or ghostly events.
So what better urban myth to test on Halloween than this for the Mythbusters? And so in a segment called The Haunted Hum, Jamie and Adam went out to a remote location where there were four empty cabins with nearly identical layouts. They set up nine huge sub-woofer type, stadium concert-sized speakers (Meyer Sound 1100-LFCs) underneath one of them and turned them up to just below the volume where they were causing things to rattle. And since the range of human hearing bottoms out at 20 Hz, the sound would not be heard.
Then they enlisted 10 volunteers to spend time in each of the cabins and report whether they felt different in any of them. I don’t want to spoil the surprise in case you have not seen the episode (you can see the Aftershow for it on the Mythbusters site to get the answer), but Jamie did report feeling a bit anxious, like he had had too much caffeine.
Watch for the episode on the Discovery Channel.