Ever heard the phrase “Cut, don’t boost!” and ever wondered is it true? Do you want to know when to cut or when to boost when sculpting your EQ? Well, this article is just for you.
But first – in case you don’t know what I’m talking about (cut what? boost what?), check out my post and video explaining what EQ and frequencies are – What is Equalization, Usually Called EQ?
Understand that equalization is one of your most powerful tools, whether you’re mixing music or recording voiceovers.
You can transform a bad sounding instrument or voice, and potentially turn those poor recordings into beautiful masterpieces. But they only have two functions as sophisticated as it sounds you need to understand these. Adding and reducing the number of set frequencies.
Boosting is the act of adding volume (energy) to frequencies, while cutting is the act of reducing them. Here’s an article from Waves.com about that – Read more here: https://www.waves.com/eq-tips-boost-or-cut-the-frequencies
frequency
A Cool And Easy Way To Learn About Frequency And EQ
 Equalization – or “EQ” for short – is an extremely useful audio editing tool. In a way it’s sort of like Photoshop-for-audio. But instead of colors and brightness, etc. EQ adjusts frequency. I know! Just stay with me:).
It helps a lot to understand at least a little about what we mean by “frequency” so that you’ll have a better idea of what is happening when you use the controls on an EQ or EQ plugin. The concepts are actually pretty easy to understand. But the terminology typically used to explain them are often very “techie” sounding and confusing.
In our beginner course – The Newbies Guide To Audio Recording Awesomeness 1: The Free Recording Studio – I devoted one lesson to simply explaining frequency in a way that anybody can understand it. You can see that video below:
So What Is The “Cool And Easy” Way to Learn This Stuff?
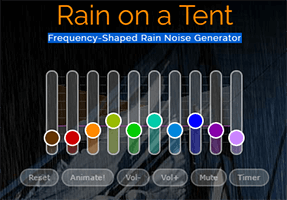
Okay, So my wife found this site called myNoisetm.net that plays background noise that is designed to help you relax, focus, sleep better, etc. But rather than just a single volume control for white noise (or whatever kind of sounds on offer on other such sites), myNoise offers something called “custom-shaped” noise machines. And by “custom-shaped,” they mean you get to control several different frequencies to tailor the sound.
If you watched the above video, you’ll have an idea what I mean when I talk about segments of the frequency spectrum using terms like “lows” or “bass,” “mids” and “highs.” Well myNoise.net lets you control (with what is basically a “graphic EQ” control) 10 such segments of the frequency spectrum for each of its noises as follows:
- Sub-bass: This is the really really low frequencies (approximately 30-40 Hz) that we almost feel more than we hear – like on a dance floor at a night club, say.
- Low bass (around 60 Hz)
- Bass (around 125 Hz)
- High bass (around 250 Hz)
- Low mids (around 500 Hz)
- Mids (around 1,000 Hz or 1KHz)
- High mids (around 2 KHz)
- Low treble (or low highs – around 4 KHz)
- Treble (highs – around 8 Khz, sometimes just referred to as “presence” range)
- High treble (high highs – around 10KHz and higher, sometimes called the “brilliance” range)
Usually the tone controls on your car’s audio system only lets you control JUST the high/treble and the low/bass – just 2 frequency controls. With 10, not only can you start to really understand what those frequency bands/segments, sound like. Ironically, hearing how one of the noises on the myNoise site respond to boosting or lowering any of those 10 frequency controls will allow you to better understand how those same frequencies apply to your music or voice. And that helps to really learn what a “low mid” or a “bass,” etc. frequency sounds like in general.
Other Awesome Stuff You Can Do
myNoise.net is incredible because not only can you use it as a fun way to learn about EQ and frequencies, they offer tons of different Noise Generators from Rain on a Tent, Ocean Waves and Cat Purr to atmospheres like Church and Nocturnal Garden. And each noise has icons next to it telling you what that particular sound is good for, such as “meditation,” “noise blocker,” and “sound therapy.”
So while you are learning about audio, you are also able to use the power of audio to improve your day:). Oh, and the best part? It’s free! And they have a free iOS app. They say Android is on the way. Though they do offer an incredible, potentially life changing tool for you, they also have a way for you to donate via PayPal, Stripe or bitcoin. This would help them keep the site running and growing without ads or paid subscriptions. Plus they offer some extra deals for donating visitors.
So go check them out at myNoisetm.net immediately. And set some time aside because you’ll almost certainly want to stay and play around for awhile.
Cheers!
Ken

EQ Tip For Creating A Wider Stereo Sound
 EQ (equalization) is an incredibly useful tool when mixing music. For the main reasons why, see my article (and video) What is Equalization, Usually Called EQ? You can do so many things with EQ, which is probably the most underutilized audio editing tool there is – at least in the mixing realm.
Here is a cool tip for enhancing the stereo imaging – making things sound even wider and larger in your mix – from The Disc Makers Blog: http://blog.discmakers.com/2016/04/complimentary-eq-home-studio-audio-mix/
And here is the video to accompany the above article:
What is Equalization, Usually Called EQ?
 EQ…That Thing You Never Knew Quite How To Use
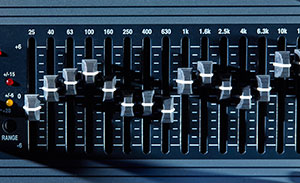
Have you ever seen one of these things? They used to be common in “entertainment systems.” Right along with your CD Player, Cassette Player, Record Player, amplifier, and “tuner” (meaning…”radio”), would be this other big boxy thing with nothing but a row like 30 vertical (meaning “uppy-downy”) slider controls across the face of it.
These sliders had little square button-like thingies that you could slide up or down. They usually started out in the middle (at the “zero” mark). About the only thing they seemed good for is making funny patterns, like smiley faces, or mountain ranges, by moving the sliders up or down in the right way. Besides maybe making you feel better by having your stereo “smile” at you, I really don’t think anybody ever knew what to do with one of these things.
But it sounds scary
With a scary name like “graphic equalizer,” it sounded so important. It also sounded like a good name for a “rated-R” action movie, but that’s another story. Anyway, you had to make everyone think you knew why you had one, so you pretended to know what it did. But in reality, you felt safer just leaving it alone to sit there with its straight row of slider buttons right down the center, the way it was the day you brought it home because it came with all the other stuff.
You are probably familiar with some kinds of EQ without realizing it. You know those controls on your music player labeled “bass” and “treble”?” That’s a crude EQ! If your graphic EQ box had only 2 little sliders on it, it would be the same thing. One control makes the sound “bassier” (the low sounds) and the other makes the sound “treblier” (the high sounds).
I always laugh when I see someone turn both controls all the way up or down. They have accomplished absolutely nothing that the volume knob wouldn’t do. If both (all) the sliders are up, you just turned the radio up. Congratulations. An EQ is only useful if you can make shapes OTHER than straight lines with the sliders.
So now you’re wondering what the heck an EQ IS good for aren’t you? Well for one thing, it turns out that our ears lie to us! Can you believe it? I know! It’s crazy, right? Every human has lying ears. I was floored when I first heard.
It turns out that there are all kinds of sounds out there in the world that we can’t hear! As a matter of fact, MOST sounds are inaudible to humans. The only sounds humans CAN hear are those in the range between 20 hertz (abbreviated as “Hz”) and 20,000 Hz. A “hertz” is a measure of how often (or “frequently”) something shakes back and forth (or “vibrates”) in one second. See the video below.
Sound is just energy that makes air particles shake back-and-forth. When these air particles vibrate with a frequency of between 20 times and 20-thousand times per second, it makes a sound that is in the “range of human hearing.” Though if you’re 21 or older, good luck hearing things above 16,000 Hz;) (where the so called “teen buzz” or “mosquito frequency” lives. Confused? Ask a teenager.
Some Particular Sounds Are On the Same Predictable Place On The Frequency Spectrum
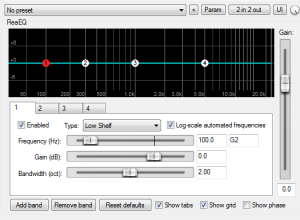
In the frequency spectrum between 20-20 thousand Hz (usually abbreviated as “KHz”), some amazing things happen.
One interesting example is that a baby’s cry is at perhaps the most annoying frequency there is, around 3KHz. I say “annoying” because humans are MOST sensitive to sounds at that frequency.
This may be a survival thing for us. But since we don’t usually have a “crying baby” solo in our audio recordings, why is this helpful?
What that means is that everything we can hear vibrates around certain predictable frequencies. And knowing that gives us some pretty cool superpowers.
For example, I know just where to find the signal of a bass guitar on the spectrum. It’ll be down around the low frequencies of 80-100 Hz. So will the kick drum. The electric guitar will usually be in the mid-range between 500Hz and 1KHz in the upper mid-range along with keyboards, violas and acoustic guitars and human voices. Clarinets, violins, and harmonica’s tend to hang out mainly in the upper-mid range around 2-5 KHz, and things like cymbals, castanets, and tambourines like to be in the “highs’ up around the 6 KHz.
Just ignore the fact that, in a range that tops out at 20KHz, we call things at 7 or 8 KHz “highs.” It’s because the spectrum is exponential, and not linear. If that makes your brain hurt just ignore it. It’s sometimes better that way.
Now that we know where specific things live in the range of hearing, we can adjust volumes at JUST those frequencies without affecting the rest of the audio.
Knowledge of this “range of human hearing,” and how to use (or NOT use) an EQ will come in handy more often than almost any knowledge. Once we know where to quickly find where a sound is on the EQ spectrum, we can surgically enhance, remove, or otherwise shape sounds at JUST their own frequencies, without affecting other sounds at other frequencies.
But how in the world can we adjust volume in just one narrow frequency, say 100 Hz, without also changing the volume at all the frequencies? Hmm, wasn’t there some discussion about a thing called an “EQ” that had a whole bunch of sliders on it? Could it be that those sliders were located as specific frequencies, and could turn the volume up or down just at those frequencies without affecting the rest of the sound? Why, yes. It could be. Now you know.
This video is an excerpt from The Newbies Guide To Audio Recording Awesomeness 1: The Basics With Audacity, and should really help you understand all this stuff better. It breaks things down to the simplest basics – and might even make you laugh a little:-).
Mixing With EQ Instead of Volume Controls
Once you know where the frequencies of certain instruments are likely to live, you can use an EQ to prevent these sounds from stepping all over each other in a mix and sounding like a jumbled mess, with bass guitar covering the sound of a kick-drum, or the keyboard drowning out the guitar. “But you wouldn’t need to use an EQ to do this if you use a ‘multi-track’ recorder, right?” That’s what recording engineers and producers usually use to record bands, and other musical acts, so each instrument and voice is recorded onto their very own “track.” Since every different sound has their own volume control, it seems obvious what to do if something is too loud or quiet, right? ‘Don’t you just simply use a mixer to turn the “too loud” track down, and vice versa. I mean, isn’t that what “mixing” means?’ That’s what I used to think too. The answer is… “only sometimes.” For example, even after spending hours mixing a song one day, I simply could NOT hear the harmonies over the other instruments unless I turned them up so loud that they sounded way out-of-balance with the lead vocal. It was like a bad arcade game. There was simply no volume I could find for the harmonies that was “right.” It was either lost in the crowd of other sounds, or it was too loud in the mix.
Then I learned about the best use of EQ, which is to “shape” different sounds so that they don’t live in the same, over-crowded small car. Let’s say you have one really, really fat guy and one skinny guy trying to fit into the back seat of a Volkswagen Bug. There is only enough room for 2 average-sized people, and the fat guy takes up the space of both of those average people already. Somebody is going to be sitting on TOP of someone else! If the fat guy is sitting on the skinny guy, Jack Spratt disappears almost completely. If Jack sits on top of Fat Albert, he will be shoved into the ceiling, have no way to put a seatbelt on, it’s just all kinds of ugly no matter which way you shove ’em in.
But if I had a “People Equalizer” (PE?), I could use it to “shape” Albert’s girth, scooping away fat until he fit nicely into one side of the seat, making plenty of room for Jack. Then if I wanted to, I could shape Jack a bit in the other direction, maybe some padding to his bony arse so he could more comfortably sit in his seat. Jack just played the role of the “harmonies” from my earlier mixing disaster. Albert was the acoustic guitar. Just trying to “mix” the track volumes in my song was like moving Jack and Albert around in the back seat. There was no right answer. But knowing that skinny guys who sing harmony usually take up space primarily between 500 and 3,000 Hz, while fat guitar players can take up a huge space between 100 and 5,000 hertz, I can afford to slim the guitar down by scooping some of it out between, say, 1-2KHz, and then push the harmonies through that hole I just made by boosting its EQ in the same spot (1-2 KHz). Nobody would be able to tell that there was any piece of the guitar sound missing because there was so much of it left over that it could still be heard just fine. But now, so can the harmonies…because we gave them their own space! And we did all this without even touching the volume controls on the mixer. So it turns out the EQ does have it’s uses!
Cheers!
Ken
Filter The Mourning Dove Hoot Out Of The Voiceover Recording
 I was working on a long voiceover recording job last week. After it was all recorded, I began the long process of editing it for the client. That involved not only optimizing the volume and minimizing the noise, but also creating 27 separate files. Things were progressing nicely, but then I heard an odd sound behind the voice at one point. You can probably guess by the title of the post what that sound was. Sigh.
Keep in mind that most voiceover jobs do not involve multitrack recording. That is to say, there is only one single track of audio being recorded. So if you hear a bird’s hoot AND your voice together on the recording, you can’t just “delete” the bird sound. In multitrack recording – such as you would use for most music recording – you purposely put different sounds on their own tracks so you can adjust the volume of each sound until it all mixes together nicely. THEN you render (mix down) the result to a single file. But I did not have the luxury of simply turning down the bird hoot. How in the world do I get rid of it?
OK, sure. I could just re-record that part when the bird is NOT outside my window. But that smacks of effort. I like to do things the easy way if I can. Yes, you may substitute the word “lazy” into that last sentence:-P. Anyway, there are some audio editing tools that you can use to reduce (or even eliminate) one type of sound, while leaving the desired audio alone. One of the best of these tools is EQ (short for “equalization”).
If the undesired audio has a much different frequency than the desired audio, then EQ can help filter out what you don’t want to hear. Sadly, this is not always the case. Sometimes, in order to remove one sound, you end up removing some or most of the sound you want to keep. But in this case, I was in luck.
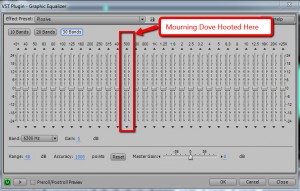
One other piece of good fortune was that a small amount of the dove noise was sounding during a section when the voice was not talking. It wasn’t enough to sample into a noise-reduction effect (unfortunately – because that is another good way to filter out the bad while leaving the good). So I highlighted the small bit of audio that had ONLY the mourning dove hoot in it. Then I opened the Graphic Equalizer tool in Adobe Audition (I still use version 3, but Audition is also part of Adobe CC – Adobe Audition CC [Digital Membership]
Awesome. Now that I knew that this particular mourning dove hooted at 500 Hz, I went back to the audio with both the voice AND the bird hooting in it, and highlighted that section. Then I just opened the Graphic Equalizer and started moving the slider at 500 Hz down, which turns down the volume at just that frequency. Now voices also produce sound at 500 Hz, so it I turned things down too much, the voice would also be affected. But in this case, by the time I moved the slider down enough to get rid of the dove, the voice still sounded fine. It probably helped that it was a female voice.
And the bird was gone! the entire process took about 60 seconds, which is a lot less time than it would have taken me to re-record the voice.
So the next time you have a bird outside your window threatening to ruin your recording session, remember this method. It might save you time and money. Of course, you could always build you own vocal isolation booth to record in. But that’s another topic altogether.