 Anyone doing a video project knows that audio can either make or break their projects. That’s why understanding the processes involved in audio post-production is super important. Avoid getting confused in the many stages of production by learning these step by step processes, understanding what happens in each step and finding the work flow that best suits you.
Take a deeper look at each step having evolved through the years ensuring the quality of audio for movie and video productions. Whether working with a big team or doing small scale projects these steps will bring efficiency to your workplace.
Check out our own post (with video) – How To Get Good Audio On Your Videos – about how to make the narration on a talking-head (or any kind, really) video sound MUCH better than about 90 percent of videos out there.
Read more about this in the Audiotuts article here: http://photography.tutsplus.com/tutorials/understanding-the-phases-of-audio-post-production-for-video–cms-26688
audio for video
Sennheiser MKH 416 Shotgun Microphone Review
We normally think of shotgun mics as “movie mics” – the things that sound crew folks hang over people’s heads with those long boom poles when shooting video. and though they are awesome for that job, did you know they were also highly prized as voice-over mics? Either way, I want one:). My Star Rating –
[This review of the Sennheiser 416 shotgun mic originally appeared here in 2013. But I thought I would update it a bit in the wake of all the microphone reviews I’ve been doing in 2019. I still want one of these, BTW:). But I ended up buying an Electro-Voice RE20 (another one I was reviewing for B&H) for my voiceover purposes until then.]
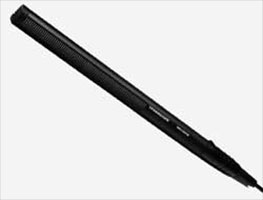
I had the privilege of testing out the Sennheiser MKH 416 microphone recently. What can I say? This mic has been described as the desert island mic by many. It’s so well known and well-liked that it goes by other nicknames too, like “The L.A. Mic” and “The Movie Mic.” Around the internet you see words like gold, the one, amazing, industry standard, and staple crop up over and over again.
So what is this thing that makes it so great?
Well you’ve probably heard audio through it before if you’ve ever watched a movie – or television. It is a standard in the film and TV industries, often used outdoors for news casts and interviews as well as location shoots. It is also used a lot in the voice-over world because not only does it make voices sound awesome, but it helps them cut through background sound effects and music. Many a movie trailer has been recorded with a 416. The next time you hear “In a world where……” etc, chances are that was recorded with a 416.
Also in this review I tested the Rycote Softie Windshield on the Sennheiser for an outdoor video test on a windy day.
So, enough of the gushing – gimme details. Yes, I heard you. OK, here is the skinny.
The Sennheiser MKH 416 is a short shotgun mic. That means that it is ultra-directional, picking up audio that is in front of it really well at longer distances than a standard condenser mic. We’ve heard of the cardioid pickup pattern. This mic has a hypercardioid pattern, which rejects sound coming from behind it in about a 120-degree field. The 416 is also different from regular condensers in that it uses something called RF biasing rather than the more common DC-biasing. You can read the technical details of this in this article, but RF (radio frequency, btw) biasing has some benefits, such as that the mic becomes less sensitive to moisture ( a good thing in an expensive mic commonly used outdoors), has a wider frequency response, and is extremely low noise levels.
Other features?
Other awesome features of the 416 make it nearly indestructible (not that I put that to the test with the review mic:)), less sensitive to plosives (p-pops), and less sensitive to the proximity effect, which is that thing where the low bass frequencies get more hyped the closer the mic gets to the source. Voice-over folks may think, “hey I like it when my voice sounds deeper when I get close to the mic.” My answer to that is that with this mic, you don’t need to rely on the proximity effect because the 416 picks up the lows of a human voice incredibly well already.
Use as a VoiceOver Mic
The 416 is fast becoming one of the most popular microphones in the voiceover industry, which has traditionally been dominated by large diaphragm condenser mics (LDC). I’ve already mentioned one of the reasons for that – you can spend less time worrying about p-pops, though in my testing, I still needed a pop-filter for the plosives. Another reason that the 416 can be a little further away from your mouth without picking up room sound noise. Plus it is lighter and much skinnier than your typical LDC. Both of those things can help when you’re reading a script while recording. But ultimately the real reason this mic is terrific as a voice mic is that it simply sounds incredible.
Shotgun Shootout
I compared the Sennheiser MKH 416 against my mainstay, the Rode NT2-A large diaphragm condenser, recording a short bit of voice-over copy. I was really impressed with how much better the Sennheiser sounded than the Rode – and THAT has never happened to me. Sure, I’ve never tested a $999 mic against my $399 Rode, but to date I have never recorded another mic that sounded better than my beloved Rode. There is a first time for everything. The Sennheiser made my voice sound rich, detailed, deep and punchy all in one aural experience of awesome. I now know why people call it the desert island mic.
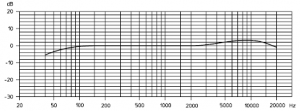
Be careful of the 5 dB bump starting at 4Khz
I did notice in the first test that the 416 produced a little more sibilance (the high hissy “ssssss” frequencies) than I normally like. Then I remembered that I have a bit of EQ permanently set on my preamp to reduce the lows and increase the highs. I did that because the Rode sounded a bit heavy in the low end without it. So I bypassed the EQ on the preamp and that took care of the sibilance issue with the 416. I did notice in the pamphlet that comes with the 416 that it is designed with a 5 dB “bump” in the high frequencies starting around 4 KHz. See the frequency response graph on the right.
Below are the two audio samples, first with the Rode, then with the Sennheiser.
VoiceOver On the Rode NT2-A
RodeNT2-A Sample
VoiceOver On the Sennheiser MKH 416
Sennheiser MKH416 Sample
Outside Test In The Wind
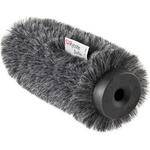
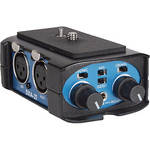
As I stated above, the 416’s most common use is in the film, TV and electronic news gathering (ENG) fields. I recorded a few different videos, one with just the built-in mic of my Canon Vixia HD Camcorder, and then three different shots with the 416 hooked up to the camera (one of the reasons I went with the Canon Vixia is that it has an external mic input) using a BeachTek DXA-2T Camcorder XLR Mic Adapter (see our review of the DXA here). First was the video with the 416 naked, without a windshield of any kind. Next I put on the foam windshield that comes with the mic. Then I thought I’d test a 3rd-party windshield (the fuzzy “dead-cat” kind) called the Rycote Softie Windshield (standard 19-22 mm hole size).
Results in the wind
The first result was that The shotgun was on a mic stand right next to the camera in this test, so the audio in all video clips below was recorded on mics that were the same distance away from my noggin.
The audio would have been truly awesome if we had a 3rd person holding the mic on the end of a boom pole (sometimes called a fish pole) mic holder with the mic just above my head and out-of-frame, pointing down at my mouth. I’ll do that test another day.
Now for the test against the wind. In video 1 (just the camcorder mic), you’ll notice the wind is extremely loud and the voice audio is thin and distant. In video 2, using the shotgun mic instead of just the on-board camera mic, the audio quality of the voice was MUCH better. But because there was no windshield of any kind, the wind was still pretty loud. For video 3 using the foam windshield that came with the mic, the wind noise was noticeably less of a problem. For final video we used the Rycote Softie Windshield. And though there was a pretty significant breeze, it was amazingly quiet.
Only the built-in camcorder mic (not shotgun mic attached)
With Sennheiser 416 shotgun mic attached, but without a windshield
Sennheiser attached with included foam wind shield attached
Sennheiser attached with Rycote Softie Windshield attached
Summary
![]() The Sennheiser MKH 416 shotgun mic is – how shall I put this – officially freaking awesome! Sadly, I have to return mine since it was on loan from B&H Photo-Video-Audio. Otherwise it would be my primary mic for all my voice-over and video work. It does cost $999, and as soon as the piggy bank gets heavy enough, to quote Mike Meyers, “it will be mine – oh yes – it will be mine.” Also the Rycote Softie Windshield worked magic at reducing wind noise for outdoor video use.
The Sennheiser MKH 416 shotgun mic is – how shall I put this – officially freaking awesome! Sadly, I have to return mine since it was on loan from B&H Photo-Video-Audio. Otherwise it would be my primary mic for all my voice-over and video work. It does cost $999, and as soon as the piggy bank gets heavy enough, to quote Mike Meyers, “it will be mine – oh yes – it will be mine.” Also the Rycote Softie Windshield worked magic at reducing wind noise for outdoor video use.
As long as I am quoting my favorite movies, here’s one from Ferris Beuller applied to the 416. “if you have the means, I highly recommend picking one up.“
[Update: B&H has “hands-on review” of this wonderful mic. Check that out here.]
Cheers!
Ken
How To Finish Long Voice-Over Jobs Faster
 Here’s a tip to help you record and finish long voice over jobs more efficiently (which translates to much faster). If you are lucky enough to have gotten a fairly long voice-over job, such as an audio book, documentary narration, etc., then you know that there will be little mess-ups along the way that need to be fixed at some point. There are a few ways to deal with that.
Ways to Deal With Mistakes
- The best and fastest way to produce an error-free voice track is to never make a mistake. Shya! Good luck with that. I will grant that there are freaks of nature who can do it perfect every time. But most of us need at least SOME do-overs, whether it’s because we mis-read something, stumbled over pronunciation, or just felt like the emphasis or “feel” of something was off some how.
- Stop recording to delete every mistake and re-read the part each and every time it happens. Yeah, that’s an option. But if you do it this way, you’re going to be working on that job for a very long time.
- Never stop recording. When you make a mistake simply wait a second then go back and re-read the part and continue.
Which One Is Best?
Well, as I stated above, option 1 is the best if you can manage it. But for mere mortals, option 3 is the way to go. You simply continue recording until you’re done, leaving all the mistakes in to be deleted after the fact. I realize that the quality gurus out there are going to complain that fixing an error as soon as possible is usually the best way to go, and I agree with that…for most things, especially physical operations like manufacturing. But in this case, if you use the tip I’m about to tell you about, deleting the mistakes after the fact is best.
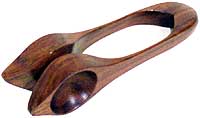
OK, so what is this tip? It involves making a loud sound right after you mess up and right before you re-read the part you messed up. How you do this is less important than that this loud sound leaves an obvious visual cue in the waveform (the blobs that appear on your screen when you record). I use either of 2 methods, snapping my finger close to the mic or using a wooden musical percussion instrument (wooden spoons) that makes a very loud “clack” when you tap any part of your body with it. I’ve heard that some people clap (lately I heard someone say they clap 3 times). Either way, the goal is to leave a visual mark in the audio (yeah, this method requires you to see sound. Don’t think about that one too hard!) so you don’t have to spend any time hunting for the mistakes while editing.
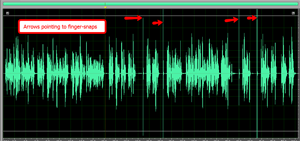 In the picture to the left, you can see where I make the visual cues by snapping my finger close to the mic after a mess-up (no cracks about how often I mess up! That’s not the point;)). Compared to my voice narration, these quick snap or crack sounds stand out like a sore thumb. Now I can simply zoom into each mistake and delete both the snap sound and the mistake. It took me all of about 45 seconds to do that for all 4 edit-points in the job to the left.
I want to repeat here how important it is that the noise you make be LOUD and “snappy,” or it might not work. I record with someone often who, on the rare occasions that she makes a mistake, blows a raspberry with her lips, which makes no obviously different wave form cue. I tell her to read it again and continue, but when editing her finished audio, I have to listen to the entire thing to make sure I find and delete the mistake and raspberry sound.
So get in the habit of snapping or clapping, or carrying a pair of funky wooden percussion spoons, or whatever it takes. This will prevent a lot of stop-and-start when you’re recording, as well as speed up the process so you can get the voice-over job to the client and get paid. So get clackin’, or snappin’ or slappin’!
Tony, in the comments below, recommended dog training clickers like below. Thanks Tony!
Editing Video In Reaper
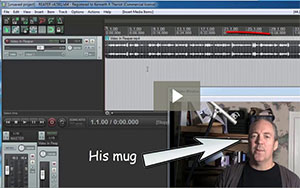 Did you know you could edit video in Reaper? Since Reaper is an audio recording program, you won’t be surprised that you can’t do a whole lot with video, but you CAN do some really impressive and important video editing.
Make Your Videos Sound Awesome
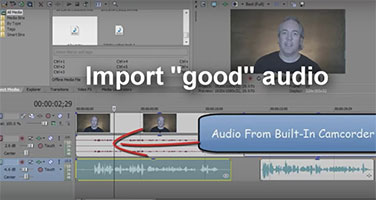
One really common mistake most folks make when producing their own talking head videos (where you have a person talking – NOT the band with David Byrne:-P) is that while the video may look great, the audio quality often sucks. See our article How To Get Good Audio On Your Videos for more on this. As I show in the video on that page, one great way to fix this is to record the audio separate from the video. For example, while your camcorder is recording the video of your noggin, you could have a microphone recording into a computer (or one of those hand-held digital audio recorders). Then after you’re done recording, just replace the camcorder’s crappy audio (this is almost guaranteed) with the “good” audio.
Well guess what? You can do THAT in Reaper. Import the video onto track one, start a new track, import the good video, line up the audio tracks, and turn down the audio on track one. Done! No need for a separate video program.
Edit Out The Video Flubs
Very few people can look into a video camera and record perfectly every time. You’re gonna mess up from time-to-time; or in my case, every 15 seconds or so:-P. Usually people fix this in a video editor. But you don’t need a video program if all you’re doing is snipping out the screw-ups!
In Reaper, what you see on a “video” track is only the audio part of that video. You can open a video view window in Reaper to see the visual part of the video. But edits you make to the “audio” in the “video” track will also affect the video. What this means, for example, is that if you cut out a part of the audio file on track one (where we imported our video file), the corresponding video will also be cut out. You’ll see what I mean in the video below.
This is fabulous news because it means that one of THE most common jobs done with a separate video editing program – namely, cutting out the flubs – can be done in Reaper! In the video below, I purposely (yeah right) make a mistake and leave it in so I can demonstrate how to use Reaper to fix it. Of course the all important replacing of crappy audio with good audio is also shown below. Enjoy!

New Zoom Q8 Video And Audio Recorder Now Available
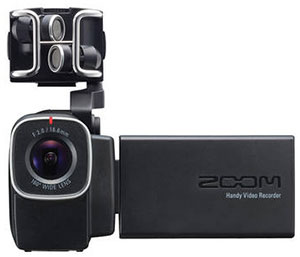
Zoom North America recently released the new Zoom Q8 Handy Video (and Audio) Recorder, which is now available in stores. The Q8 was the first compact fixed-lens HD video recorder (camcorder) that also records high quality audio.
I have the first version of the Q8 from a few years back, and not only did it record only standard definition video back then, but its pair of microphones (it has two mic capsules arranged in a stereo “X-Y” configuration) was the only way to record audio. I actually always thought that this was a huge disadvantage, not really offering much better audio than most camcorders were already recording, even though the mics were better. That’s because in order for audio for video to sound really good, you have to get the mics close to your subject – regardless of how good the mics are. See my post (and video) “How To Get Good Audio On Your Videos” for more on this. The old Q8 offered no way to get the mics close to your subject unless the camera itself was up close too, which could make for some awkward video:-P.
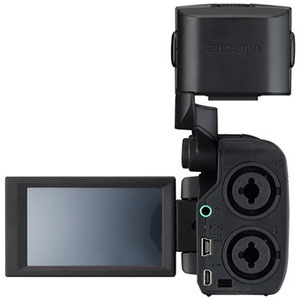 But the new Q8 (though it also has the on-board stereo X-Y mics) also has two XLR microphone input jacks! See the pic on the right. This is AWESOME!
Read more about this here: http://www.vizworld.com/2015/04/zoom-q8-handy-video-recorder-is-now-available-in-stores/#sthash.bFBglvqf.dpbs