Why does it seem like the audio quality for videos, especially internet video, is crappy even when the audio looks great? Every day video capability is improving, pictures are getting sharper, technology is getting faster and almost everything is high definition or three dimensional. When recording your own videos, it turns out that it is pretty hard to get your audio recording to the same quality as your video. What is up with that? To achieve fantastic audio to accompany your fantastic video, you may well need to follow a few more instructions and go through a few more stages. It isn’t hard, but it seems like a whole lot of folks are just living with crappy audio even when the video looks great.
Your camcorder may have cost you a fortune and be top of the range but its built-in microphone probably isn’t. These microphones are generally very cheap, and the distance from the speaker or sound emitter (unless the camera is 6 inches from the narrator’s face!) means too much echo and reverberation are mixed in with the desired sound by the time it reaches the camera’s audio recorder. To achieve on-the-spot quality audio, invest in an external microphone. To achieve quality audio the microphone needs to be near to the speaker or sound emitter. The optimum distance for recording great audio is around 12-18 inches, and this can really only be achieved by using an external mic jack. This option is great for video where it is OK for the microphone to be seen or you will be recording up close. If you don’t want the mic to be seen in the video, you can use a kind of mic called a shotgun mic, which is capable of picking up good, noise-free audio from a few feet away, usually just outside the picture. This is what they do in the movies. Or you can actually use a small-diaphragm condenser mic or even a USB mic (if you have a computer). I explain how to do this – and you can hear an audio comparison of audio from the camera and from the external mic – in a video I put on the post How To Get Good Audio On Your Videos.
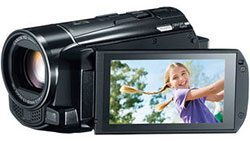
Picking the right camera up-front is the best solution here. It is a good idea to contact your camera supplier to make sure you get one with an external mic jack, especially if you are serious about your film making. It actually isn’t as common as it should be. I had to investigate about 10 different camcorders before I came up with one that met both my video needs AND had an external mic input. that camcorder was a Canon Vixia HF M500 Full HD Camcorder.
If you are recording a theatrical or cinematic video, you could use a small lapel-based microphone which would be barely visible to the viewer or you could use a completely different method. The other potential method involves using state of the art video editing software. Reputable programs include Sony Vegas Pro and Adobe Premiere Pro. With these programs you can record your audio and video files separately. This is especially handy if you don’t have a shotgun mic, or your camera does not have an external mic jack. You can record the dialogue along with the video, then align the audio track to the video track in the software. That allows you to cut, splice, move, etc. the audio and video together simultaneously. Then you can add background music, sound effects, etc. to the edited video as additional audio tracks to really make things sound professional.
Technology is developing at an alarming speed. Every day there is a better camcorder or more advanced program on the market and to keep up with the trends in video and audio technology, you need to be aiming for the top in BOTH instances. Putting cheap-sounding audio onto a slick looking video pretty much tanks your goal of trying to create a professional end-product.
audio editing
Quickly Turn One Long Audio File Into Many Small Ones
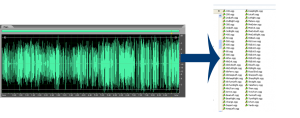
You can break up a single long audio file into several smaller files very easily using an audio editing program such as Adobe Audition. Other programs may have other ways of doing the same thing, but this article will focus on the tools in Audition. So are you ready to save a little life? Read on.
If you work with audio on your PC recording studio, you will, at some point, almost certainly need to take one long section of audio and convert it into lots of smaller sections of audio. This task usually involves giving each small audio file a unique name. The first time I was presented with this job I couldn’t think of any was to do it that didn’t involve repeatedly cutting several seconds of audio from the main file, pasting it into a new audio file, and then using the “Save As” function to give that little piece of audio the appropriate file name. Gahh! That may not sound bad when you’re talking about converting a 1-minute long sound file and saving it as 4 or 5 smaller ones. But when you are presented with 45 minutes of contiguous audio, and the final project requires over 100 small audio files, well it quickly becomes apparent that it IS bad. That is unless you can find a better way to do it than the “cut-paste-Save As” technique done 100 times.
Fear not, intrepid audio recording ninja! Your weapon of choice is Adobe Audition. Here is how you can accomplish what would have been a long and tedious task in just a matter of minutes.
Step 1. Open your audio file in Audition.
Step 2. Select the first bit of audio that will need to be saved as its own file by dragging the cursor over it.
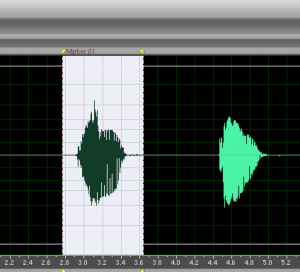
Step 3. Hit the “F8” key on your computer keyboard. This will create a phrase marker for the audio you selected. See Figure 1.
Step 4. On the Window drop-down menu, select Marker list. This will open a floating window that shows every marker you create in the long file.
Step 5. Repeat steps 2-3 for the next bit of audio that needs to be saved off as its own file. The process only takes about 5 seconds. Highlight and hit F8; highlight and hit F8.
Step 6. Once you’ve marked off all 100 sections of audio, you’ll have 100 markers showing in your Marker list. Each one will have a window next to it called label. Presumably you will have a document telling you what you should
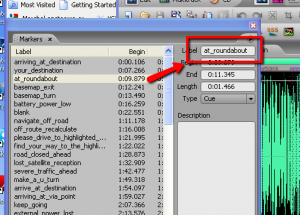
name each smaller file. Simply copy the target file name and paste it into the label window. See Figure 2.
Step 7. After every marker has a label, click on the icon at the bottom of the Marker window for Batch Process Marker Regions. The icon looks like one of those old floppy disks.
Step 8. Select your destination folder and audio file output format (mp3, wav, etc.) and put a tick in the box that says “Use marker label as filename.” Then hit OK (see figure 3). That’s it! Done! Every marked phrase is now its own separate file with the proper file name.
Okay I hear you. Even THAT process was a bit tedious and repetitive. Surely there is a way to automate it even further. Well yes there is, especially if the filenames don’t have to be specific, only unique. For example, if the project calls for 100 small audio files named sound_1.wav, sound_2.wav…sound_100.wav, the process is much shorter. You simply eliminate Step 6 above.
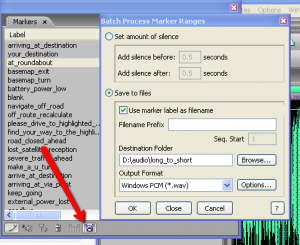
Then all you have to do is remove the check mark from the Use marker label as filename box in the Batch Process Marker Ranges window. You can also specify what the prefix for each filename should be at this point (such as sound_ in the example above). Then each file will be named in sequence.
Do I hear more moaning about automating even more? Sheesh, what a bunch of impatient people you are. OK, there is one other thing you can do. It will require a bit of trial and error, but will be well worth it as long as there is at least a little bit of silence between each bit of audio in the big file.
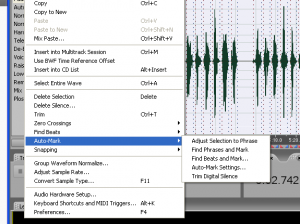
Select enough audio in the big file so that it encompasses 4 or 5 of the smaller phrases. Select Edit/Auto-Mark/Find Phrases and Mark. If you’re lucky, all 4 or 5 of the audio phrases will be marked in one click of a button! You may have to adjust the Auto-Mark settings (see figure 4) for what constitutes signal and silence, etc. But after you get it right, select the entire file and run Find Phrases and Mark. Boom! All 100 sections of audio are marked off in an instant.
Under the right circumstances, using the above steps can turn an hour-long job into a 5-minute job. Now THAT is worth doing, unless you have no better use for your time than to do unnecessary work. Do it with Adobe Audition
Good luck in your audio editing ventures!
Ken
How To Record A Voice Over With Audacity
 Here are some suggestions on how to record a voice over. Ready to land your next voice over job?
This is a fairly detailed step-by-step guide for creating a pro quality voice over using Audacity (the free audio software). The steps here will work for any mic, but you should use at least a decent USB mic like the Samson Q2U (which you can get for 59 dollarinis). Ready? Here we go.
1. Open Audacity (you can download that here)
2. Make sure your mic is set up in Audacity
To do that, go to Edit/Preferences/Devices (choose the Samson mic under “Recording” and make sure it says “mono” under “channels.”
3. Click the “Record” button (big red circle) in Audacity – a track will appear and begin recording.
4. Record your voice-over
Here are some tips for that:
- Use a pop filter if you have one. If you don’t, you can make one quickly by stretching an old pair of nylon stockings over a wire hanger that you have shaped into a circle. But you can buy one for about $10 on Amazon – Auray Pop Filter.
- Record in as quiet a place as possible.
- Keep you mouth close to the mic (3-5 inches). Most of us record in spare rooms in our house, which means lots of echo-y, reverb-y room sound. And one quick way to reduce that that you can implement immediately is simply to record close (that 3-5 inches I suggest) to the mic. I believe that this could be the most helpful bit of advice on how to record a voice over of everything in this post.
- Keep recording even in you make a mistake. I like to clap my hand or make some other quick, loud noise after a screw-up so that I’ll see it on the track when I’m editing. Just make that mark and continue recording. You can cut the bad takes out during editing.
- Make sure the wave forms (blue blobs) are fairly large in the track. You don’t want to over do it to where they go out to the edges and beyond. But if they are too quiet – not much more than what’s on the center line – then you should turn up the input level* and start again until you get fat and chunky blobs. This may be the 2nd most important piece of advice for how to record a voice over!
* If you are using an interface unit to plug your mic in, you can turn the input level up on that. If you have a USB mic, go into your Windows Sound control panel, click on the Recording tab, select your mic, select Properties, click the “Recording” tab, and then “Level.” Make sure the slider is at around the 85-90 percent mark. Sometimes Windows puts this level down to like 20% for some reason.
5. Hit the “Stop” button when you’re finished (big yellowish square).
6. Now find all the parts you want to cut out (bad takes, baby crying, phone ringing, etc.) by highlighting that bit of audio and simply hitting the “delete” button on your computer keyboard.
7. Once you’re left with the parts you want to keep, it’s time to reduce the ambient background noise.
8. Find a section of the recording where you’re NOT talking, but the mic was recording. Usually this will be low-level computer drive noise, electronic buzz or hum, etc.
9. Select Effect/Noise Removal in Audacity and select “Get Noise Profile.” The Noise Removal window will close. You’ve just told audacity what constitutes “noise.”
10. Select the entire audio recording (double-click on the audio), open the NR tool again, and click “OK.”
This will filter out the ambient noise and leave your voice alone (for the most part).
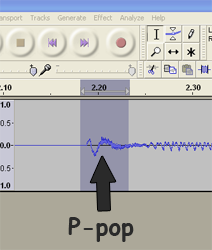
11. Listen carefully to the recording in headphones. You’ll likely have several “p-pops” or “plosives” as they are commonly called.
Zoom in to very beginning of an offensive p-pop (see:
https://www.homebrewaudio.com/how-to-fix-a-p-pop-in-your-audio-with-sound-editing-software for a bit more on this)
12. I find that bad p-pops tend to look like the letter “N” in the audio waveform.
See pic. Select just the “N” part and then go to Effect/Equalization in Audacity.
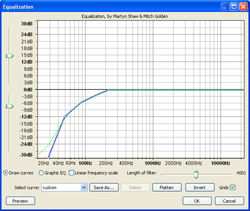
13. Create a curve on the horizontal line that starts sloping down to the left at about the 200-250 Hz spot.
Just click your mouse on the line wherever you want to create a drag-handle (4 or 5 spaced between 30Hz and 250Hz should do the trick). Then drag the 30Hz handle all the way down.
Drag the next one to the right down but not as far, etc. Continue until your curve looks like the picture above.
14. Then click “OK” and listen to the result.
The “p” sound should sound more natural and less like an explosion of air. You’ll also notice that the “N” shape is much smaller.
15. Next You’ll want to compress the audio just a smidge to even out the volume and give it some punch.
So select the entire audio file (double-click on the blue blob somewhere) and select Effect/Compressor. Set the sliders as follows: Threshold: -12 db, Noise Floor: -40 db, Ratio: 2:1, Attack Time: 0.2 secs, Decay Time: 1.secs.
Also, make sure there is a check in the box marked “Make-up Gain for 0dB after compressing.” Click “OK.”
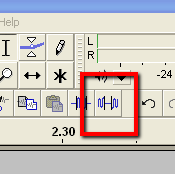
16. Now listen carefully, through headphones, to all the audio.
You may notice a few stray bits of unwanted noise in between the talking bits, so to fix those, just highlight them as you find them, and click the “Silence” tool button in Audacity (see Pic 3).
17. Lastly, save the audio in whatever format you need by selecting File/Export in audacity.
44.1KHz and 16-bit wav files are standard “CD quality” audio. Note that if you want to export the audio as mp3, you’ll need to download the Lame MP3 Encoder here: http://audacity.sourceforge.net/help/faq?s=install&item=lame-mp3 . That will install to the correct place automatically.
Hopefully that should give you an idea how to record a voice over, a professional sounding one, very quickly. For more in-depth info, check out our course, the Newbies Guide to Audio Recording Awesomeness.
Good luck.
Ken
Voice Over Recording While Camping–The Zoom H2 Saves My Butt
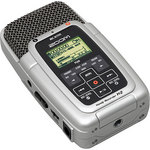 You’d think it would be a pretty good bet that I could take a week off without having to record any audio. After all, I’d had to actively submit auditions for all the voice over jobs I’d gotten at that point. So you might imagine my surprise when I got an e-mail on the 2nd day out (why was I checking e-mail? Brand new iPhone…but that’s a different story:)) I received an offer for a voice over job I hadn’t even auditioned for. And they couldn’t wait a week. It was take-it-or-leave-it. So I decided to give it a shot. Here is all the equipment I had with me.
If you’d like to get an idea of how the audio turned out, listen to the audio here:
[jwplayer config=”Custom Audio Player” mediaid=”3485″]
So now I know there is no reason to ever fear losing out on a recording gig when I’m on the go. All 3 required items fit very easily into a quite small hand bag or back pack.
Happy recording!
Ken
ps – By popular demand, here is an audio clip from the actual job – the final audio sent to the client.
[jwplayer config=”Custom Audio Player” mediaid=”11049″]
Reaper Tutorial Video
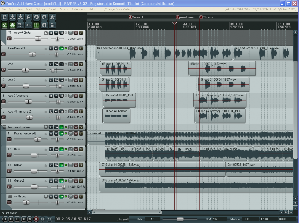 After several folks asked for this, I went ahead and did a video on the basic use of Reaper digital audio workstation (DAW) software. In 10 minutes, I demonstrate how to create a voice over with background music, then a song with piano accompaniment (if a very brief song;-))), using midi and a virtual instrument.
I also include how to use Audacity along with Reaper for the tracking and editing software “1-2-punch.”
I put the first video up on YouTube, but it was pretty blurry. so I put up the new one here:
I’ve also embedded it into this post for your viewing pleasure:
I’ll be adding more Reaper videos to the tutorial collection very soon.
Cheers,
Ken