Here is a good article on vocal EQ tips. Whether you’re a voice-over person or you also record music, chances are good you’ll want to know a little something about vocal EQ (remember that EQ is short for equalization, which is one of the audio recording terms that don’t really describe what it means to the layman…sigh). If you want to brush up on what it is all about, check out our article here: What is Equalization, Usually Called EQ?
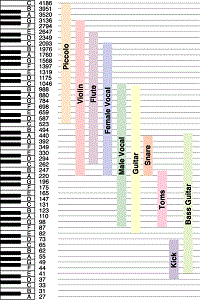 Anyway, the human voice tends to live in a very predictable place on the EQ spectrum. See the picture to the left, which should help describe this. Male and female voices overlap between 300 and 900 “hertz” (cycles-per-second or “HZ”).
In an ideal world, or more specifically, and ideal recording situation, you would not need to EQ the human voice at all. When doing voice-over work, I rarely use EQ (except to fix p-pops – see our article: www.homebrewaudio.com/how-to-fix-a-p-pop-in-your-audio-with-sound-editing-software). But we don’t live in a perfect world and few of us have that ideal recording set-up (great recording space, top-drawer gear, etc. so there are times when applying EQ to a vocal track is desirable or necessary.
Dev’s article explains those situations and gives you some ideas on how to deal with them using EQ.
Read his article here: http://www.hometracked.com/2008/02/07/vocal-eq-tips/
audio editing
32-Bit Floating Point – Huh?
If you’ve spent any time looking around in any recording and/or audio editing software, you’ll likely have come across several options for audio files. If you’re anything like me you saw a lot of options and terminology that made you think you’d better just leave everything at the “default” settings until you can understand what some of the gibberish meant. One of the terms that really seemed confusing to me at first was the term “32-bit floating point.” It almost sounds more like a medical condition:). It is, in reality, a digital audio term (go figure). It you’re curious about how bits figure into digital audio, see our article here: https://www.homebrewaudio.com/16-bit-audio-recording-what-the-heck-does-it-mean
Here is an article from Emerson Maningo that will help you to understand what 32-bit floating point actually means: http://www.audiorecording.me/32-bit-float-recording-bit-depth-vs-24-bit-complete-beginner-guide.html
Crossfade Meaning – What Does It Mean To Crossfade Audio?
 So what exactly does it mean to “crossfade audio”? Well before we talk about crossfading, we should probably first talk about just plain old regular fading. What is a fade?
Happily, this is one of those few audio terms that actually sounds like what it means. Whether you know the term or not, I’m fairly confident that you’ve at least experienced/heard fading going on before.
Pop songs used to end with a fadeout a lot back in the day. You see it on sheet music all the time. At the end it often says “repeat and fade.” It just means that instead of an abrupt or definite ending, the song would continue. The volume would just get lower and lower until it was inaudible, at which point it would end. It fades out.
Fades
Often on TV or movie soundtracks you hear the audio fade in (as opposed to the above example of fading out). The music (usually) or other audio will start out inaudible and rise in volume gradually until you can hear it at full volume.
This is the same idea for audio items in our recording projects. We use it as describe above sometimes, especially when producing voice overs or narrations that have background music.
The music frequently fades in before the narrator starts talking. If the music is not going to continue behind the voice for the duration of the program, as in a podcast or radio show intro perhaps, the music usually fades out just after the narrator starts speaking.
But the most common use of fading when doing multitrack recording projects is simply to allow audio items to start and finish more smoothly. If the edges of an audio item do not fade in or out at least a little bit, you get clicks and pops due to the sudden stops and starts of the item.
Crossfades

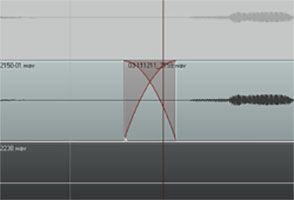
Now we know what fading is. So let’s talk the crossfading. It is when one bit of audio fades out at the exact time as another bit of audio is fading in (see the picture at the beginning of the article).
Let’s say you are recording a vocal track, and you mess up. What most of us do is wait a second while the program continues recording, and read/sing the part you messed up a second time, and then proceed with the recording.
Things often run more smoothly this way, as opposed to stopping and starting over all the time. However, doing it like this requires that when you have finished recording, you go back and cut out that messed up part. Crossfades to the rescue!
A common way to deal with mistakes is to simply highlight the screw-up, and cut it out. This leaves a blank space there (unless you have ripple editing turned on – see our post on THAT here: https://www.homebrewaudio.com/what-is-ripple-editing), creating 2 audio items, the part before the cut and the part after it. Now you’ll want to join these two items so you drag the later audio to the left to connect it up like a train section to the end of the earlier audio item (see figure 1).
Crossfades Are About Seamlessness
In order for the audio to sound seamless to the listener, you’ll usually want to slightly overlap the end of the earlier audio and the beginning of the later audio item. But that will still frequently give you an abrupt and unnatural sounding transition. So you want the end part of item 1 to be fading out exactly at the same time as the beginning part of audio 2 is fading in.

So most programs, including Reaper (shown in the pictures in this article), default to automatically crossfading any audio items that overlap. Take a look at Figure 2 where I have connected the same audio items shown in figure 1. I’ve drawn a box around where the item on the left is fading out as the item on the right is fading in. The red lines represent the volume of the items. It sort of looks like an “X.” I did not have to do anything extra because as soon as the items started overlap, Reaper automatically executed the crossfading.
This kind of crossfading is not done as an effect, where you’d hear something slowly fade in or out pleasantly. I had to zoom in pretty far to even see the red fade lines. That’s because the fades happen very quickly. This type of crossfading is used as a tool to help avoid the popping and clicking that frequently accompany the cutting and deleting of audio.
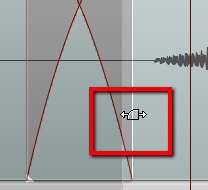
You can edit each fade if you wish. You could change the shape of the curve or make the fade longer or shorter. Do this by hovering your mouse over the edge of the audio item until the “fade” tool icon appears (Figure 3). Then right-mouse-click to change the shape of the fade. Or simply drag the edge of the item to change the length of the fade.
Items Do Not Have To Be On the Same Track To Crossfade Them
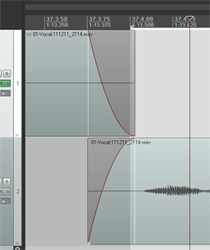
One last note – items do not have to be on the same track to use the crossfade idea. In Figure 4 I used the same two audio items, but I put the second one on a different track.
They still overlap in time. The end of the first one still fades out just as the beginning of the second one is fading in. The only difference is that they are on different tracks.
So now you know what crossfading means. And you know how you can use it to smooth out the transitions between audio items. Crossfading is a good tool to give you better audio recordings.

What is Ripple Editing?
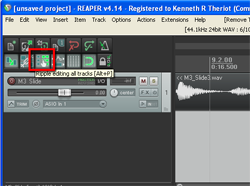
Ripple editing can be a very useful tool in both audio and video editing. But it’s one of those things you don’t want in the “on” position all the time. If you think it’s on and merrily go about editing audio items on your track, you’ll have caused quite a train wreck with your audio clips. Likewise, if you think ripple editing is turned off, and you start deleting or moving items on your track – train wreck.
Definition of a couple of terms
First, let me clarify a thing or two about two terms I’ll be using.
Track: A track is simply a container in audio and video software. It is usually displayed as a sort of swim-lane in horizontal stripes across the screen. You put media “items” into these tracks, where you can move them around (left for earlier in time and right for later in time).
Item: Any audio, video or MIDI file that you place on a track. The big source of potential confusion on this is that while the underlying media is a file (.wav, .mp3, .mid, etc.), once it’s placed into a track, the edits you make do not affect the underlying file. If you insert a wav audio file onto a track, it becomes an item on the track, which is sort of like a copy of file. If you slice that item into 5 pieces, the underlying file is still in one piece, for example. This is typically called non-destructive editing.
So what is ripple editing?
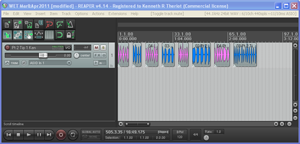
Where ripple editing comes into play is when you have multiple items on a track. See the picture on the left, where I have one track with 8 items in it. Now let’s say I want to slide one of the items (say, the 3rd item from left) to the right just a smidge. This could be because there wasn’t enough blank space (silence) between the blue item before it, and maybe you want it closer to the 4th item, the blue one after it. With ripple editing turned off, you simply left-mouse-click on the item, and drag it to the right. Only THAT item will move and none of the others will.
However, if you did this same thing with ripple editing turned on, not only would the 3rd item from the left move to the right, but every item to the right of it would move by the same amount. The first two items in the track would stay where they were.
Why would you use ripple editing?
Very often, when you have multiple items in a track, you want to maintain the spacing between each item. This would be really hard to do if you had to delete one of the items in the middle of the track without ripple editing. It would leave a huge gap where the deleted item used to be. You’d have to individually drag each of the items, that are on the right of the gap back to the left, one at a time, in order get everything correct again, which would not only be tedious, but the spacing between those items would have to be re-done. But if you have ripple editing turned on when you delete a middle item, all the items to the right immediately shift to the left, not only covering up the gap, but also maintaining the timing relationship between themselves.
Note that this is NOT the same thing as “grouping” all the items on a track, which is another option altogether. When ripple editing, everything you do (if it affects timing – like deleting, moving, lengthening or shortening) to an item affects that item and any item to the right of it, but not the items on the left, the ones that occur earlier in time to the item you are editing. If you group all the items, then every item is affected regardless of whether they are to the left or to the right of the item being edited.
Another useful use of ripple editing is when recording music. Frequently everything is aligned to a tempo grid in the audio software. If you realize that you put too many measures in your introduction (I’ve done this many times) you can easily delete a measure. But without ripple editing, you’ll just end up with a one-bar-long gap of silence in your song after you delete it. With ripple editing turned on, every measure to the right of the deletion will shift to the left, the beginning of the subsequent measure moving nicely into place (assuming you deleted exactly one measure).
This is all very like using a word processor. You type text onto the screen from left to right (in English). If you see a word you want to delete, you can highlight it and hit the “delete” key. What happens? All the text to the right of it shifts back to the left. What it you need to insert some text in the middle of a sentence? You just place your cursor and start typing. What happens to the text to the right? It moves to the right with every keystroke. THAT is just like ripple editing, which is turned on by default in most word/text processors. If you’ve ever turned it off by accident you’ll see how messed up things can get. If you try to insert a word into a sentence, you’ll start deleting everything to the right of it.
Hopefully that makes ripple editing more clear. If you’d like me to put up a video to help clarify it, let me know in the comments below!
Cheers!
Ken
Normalization Myths
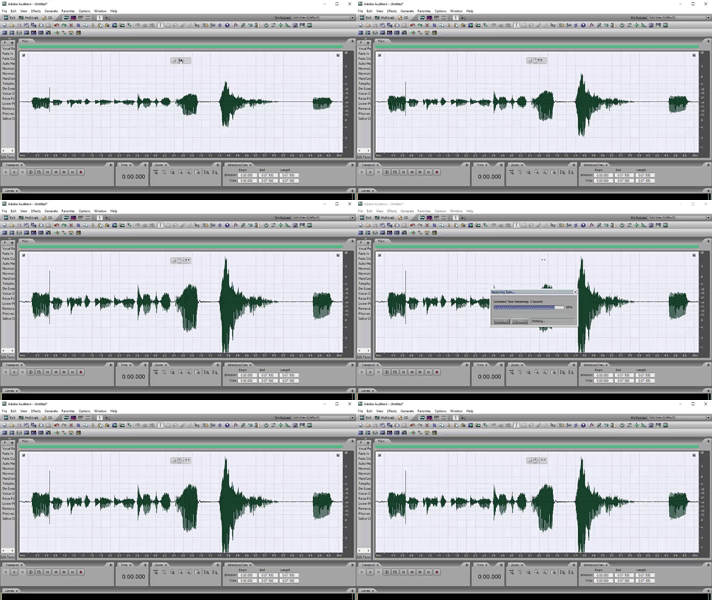 Normalization is another example of an audio recording concept whose term is both misleading, needlessly confusing.
What Does Normalization Mean?
Basically it means turning up the volume. Well, technically it is “increasing the gain.” But that’s another story you can read about here:
Gain, Volume, Loudness and Levels – What Does It All Mean?). You turn up a selected of a piece of audio until the loudest/tallest peak is as loud as possible without clipping. What’s so hard about that?
Find out more about normalization in our post: Audio Normalization: What Is It And Should I Care?
People normalize their audio to make it as loud as it can be.
But the term “normalization” implies that if you do this to multiple files, they’ll all be the same loudness – at least that is what normalizing something means to me.
But surely anyone can see that this simply is not true. The amount that your audio is turned up depends on how high the highest peak is.
Say you have two recordings of equal average loudness. If one recording had a single very loud peak, like a quick shout, that only about 3 dB lower than max volume, that entire file would only be turned up by 3 dB.
If the loudest part of another recording were not very high, say 10 dB lower than maximum volume, then normalizing that audio would increase the whole file by 10 dB.
See? These files, who had equivalent average loudness prior to normalization now have radically different volumes.
That (the idea that after normalizing multiple audio files, they’ll all be the same loudness) is only one of the normalization myths discussed in this article:
http://www.hometracked.com/2008/04/20/10-myths-about-normalization/