Don’t fret if your raw track doesn’t have all of the polish and professional sheen that you would like. As long as your tracks start with clean and clear audio, there is plenty of room to make adjustments when mixing. Many pro studios are already adding some degree of processing and effects while recording, so the comparison isn’t really apples-to-apples. Take your mixing one step at a time, and try to stay goal oriented.
You can read more details here: http://therecordingrevolution.com/2012/12/10/help-my-tracks-dont-sound-as-good-as-pro-studio-tracks/
audio editing
How To Remove Vocals From a Song So You Can Sing Along
 Have you ever wished you could remove vocals from a song so you could use the music behind YOUR voice? Perhaps you want to make a CD for a karaoke party, or you just want to try it because it’s cool. Well in this computer age, it is possible (usually) to do just that.
Before I tell you how, I should quickly mention a couple of things. This technique won’t work with every recording you try it on. Much will depend on how the lead vocal was mixed by the original producer. the only 100% guaranteed way to do it perfectly is to have the original tracks to the song (not likely if it’s a popular song). But you can usually get close enough. Also, speaking of the original producer, if you do manage to remove the lead vocal the remaining recording still is under copyright. So a review of copyright law may be prudent if you hope to publish the recording.
Okay! So how can you get this done? First you need audio editing software. If don’t already have your own, try Audacity, which is open source freeware that you can download from the web. For this you’ll also need a plug-in (also free) for Audacity called “Center Pan Remover.” Then you just put that file into the Plugins folder in Audacity. There are instructions on the Audacity website on how to do all this.
 Now open Audacity, and open the song from which you want to remove the lead vocal. Next, you’ll notice that the song is a stereo track (has two waveforms, left and right). The reason this process works is that usually, a lead vocal in panned into the center of the stereo field. So if you can somehow isolate and cancel that center part, you can usually remove the lead vocal. For songs where the lead vocal is NOT panned to the center, which isn’t very common, this process won’t work very well. In that case, I recommend trying something like Singing Superstar
 (and you can download it right now!), which does some amazing things, including removing vocals from your favorite songs on your CDs, mp3s, etc.
All you have to do now (back to the Audacity method) is select the entire song by clicking in the area around the pan and volume controls on the left side of the track, go to the Effect drop-down menu, and choose Center Pan Remover. The default setting ought to work just fine. But if not, undo it and try some different values in the “frequencies above” and “frequencies below” windows. I recommend 250 Hz for frequencies above and 3,000 Hz for frequencies below.
If everything went according to plan, you now have the music without the lead vocal. Now you can sing along with your favorite band.
This doesn’t always work well with Audacity. Other audio editors can do it better, such as Adobe Audition. Just load up the song in the edit window and apply the Center-Channel Extractor effect.
If you don’t have access to Adobe Audition or other high-end editor, try any of the programs out there designed specifically for this purpose, like Singing Superstar.
Have fun!
Learn more cool things to do with your home recording studio with our video tutorials.
Sound Forge Pro Audio Editor Now Available For Mac
Sony Sound Forge Pro has long been a staple audio editing program – basically the industry standard. But since its inception these 15 or so years ago, it has not been available for Mac users. That has finally changed.
Sound Forge Pro Mac – designed for OS X, is now available. Can I get a halleluja?
A new license is $269 (compare this to Adobe Audition – my main editor – which costs $317.98).
If you already have Sound Forge Pro for PC, you can cross-grade to the new Mac version for $239.
Click the picture above for more details and/or to buy.
What Does Compression Mean In Audio Recording?
A very common question I see is “should I use compression in audio recording?” The best answer to this question is, as is so often the case, “Do you need compression in your recordings?”
Let’s start with a workable definition of compression in the audio recording sense. When you lower the volume of only SOME of your audio, usually the bits that are clearly louder than most of the rest of the audio you’re working with, you are “compressing” that audio. You would do this in order to allow you to raise the average loudness of the entire audio file.
How Can I Compress My Audio?
Now, this can be done manually, by which I mean you could open your audio in an editor, seek out all the areas where the wave forms (I like to use the term “blobs” instead) are loudest, then turn those bits down. But that can get REALLY tedious and time consuming. So to automate this process, a machine (nowadays done with software) called a “compressor” was invented. This allowed folks who really knew what they were doing to more quickly manipulate volume and loudness dynamics. The dark side of the situation, though, was that it allowed folks who were less expert to mess up their audio, and do it much faster and more efficiently than ever.
Compressor Settings?
There are all kinds of settings on a compressor that are better discussed in other articles. For a good idea of what those are, see my article and video – Vocal Compression Using Reaper’s ReaComp Effect Plugin.
For the moment I’d like to focus on a visual explanation of basic compression, since I strongly believe that those who use compressors to mess up their audio (usually without actually WANTING to mess up their audio) do it because they don’t have a really good grasp on what compression really is. This should help.
Lets Just Focus on What Compression Is
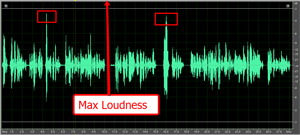
Take a look at figure 1, which is a voice narration file. I’ve boxed off the two loudest peaks.
If I tried to turn up the volume of this audio, all of the audio, including the 2 peaks, would “get bigger.” But there is a problem here. Do you see it? Look at the label in the picture pointing to Max Loudness. If any of the audio wave forms (blobs) get pushed beyond that border line the arrow is pointing to, you get nasty, awful digital distortion. Suffice it to say that the border line represents the upper boundary you must not cross.
Knowing that, it should be easier to see why you can’t turn the loudness up very far before the peaks hit that boundary. And when that happens, none of the rest of the audio can get any louder either. See figure 3 to see what would happen if we told our editor to turn the file up until the loudest bit hit the upper boundary. There wasn’t a lot of change was there?
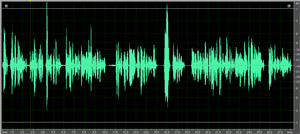
The blobs didn’t get much bigger (louder) did they? Oh no, whatever shall we do?
How about if we turn DOWN the level of JUST those two peaks? Let’s do that. Now take a look at figure 3 to see what our new file looks like. Notice that the
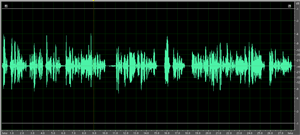
average level of the audio blobs is much more even now? THAT is what compression is for. Now that we don’t have just a couple of pesky peaks preventing us from turning our audio up without it distorting, we can raise the average level much higher, resulting in louder audio across the entire file. If we now tell our editor to raise the level of the loudest peak to maximum loudness (raising the rest of the audio by the same amount), we get figure 4. Compare
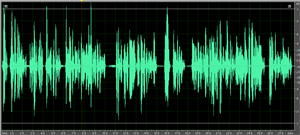
the picture in figure 4 with the one in figure 2. You will notice that blobs in figure 4 are much wider/bigger than the ones in figure 2 across the board.
Being able to increase the overall loudness level of your audio is just one benefit of compression, and perhaps its most common goal. when used wisely, this can also add punch and “up-frontness” to your audio. But don’t forget what compression actually accomplished for us BEFORE we were able to turn it up. It evened out the overall levels first, which gives a more consistent listening level to the user.
How Compression Would Help When Watching TV
I’ve often wished I had an audio compressor attached to my television for this very reason. Have you ever been watching a movie where the action scenes were so loud that you had to turn the volume down on the TV, only to find that now the talking parts are too quiet? Then you have to turn the TV back up to hear those parts. You end up turning the volume up and down throughout the show.
What about when the commercials on TV are much louder than the show itself? Don’t you wish you had a compressor to even out the volume so that it automatically turned the commercials down to the same level as your TV show?
I mentioned earlier that people frequently mess up their audio by over-use or incorrect use of compression. The most common problem is with music.
If you compress it too much, say, in order to make your mix louder than everyone else’s, you risk sucking out the dynamic range of the music. Changes in levels are important to the emotion of music. Over-compressing can flatten things so much that there is no more emotional flow to the music. That can also make it sound unnatural.
Also, compressors tend to impart certain sonic strangeness to audio when over-done, such as increasing sibilance (the sort of hissy sounds you hear when someone uses the letter “S”) in vocals, or audio “pumping” which is when the compressor is rapidly clamping down on loud audio and then letting up on quiet parts over and over.
So Should I or Shouldn’t I?
So back to the original question. “Should I use compression in audio recording?” Now that you understand what compression is, you can answer your own question. Do you want to even out the loudness of your audio? Then compression can help you. Do you want to raise the overall loudness of your audio without distorting? Compression can help you. Do you want to add some punch and ‘in-your-faceness” to a voice over? Compression can help. Just make sure you remember that it is really easy to overdo compression if you’re not careful.
Now go forth and squash your audio responsibly.
Ken
ps – Since this article was written, there have been several more posts that have to do with compression in some way. Since you’re now thinking about compression, you might be interested in learning more about it. See our other articles on compression here:
Using Multi-Band Compression
Home Recording: Singing As Loud As You Want
Compression For Punch and Presence
How To Build A Home Recording Studio: Part 4 – Software
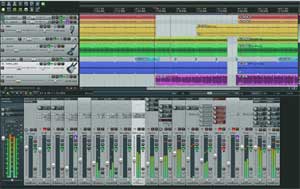 This is part 4 in our How to Build a Home Recording Studio series that shows you how to set up a computer-based studio capable of recording pro-quality audio. In part 3, we talked about microphones and sound cards and other type of interfaces. Today, let’s talk about audio software.
The Software
I left this part until the end because if you get everything else right, the software is probably the least important part of the equation. There are tons of programs to choose from, so it can be tough to figure out what you should get and how much you should pay. My suggestions will be based on my experience and will enable you to sound professional even with a limited budget.
Audacity
 For most voice-over stuff, you can probably do most (if not all) you need to do with the free program called Audacity, which you can download from the web and start using right now. For a free product, Audacity is pretty amazing, capable of just about any basic audio recording and editing function, including multi-track recording.
But it is a bit hard to use, not very intuitive, and some of the editing tools aren’t great, especially the noise-reduction tool, which as we have mentioned, is important for voice-over recording. By the way, our “recording 101” course called The Newbies Guide to Audio Recording Awesomeness – Part 1” uses Audacity to teach you the basics of recording. Part 2 of the course (due out this summer) will use Reaper.
Reaper
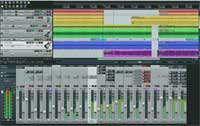 I always recommend Reaper, by Cockos, which is incredibly powerful. I use it for everything, even my music studio. Make no mistake, this is professional software that rivals programs 10 times more expensive. From basic voice-over recording to full-blown multi-track music recording, including MIDI, virtual instruments, etc., Reaper can do it all. I’ve recorded 5 CDs (for Raven Boy Music) using it, and have several more in-work.
I mention this next bit only because I made such a big deal about noise reduction in this series. Even though it isn’t labeled as such, there is a tool in Reaper that is one of the best noise reduction tools available, called ReaFIR (FIR=finite impulse response). It actually works better for reducing noise than many programs designed for the purpose! And ReaFIR is just one of dozens of effects that come bundled with Reaper. That’s just a bonus tip;). I put up a post with a video on ReaFIR here.
Cockos also has a “Fair Pricing” scheme for Reaper that is unheard of in any kind of business. Unless or until you start making on the order of 20 grand per year with the audio you produce using Reaper, you don’t have to buy the commercial license, which costs $225. You can use the “discounted” license, which is only $60. And the software is the same!
Also, the 30 day trial is a completely un-crippled, full version of the software – the exact same as the commercial license version – and will never stop working. Though after 30 days you’ll start getting pop-ups reminding you that the product is not free. They understand that it sometimes takes more than 30 days to evaluate audio software, especially if you’re just getting into recording. All of this is on the honor system. Who does that? Well, I can’t think of any other business off-hand. I recommend Reaper all the way.
Adobe Audition

I use Adobe Audition along side Reaper to edit individual files and final project renders (aka mix-downs). Audition started out as just an audio editor called Cool Edit back in the 90s. It didn’t do multi-track recording, but rather focused on making changes to a single audio file.
You could analyze, filter, and apply treatments by the dozens – multiple kinds of EQ, compression, reverb, echo, noise reduction, clicks-and-pops reduction (really helps with recordings transferred from old LPs), and tons of other things. These edits were “destructive,” which doesn’t mean “bad.” It simply means that once you apply them, they affect the underlying file.
Cool Edit Pro added the ability to do multi-track recording, was bought by Adobe and had its name changed to Audition. Now you can pretty much do it all with Audition – destructive AND non-destructive editing, MIDI, virtual instruments, the works. It, like Reaper, is decidedly professional software. Though it used to be a stand-alone program (and you can still sometimes get DVDs on Amazon for older versions), it’s now part of the Adobe Creative Cloud.
Some words about the editing thing
I use Adobe Audition strictly as an editor – I usually don’t record audio with it. Though you can do most things, including editing (non-destructive), with Reaper, I prefer to finish every project with a full-fledged editing program like Audition or Sound Forge (Audacity can be used as an external editor with Reaper as well).
These programs have more specialized tools for really getting down into the bits (literally) of an audio file, as well as music mastering and CD authoring, and some things simply cannot be done in Reaper such as redrawing a waveform with a pencil tool to get rid of a glitch in the audio.
But it isn’t only that. There is a different mindset to working on the final audio from a project. It’s like taking off the recording and mixing hat and putting on the final editing and mastering hat. To me it is a workflow thing.
For example, let’s say you had several tracks of audio in a Reaper project. in voice-over work you might have the voice on one track and music and/or sound effects on other tracks. You can’t send it to a client until you render (mix down) the project into one audio file (mp3 , wav etc.).
That final audio file is what I then open in Audition. It’s where I put on the headphones and really listen to the details, doing things like clipping out odd mouth sounds like breathing or what I call “saliva clicking” (don’t dwell too much on that last one:)), editing and eliminating offending p-pops, fading in and out on specific phrases, evening out overall volume with compression, and controlling maximum volume with normalization.
Finally I can save the audio as any number of different formats quickly and easily. It’s polishing and finalizing the audio before it goes to a client or onto a CD or some other sale-able form. Some of these things can be done in Reaper, but I find them faster and easier in Audition. In the end though, whether you use an external editor comes down to need and personal preference.
The software mentioned in this article, though there are dozens of others out there, should be enough to do anything you need to do from recording, mixing, editing and final mastering. Join us for the final installment of this series on building your home recording studio when we’ll talk about the accessories such as mic stands, pop filters, shock mounts, speakers and headphones.
Cheers!
Ken