Now part of a new signature series, the MA-1000 uses an original new old-stock 5840 tube, a 1 inch 3 microns thin 251-style capsule, and a custom-designed transformer giving you that old Austrian/German vibe.
The mic gives you that same sound you get from classic large diaphragm condenser mics but in a more affordable price.
Read more about this here: http://bobbyowsinskiblog.com/2016/12/12/mojave-audio-ma-1000-microphone/
Voice Over Recording
Tips for Recording Your Own Spooky Audio To Scare The Kids On Halloween
 It’s that time of year again. So I’m bringing this post to the top of the deck for Halloween 2017. Enjoy!
Do you like to set up scary decorations and try to scare (in a good way, of course) the kiddies on Halloween? When I was a kid, I REALLY wanted to go to the houses that were the scariest. I remember one house where the lady always dressed up as a very scary-looking witch, and I always went to her house on the night.
One terrific way to really add to the spooky atmosphere is to have scary sounds coming from your house. You can, of course, buy commercial “scary sounds” CDs at the shops, or on-line. One place to get some downloadable horror sound-effects is on iTunes – great sounds you can get with immediate gratification.
But it can get expensive to buy scary sounds. So why not make some of your own? Below are a few ways you can record your own scary sounds at home.
The Reverse Reverb
One of the most effects to make a human voice sound ghostly or otherwise creepy and/or mysterious is to use something called reverse reverb. This is used in just about every scary movie ever. Take listen below for the kind of thing I mean:
Audio Player
This kind of effect can be created on any recording software. I used Reaper to do this. For specific instructions on how to create a spooky vocal sound effect like this, see our post – The Reverse Reverb Effect For Creepiness. Basically, you just record the voice as normal. Then reverse the audio (so easy to do now with computer recording software!) so that it sounds backwards, which is creepy all by itself, by the way!). Then you apply a reverb effect to that backwards audio, and render that audio as a new file. Then just import that audio back into your software and reverse it again. You’ll hear the voice going “forward” again, but the reverb will be backwards – sounding like it’s sucking in at the beginning – nice and creepy:).
The Demon Voice
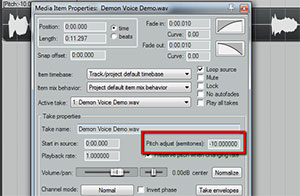 This is very easy to do. You simply record a voice saying something menacing (or whatever you think a demon would say). Then apply a stretching – sometimes called pitch-shifting – effect to it. It will sound something like this:
| Audio Player |
BTW, you can learn to do basic recording using Reaper (a VERY inexpensive, but powerful and professional program or the free program called Audacity) with our course – The Newbies Guide To Audio Recording Awesomeness. To do this (the demon voice) in Reaper, simply right-mouse-click on the audio item of the voice after you record it, which brings up a drop-down menu. Select “Item Properties.” Then about half-way down that menu, find the box that says “pitch adjust (semitones).” See the figure over there on the right. The default setting is to have all zeros in the box next to it. You can see in the picture that I have changed that to “-10.000000.” You can play with those settings to get just the right effect. If you do this in other software, just be sure to make sure that you aren’t also slowing the speed down (unless you want it to be slow). You usually have the choice to preserve the pitch and change the speed, or preserve the speed and change the pitch. You’ll probably want the latter.
That Crime Drama TV Sound Effect
You may not know it, but you’ve heard this dozens – if not hundreds of times if you’re a regular TV watcher. It usually shows up in murder mystery shows or any crime drama. I even heard it in Doctor Who last year (in 2012). It sounds like this:
Audio Player
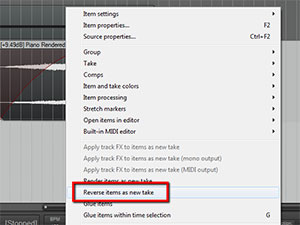 You can make this effect by using turning a sound around and playing backwards, similar to what you did to create your spooky voice above. In Reaper software, record a single strike of a chord on any instrument. I used a piano for the example. Then you just right-mouse-click the audio item and select Reverse Item As New Take. See picture on the left. There is a more detailed walk-through on how to do this over at our post – How To Create The Most Common TV Show Sound Effect.
Other Ideas
Some other things you can do include recording some bells (there are some excellent virtual instruments or sound effect collections out there that have all kinds of bells. You can also simply record people screaming at the top of their lungs. Get males and females involved. Have fun with it. Just make sure, when doing the screams, that you back away from the mic and make sure you aren’t overloading it or else it will sound distorted. But then again, a distorted sound may be what you’re looking for. In that case, be sure not to damage you mic if it is sensitive and expensive. If you have a dynamic mic, it might work better for the screaming since those are very rugged.
Also, add lots of reverb to all the things you record, which can add even more creepiness. Just about any audio recording software you use nowadays has a reverb effect built right in. In Reaper, just click the “FX” button in the track control panel on the left of the audio, Click on “Cockos,” and try “ReaVerb” and/or “ReaVerbate.”
Once you get going, you can really get creative and make up your own sounds to really add to the awesomeness of your house on Halloween.
Audio For Videos: Do Not Let Bad Sound Ruin Great Video
 The audio for videos, especially the videos produced in a home studio, always seems to take a back seat to the visual aspects involved in the project. I can see why this might be. They are, after all, called “videos,” which seems to imply that sound is less important. But boy is that a mistake! Nothing says “amateur” to me faster than crappy, echo-y, thin voice audio on a video, no matter how good it looks. I’m betting I’m not alone in this. So the question is: why would you go to all the trouble to make a video look good if you were just going to ruin it with crap audio?
I could guess. Maybe it’s because folks don’t understand how to GET good-sounding audio on a PC recording studio. Maybe they think it isn’t important. It’s possible they believe that it requires an expensive studio or high-end costly gear to achieve professional audio. I don’t know.
What I CAN tell you though, is that sound quality can be pushed into the professional level of quality without lots of expensive gear and without having to go to a commercial studio. The truth is that it’s more about knowledge than gear. It is very possible to make terrible recordings with expensive gear. I have both done it and seen it done many times.
But it is also possible to make great sounding recordings with really cheap gear if you know what you’re doing. And guess what? You don’t have to be a recording engineer to know what you’re doing. There are some basic audio principles, along with some tips and tricks anyone can use with cheap gear, that will allow anyone with a computer and half a brain to bring the good stuff when it comes to audio for videos.
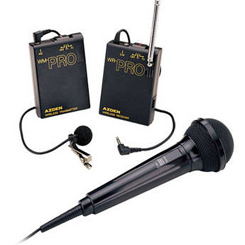
One of the main ways to get that improved audio is to use a lapel (or lavalier mic), such as the Azden WMS-Pro, which costs only $159.00. [update: There is now also a version of the WMS pro that plugs into smartphones and tablets as well! That one is the Azden WLX-PRO+i VHF Wireless Lavalier Microphone System for Cameras & Mobile Devices.
Here’s a video demonstration I did using this microphone:
The reason I mention a computer is that computers have allowed mere mortals (as opposed to tech-savvy electrical engineers or physicists with audio and acoustics engineering degrees) to record and produce high quality audio with cheap gear and modest knowledge.
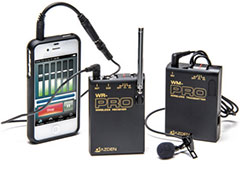
The next statement I’m going to make is going to be considered heretical to some purists. Are you ready? You don’t truly need to know that much about acoustics and audio in order to make excellent audio. It’s true. As long as you follow a few rules and understand just a couple of easy ideas, the computer age makes the rest possible and affordable. Now, before some of you pick up your rocks and take aim, know that I am not saying it isn’t better to have more knowledge about audio. But for too long regular people have been made to feel that unless they took special classes or just spent a freakish amount of time tinkering with electronics, they had to rely on the professionals if they wanted great audio. The only alternative, folks were led to believe, was to go out and buy very expensive equipment and software and, of course, then learn how to use all that stuff. Unless you were rich AND had too much time on your hands, that dog wasn’t going to hunt.
Well forget all that stuff! Home Brew Audio is here to provide all you regular people out there with the knowledge and resources you need to start recording and creating professional quality music, voice overs, loops, and sound effects with stuff you probably already own or can download for free. And we can get you started in the next 30 minutes. There really is no need to undercut the effectiveness of your videos, whether you’re making sales videos, music videos or movies. When bad sound can completely tank the best looking video, and when good sound can be had cheaply and quickly, there isn’t really any excuse for crappy audio anymore. Come on by when you’re ready to get started, and we’ll help you make better videos by making better audio quality for them.
How To Use An Audio Editor To Remove Saliva Noises From Voice Recordings
 Using an audio editor, you can REALLY improve your voice over recordings. This article and video shows you how to get rid of saliva noises when recording voice overs. Of course it works for any kind for any kind of vocal recording where your mouth is close to the microphone.
These saliva “clicks” – along with “p-pops,” (for how to remove those, see our article How to Fix a “P-Pop” in Your Audio With Sound Editing Software) are probably the two most common problems we experience when recording vocals.
Just this past week, I was helping a voice-over actor to improve the quality of her recordings. She had just been turned down for a job because, according to the client, there were too many saliva noises in her audio. When I listened to one of her recordings, I knew exactly what the client was hearing. I struggle with this on my own recordings, so I have experience doing everything I can to prevent that spit noise. But usually I cannot prevent it all, so some saliva noises get recorded.
So If You Can’t Prevent The Noises?
Once the noises are already in the recording, the only choice (other than trying to record again…and again) is to use audio editing tools to remove the offending saliva noises. My editing tool of choice for this is equalization (or “EQ” for short). To brush up on what EQ is, see our article What is Equalization, Usually Called EQ?
It is almost always best to prevent a problem rather than have to fix it later. So here are some things you can do to keep those spit sounds out of your recordings in the first place:
- Eat tart apple slices – This helps my wife and me quite a lot. Try different kinds of apples (or any type of food, for that matter), but we like Pink Lady apples for this.
- Drink water – This is probably the most commonly offered advice for keeping that saliva from sticking under and around your tongue. But again, try different things. I’ve heard of people using unsweetened tea and even beer for this:). That could be a fun voice-over session:).
- Mouthwash – Ironically, I find that the times when my mouth feels dry is when the saliva noises are the worst. You might try one of the moisturizing mouth rinses like Biotene to help with this. Biotene also makes a convenient moisturizing spray.
Fixing The Saliva Noises After The Fact
 Sometimes no matter what you do, your saliva finds its way into your recording. When that happens, here is what you do (which is shown step-by-step in the video below):
-
Open your audio in an audio editor
Though it is possible to do this kind of editing in digital audio workstation (DAW) software like Reaper (usually more geared toward the recording and mixing of audio), I prefer to do it in a program more focused on editing. Examples in include Adobe Audition, Sound Forge, and even the free Audacity. There are many others of course. I used Audacity in the example below, since the video is an excerpt from our course, The Newbies Guide To Audio Recording Awesomeness 1: The Free Recording Studio.
-
Find the saliva noises in the recording
Listen for where the saliva spit noises are located in the audio file and make note of where they are. Then highlight/select the first bit of audio containing the offending sound. We’re going to use EQ on as small an area as possible so we can be surgical about this. It we apply EQ to large areas of the recording that do NOT contain saliva clicks, the resulting voice could sound a bit muffled. The more we can surgically remove these noises without affecting the audio around it, the better.
-
Hit it with EQ
When we used EQ to fix p-pops, we reduced frequencies around 250 Hz and below. Those are low, bass-sounding frequencies. But for the saliva clicks, we need to focus in the higher frequencies from about 6,000 Hz (6 KHz) and above. See figure 1. You’ll see in the video how to do this using a graphic EQ setting in Audacity’s equalization tool.
As promised, here is a video showing you how to do all of this:
http://homebrewaudio.wistia.com/medias/wk6zbs5ku0?embedType=async&videoFoam=true&videoWidth=700
There you have it! Another way to clean up your audio quickly and easily, as long as you have a good idea what to do, which is what Home Brew Audio is here to do for you:).
Now go forth and produce better audio!
Sennheiser MKH 416 Shotgun Microphone Review
We normally think of shotgun mics as “movie mics” – the things that sound crew folks hang over people’s heads with those long boom poles when shooting video. and though they are awesome for that job, did you know they were also highly prized as voice-over mics? Either way, I want one:). My Star Rating –
[This review of the Sennheiser 416 shotgun mic originally appeared here in 2013. But I thought I would update it a bit in the wake of all the microphone reviews I’ve been doing in 2019. I still want one of these, BTW:). But I ended up buying an Electro-Voice RE20 (another one I was reviewing for B&H) for my voiceover purposes until then.]
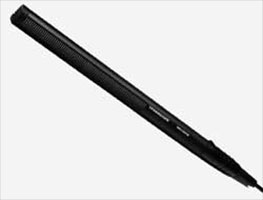
I had the privilege of testing out the Sennheiser MKH 416 microphone recently. What can I say? This mic has been described as the desert island mic by many. It’s so well known and well-liked that it goes by other nicknames too, like “The L.A. Mic” and “The Movie Mic.” Around the internet you see words like gold, the one, amazing, industry standard, and staple crop up over and over again.
So what is this thing that makes it so great?
Well you’ve probably heard audio through it before if you’ve ever watched a movie – or television. It is a standard in the film and TV industries, often used outdoors for news casts and interviews as well as location shoots. It is also used a lot in the voice-over world because not only does it make voices sound awesome, but it helps them cut through background sound effects and music. Many a movie trailer has been recorded with a 416. The next time you hear “In a world where……” etc, chances are that was recorded with a 416.
Also in this review I tested the Rycote Softie Windshield on the Sennheiser for an outdoor video test on a windy day.
So, enough of the gushing – gimme details. Yes, I heard you. OK, here is the skinny.
The Sennheiser MKH 416 is a short shotgun mic. That means that it is ultra-directional, picking up audio that is in front of it really well at longer distances than a standard condenser mic. We’ve heard of the cardioid pickup pattern. This mic has a hypercardioid pattern, which rejects sound coming from behind it in about a 120-degree field. The 416 is also different from regular condensers in that it uses something called RF biasing rather than the more common DC-biasing. You can read the technical details of this in this article, but RF (radio frequency, btw) biasing has some benefits, such as that the mic becomes less sensitive to moisture ( a good thing in an expensive mic commonly used outdoors), has a wider frequency response, and is extremely low noise levels.
Other features?
Other awesome features of the 416 make it nearly indestructible (not that I put that to the test with the review mic:)), less sensitive to plosives (p-pops), and less sensitive to the proximity effect, which is that thing where the low bass frequencies get more hyped the closer the mic gets to the source. Voice-over folks may think, “hey I like it when my voice sounds deeper when I get close to the mic.” My answer to that is that with this mic, you don’t need to rely on the proximity effect because the 416 picks up the lows of a human voice incredibly well already.
Use as a VoiceOver Mic
The 416 is fast becoming one of the most popular microphones in the voiceover industry, which has traditionally been dominated by large diaphragm condenser mics (LDC). I’ve already mentioned one of the reasons for that – you can spend less time worrying about p-pops, though in my testing, I still needed a pop-filter for the plosives. Another reason that the 416 can be a little further away from your mouth without picking up room sound noise. Plus it is lighter and much skinnier than your typical LDC. Both of those things can help when you’re reading a script while recording. But ultimately the real reason this mic is terrific as a voice mic is that it simply sounds incredible.
Shotgun Shootout
I compared the Sennheiser MKH 416 against my mainstay, the Rode NT2-A large diaphragm condenser, recording a short bit of voice-over copy. I was really impressed with how much better the Sennheiser sounded than the Rode – and THAT has never happened to me. Sure, I’ve never tested a $999 mic against my $399 Rode, but to date I have never recorded another mic that sounded better than my beloved Rode. There is a first time for everything. The Sennheiser made my voice sound rich, detailed, deep and punchy all in one aural experience of awesome. I now know why people call it the desert island mic.
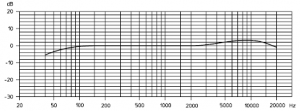
Be careful of the 5 dB bump starting at 4Khz
I did notice in the first test that the 416 produced a little more sibilance (the high hissy “ssssss” frequencies) than I normally like. Then I remembered that I have a bit of EQ permanently set on my preamp to reduce the lows and increase the highs. I did that because the Rode sounded a bit heavy in the low end without it. So I bypassed the EQ on the preamp and that took care of the sibilance issue with the 416. I did notice in the pamphlet that comes with the 416 that it is designed with a 5 dB “bump” in the high frequencies starting around 4 KHz. See the frequency response graph on the right.
Below are the two audio samples, first with the Rode, then with the Sennheiser.
VoiceOver On the Rode NT2-A
RodeNT2-A Sample
VoiceOver On the Sennheiser MKH 416
Sennheiser MKH416 Sample
Outside Test In The Wind
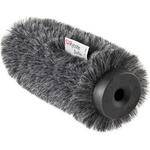
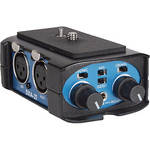
As I stated above, the 416’s most common use is in the film, TV and electronic news gathering (ENG) fields. I recorded a few different videos, one with just the built-in mic of my Canon Vixia HD Camcorder, and then three different shots with the 416 hooked up to the camera (one of the reasons I went with the Canon Vixia is that it has an external mic input) using a BeachTek DXA-2T Camcorder XLR Mic Adapter (see our review of the DXA here). First was the video with the 416 naked, without a windshield of any kind. Next I put on the foam windshield that comes with the mic. Then I thought I’d test a 3rd-party windshield (the fuzzy “dead-cat” kind) called the Rycote Softie Windshield (standard 19-22 mm hole size).
Results in the wind
The first result was that The shotgun was on a mic stand right next to the camera in this test, so the audio in all video clips below was recorded on mics that were the same distance away from my noggin.
The audio would have been truly awesome if we had a 3rd person holding the mic on the end of a boom pole (sometimes called a fish pole) mic holder with the mic just above my head and out-of-frame, pointing down at my mouth. I’ll do that test another day.
Now for the test against the wind. In video 1 (just the camcorder mic), you’ll notice the wind is extremely loud and the voice audio is thin and distant. In video 2, using the shotgun mic instead of just the on-board camera mic, the audio quality of the voice was MUCH better. But because there was no windshield of any kind, the wind was still pretty loud. For video 3 using the foam windshield that came with the mic, the wind noise was noticeably less of a problem. For final video we used the Rycote Softie Windshield. And though there was a pretty significant breeze, it was amazingly quiet.
Only the built-in camcorder mic (not shotgun mic attached)
With Sennheiser 416 shotgun mic attached, but without a windshield
Sennheiser attached with included foam wind shield attached
Sennheiser attached with Rycote Softie Windshield attached
Summary
![]() The Sennheiser MKH 416 shotgun mic is – how shall I put this – officially freaking awesome! Sadly, I have to return mine since it was on loan from B&H Photo-Video-Audio. Otherwise it would be my primary mic for all my voice-over and video work. It does cost $999, and as soon as the piggy bank gets heavy enough, to quote Mike Meyers, “it will be mine – oh yes – it will be mine.” Also the Rycote Softie Windshield worked magic at reducing wind noise for outdoor video use.
The Sennheiser MKH 416 shotgun mic is – how shall I put this – officially freaking awesome! Sadly, I have to return mine since it was on loan from B&H Photo-Video-Audio. Otherwise it would be my primary mic for all my voice-over and video work. It does cost $999, and as soon as the piggy bank gets heavy enough, to quote Mike Meyers, “it will be mine – oh yes – it will be mine.” Also the Rycote Softie Windshield worked magic at reducing wind noise for outdoor video use.
As long as I am quoting my favorite movies, here’s one from Ferris Beuller applied to the 416. “if you have the means, I highly recommend picking one up.“
[Update: B&H has “hands-on review” of this wonderful mic. Check that out here.]
Cheers!
Ken