Voice over recording tips – This is the third in a series of articles by Lisa Theriot on speaking in different accents, a useful skill for voice over actors.
 Okay, this is a personal trauma, but I will never get over Walter Koenig as Chekhov on Star Trek saying “nuclear wessels.” Would it have killed somebody to at least introduce the man to a real Russian speaker? I know it was the Cold War, but sheesh! W is not a letter in the Russian (Cyrillic) alphabet. The sound does not occur naturally in Russian. When Russians have to represent a W sound, they either change it to a V (B in Cyrillic) or they use Y which sounds like “oo” as in “pool.” Imagine spelling “wall” as “oo-all.” Wales is “OO-ales” and Washington is “Vashington.” A Russian, of whatever century, is going to look at the word “vessel” and pronounce it vessel. Sigh.
It’s appalling in the era of YouTube that anyone attempts a Russian accent without listening to some Russians speaking English. Heck, just pick up the DVD of White Nights, which features Mikhail Baryshnikov (authentic accent) and Helen Mirren. Though Helen is a fine English lady, she was born Ilyena Vasilievna Mironoff and her accent is honestly come by. I find that if I check IMDB, anybody whose Russian accent I can’t fault after five minutes is either Russian or Eastern European, or has an immediate family member who is. A possible exception is the fabulous Timothy V. Murphy. I loveloveLOVE the Russian mobster DirecTV ads, and I was completely blown away when I found out he was Irish. I have not been able to discover if he has any Eastern European relatives (he lists Serbian as well as Russian and many others as familiar dialects on his resume), but if he doesn’t, I’m even more impressed. Oddly, there are some sounds in Gaelic that are helpfully similar to sounds in Russian, but God bless the man, he did his homework. And I soooo want a pygmy giraffe.
Pitfalls waiting to expose your Russian accent as phony include…the letter H: Like W, it doesn’t exist in Russian. Their letter is X, pronounced like the <ch> in Bach. A breathy H sound with no slight phlegmy edge will give you away. Also the letter R: Russian Rs are rolled, more heavily the later English was learned. In fact, the tongue is pretty far forward in the mouth for most consonants; the letter D is often pronounced with a slight “th” quality. Short I: My Russian teacher always said most Russians can’t tell the word “live” from the word “leave”. Eef I hear “if”, I know eet ees phony accent. Short A, as in “cat”: this sound is rare for anyone but English speakers. A Russian saying “cat” sounds like a very quick “key-ett.” Articles: They don’t really exist in Russian. If you aren’t limited to a script, saying “I have apple” is much more likely than “I have AN apple” or “I have THE apple.” “Russia” is spelled with an O in Russian, so a Russian pronounces the first syllable as in “rock” rather than “ruck.”
I admit I am not Russian. I studied Russian when I was a volunteer for American Ballet Theatre; if I ever got the chance to say “your place or mine” to Baryshnikov, I wanted to do it in Russian (yes, I had the chance, and no, I chickened out). But I fell in love with the music of the language, and I don’t like to hear people butchering it. So remember that Tolstoy, Dostoevsky and Chekhov (the real one) are spinning in their graves every time Star Trek airs, and be careful with the Mother Russian tongue. ???????.
Lisa Theriot
Voice Over Recording
Accent on Accents: American or British? The Nose Knows
 Voice over recording tips – This is the second in a series of articles by Lisa Theriot on speaking in different accents, a useful skill for voice over actors.
I used to babysit some English children, and they found it delightful when I copied their accent and began to speak “normally.” When I asked them to copy MY accent, they said, “Oh, it’s easy to do an American accent; all you have to do is hold your nose.” They demonstrated, and I was somewhat alarmed when these children, who naturally had straightforward “BBC newsreader” British accents, produced fair Manhattanite American simply by holding their noses. They were nowhere near my SoCal American, but they were definitely more American-sounding than British-sounding.
This taught me two things. Number one, the less you know, the less you recognize. Just as many Americans miss the differences between, say, a West Country accent and a Merseyside accent, a lot of Brits will not hear the difference between “right coast versus left coast” American accents, especially from urban centers. (Most Brits can spot more pronounced accents, like Bronx or North Dakota, and almost everyone in the world can spot a “twang” accent, though they can’t usually distinguish between Texan, Deep South, and Midwest rural. Heck, a lot of Americans can’t.) The narrower your audience, the better your accent has to be. Try to convince a native Texan that you were born in Dallas, and you’d better be perfect; to convince a Californian, you might only need to slow down your delivery and throw in an occasional “y’all.” (I was born in California to a Texan mother; as a child, California kids at school would tease me about my “Texas” accent, while I can remember my Texan cousins remarking on how “funny” I sounded.)
The second thing I learned was the critical importance of the nose. As someone with a prominent proboscis as well as chronic sinus problems, I have spent years learning to speak and sing around my nose. This turned out to be a real boon in accent work, because if you can’t banish the nasality from your delivery, there are some accents you just can’t pull off. (Happily, there are a lot you can, even in Britain; South London and Geordies are pretty nasal, to name just two.) The opposite is also true; you’ll need to manipulate your nasality to do an accent from a culture that is more nasal than yours. When doing Indian British, I focus on shutting off my nose (and no, holding your nose won’t do—you’ll likely sound less like Shaheen Khan and more like you with a cold ).
Here’s an easy exercise to try. Get a short passage of text, say it as you would normally, then hold your nose and say it. It will probably sound ridiculous, but that’s the point. You’ll also feel the vibration in your nose through your fingers. Say it again, and this time, try to make your vowels rounder and deeper (say “how now brown cow” a few times). Drop your chin as you speak (say “Dad” and then “father” while watching what your mouth does, and you’ll know what I mean). You should notice the vibration reducing dramatically. Eventually, you’ll be able to sound almost the same with your nose pinched, though M and N sounds, which are inherently the most nasal, will still buzz a little. For you Brits trying to sound more American, the reverse will work; hold your nose and TRY to make it vibrate. Think flatter vowels (say “mitt meet mitt meet” for awhile) and grin while you say it. A little practice, and then, who nose?
Lisa Theriot
Radio Ready Voice Narration Sound: How Do You Get It?
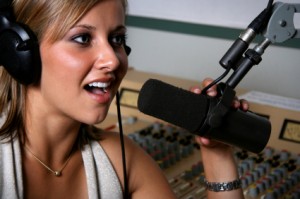 Radio ready voice recordings are possible to create at home.
We just received the following from someone who had just completed The Newbies Guide To Audio Recording Awesomeness 1 video tutorial course on home recording:
First I want to congratulate you on an excellent job. The home brew audio [Newbies Guide To Audio Recording Awesomeness (ed.)] is the best home recording tutorial I’ve invested in. I am simply amazed at what you were able to do on a home computer without using expensive recording equipment. I’m particularly interested in knowing more about the narration. Did you use special compression, EQ or effects on your voice during or post recording to get it to sound so rich and radio-ready? I’d sure would like to duplicate that sound on my project.
Thanks
Wow! That was quite a nice testimonial to the course, for which we are VERY grateful. And we felt his question about the process we go through to create what he calls “the rich and radio-ready” (don’t you just love the alliteration?) voice quality deserved a thorough answer. So here is what we wrote back:
Thanks so much Larry! I actually do use a pretty simple set of EQ, compression and noise reduction treatments on everything I do. Here’s how it goes.
The Recording Process
I record my voice in Reaper with no compression at all. I ALWAYS use a pop screen/filter to reduce p-pops (plosives) and I get my mouth about 3-5 inches from the mic, which helps with the “deep/low” energy on the voice. Also, I try to address the mic slightly off-axis, just about 15-30 degrees, which also helps with the p-pops. I do not run my narration voice through any filters or effects when recording. I just make sure the recorded level is high enough that the loudest bits are just below peaking/clipping.
Once I have the dry vocal recorded, I double-click on the audio item to open the audio in my editing program. I use Adobe Audition, but the effects I use can be found in most any decent editing program. If the ambient noise level is low enough (it’s important to keep the noise in the recording space as low as possible, especially computer drive noise), Audacity can handle the noise reduction, though I have to say that Audacity’s NR is not the best. I use Adobe Audition myself.
The Editing Process
Once the audio is in the editor, here are my steps. I never vary from this process.
- Noise Reduction. Sample (copy to the clip board) a second or two of the file where there is no voice or breath. This will contain ONLY the ambient noise. Then open the Noise Reduction tool in Audition, select the “Entire File” from inside the NR window, and click OK to reduce the ambient noise across the entire file.
- Eliminate p-pops. Listen to the audio from start and note EVERY time you hear a p-pop. Zoom in on just the part of the voice saying the “P” (or “B” or whatever the offending consonant is) and highlight it. Open the Graphic Equalizer tool in Audition. View the “10 Bands” screen. Starting with the 250 Hz slider, I progressively reduce the volumes to the left until the slider for the left-most band at <31 Hz is all the way to the bottom, which is 124 dB. For me, that works out to -5 dB at 250 Hz, -11 Hz at 125 Hz, and -17 Hz at 63 dB. You’ll have to experiment with your own settings for your own voice. Go through the entire file and run this EQ setting for each instance of a plosive. This is made MUCH faster is you create (save as) a preset in the Graphic EQ tool and then make it a “Favorite” so it always shows up in the “Favorites” pallet, which I always have open. That way I can just highlight the plosive and click my “Plosives” favorite, and it runs the preset.
- Compress. Once all the plosives are out, I run a subtle compression treatment. I created a preset Audition’s compressor tool, which they call “Dynamics Processing.” This preset has the settings: ratio of 2:1, threshold of -12 dB, output gain of 0 dB, Attack Time of 24 ms, Release Time of 100 ms in the Gain Processor, Input Gain of 0 dB, Attack Time of .5 ms and Release Time of 300 ms, and RMS (as opposed to Peak) selected in the Level Detector. Under General Settings I use a look-ahead time of 3 ms. Before I run the compression though, I highlight the entire file and (if needed) raise the level until the loudest bits are higher than the -3 dB line. If I have to lower the volume of one or two especially loud bits, I’ll do that first in order to get several peaks beyond the -3 dB line. I do this to ensure that enough of the audio is above the compressor setting threshold of -12dB. Then I run my preset compression settings as described above. To find out more about what compression is, see my post Vocal Compression Using Reaper’s ReaComp Effect Plugin.
- Normalize. After this light compression scheme that evens out the audio loudness, I want to make sure that the very loudest part of the compressed audio is RIGHT below or at 0 dB (without clipping), to optimize for loudness. That’s exactly what the tool called Normalize is for. See my post Audio Normalization: What Is It And Should I Care? I simply select the entire file and click on the Normalize tool in Audition. I always choose the “Normalize to 100%” setting, which puts the very loudest peak right at 0 dB.
That’s it! Less expensive editors will have the same tools as Audition. I only use that because I have been using a version of that program since 1996 or so when it was called Cool Edit Pro. I used to do EVERYTHING with it, including recording and mixing. But as with many things, when a program designed to specialize in one thing tries to offer “the entire enchilada,” they won’t be as good at those ancillary functions. This is true for Adobe Audition’s multitrack and mixing functions.
They are very good now, and one could do everything in Audition. But it makes for a bloated program (which accounts now for its price tag) that is still an excellent editor with some mediocre ancillary functions. That’s why I use Reaper for my recording, multitrack, MIDI and mixing needs. For a more affordable editing program that isn’t bloated with tacked-on extras (including price!), you can still use Audacity, though if you can afford it, I think ease and work-flow are better with a program like GoldWave Digital Audio Editor ($60) or WavePad Sound Editor ($79 normally). There are others of course that are more expensive, like Sony Sound Forge ($350) and Adobe Audition ($234).
I hope that helps!
Cheers!
Ken
Voice Over Jobs: Useful Tips For Landing Them
 Way back in the day, voice over jobs were only given to members of various voice actors’ unions. All of these members had agents, so they had the connections to land the job, but they also had the ability to get into a recording studio with the help of their agent to record their demos. Once they landed the job, they were even able to use the recording studios for the work that needed to be done. Now in 2011, these same jobs that took special invitations, connections and resources before are not only being advertised all over the internet, you can even apply for them on the internet yourself. Yup, anyone can do it.
There are literally thousands of voice over jobs available on the internet today, but even better is that these jobs are no longer exclusive to members of the voice actors’ unions. In fact, ordinary people are now filling many of these jobs from the comfort of their own home. Therefore, if you are interested in providing voice over jobs, whether it is narrating a book or doing radio ads all you have to do is land the right job. Voice over jobs are not that easy to come by, you need to remember that the competition in this market is fierce, so knowing a few things to help get you started certainly doesn’t hurt. And mark this well: audio quality is as important as ever. Just because audio recording is easier and more accessible than ever does not mean that crappy voice overs are now somehow more acceptable.
One of the best places to go to find voice over jobs is Voices.com, but there are many other websites similar to them out there, all you have to do is search for them. Voices.com allows you to create a free account, so that helps keep your start up costs down. As soon as you get your free account set up, you can begin uploading your demos to help you land the job of your dreams. Even if you do not have any job experience you can still land voice over jobs, you just need the knowledge to do it.
One misconception that people have about voice over jobs is that you need the fanciest equipment to make the best recordings. This is no longer true folks! You can make quality recordings with a $50 USB mic and a computer, as long as you have some audio knowledge. Even if you have never made a demo before there are many websites out there that can help teach some of the basics about creating great audio. Home Brew Audio has some of the most amazing audio tutorials that you will find on the internet to teach you the key fundamentals. What you need to remember is that even if you have hundreds or thousands of dollars worth of equipment you can still produce horrible audio if you lack the knowledge necessary!
So if you want to try out a new career, visit Voices.com for some excellent “getting started” resources, including scripts for different types of demos. Then come on by Home Brew Audio for some recording tips, and start producing your demos. Upload those to your Voices.com profile and you’ve taken the first step! A paid membership in Voices.com allows you to receive dozens of job postings via e-mail every day. Start submitting auditions for these ASAP. I recommend that whenever possible, you record a custom demo for these auditions, reading from the audition script the job poster almost always supplies. And then be ready to be persistent and patient. It will feel pretty darned great when you get paid for your first voice over job.
How To Record A Voice Over With Audacity
 Here are some suggestions on how to record a voice over. Ready to land your next voice over job?
This is a fairly detailed step-by-step guide for creating a pro quality voice over using Audacity (the free audio software). The steps here will work for any mic, but you should use at least a decent USB mic like the Samson Q2U (which you can get for 59 dollarinis). Ready? Here we go.
1. Open Audacity (you can download that here)
2. Make sure your mic is set up in Audacity
To do that, go to Edit/Preferences/Devices (choose the Samson mic under “Recording” and make sure it says “mono” under “channels.”
3. Click the “Record” button (big red circle) in Audacity – a track will appear and begin recording.
4. Record your voice-over
Here are some tips for that:
- Use a pop filter if you have one. If you don’t, you can make one quickly by stretching an old pair of nylon stockings over a wire hanger that you have shaped into a circle. But you can buy one for about $10 on Amazon – Auray Pop Filter.
- Record in as quiet a place as possible.
- Keep you mouth close to the mic (3-5 inches). Most of us record in spare rooms in our house, which means lots of echo-y, reverb-y room sound. And one quick way to reduce that that you can implement immediately is simply to record close (that 3-5 inches I suggest) to the mic. I believe that this could be the most helpful bit of advice on how to record a voice over of everything in this post.
- Keep recording even in you make a mistake. I like to clap my hand or make some other quick, loud noise after a screw-up so that I’ll see it on the track when I’m editing. Just make that mark and continue recording. You can cut the bad takes out during editing.
- Make sure the wave forms (blue blobs) are fairly large in the track. You don’t want to over do it to where they go out to the edges and beyond. But if they are too quiet – not much more than what’s on the center line – then you should turn up the input level* and start again until you get fat and chunky blobs. This may be the 2nd most important piece of advice for how to record a voice over!
* If you are using an interface unit to plug your mic in, you can turn the input level up on that. If you have a USB mic, go into your Windows Sound control panel, click on the Recording tab, select your mic, select Properties, click the “Recording” tab, and then “Level.” Make sure the slider is at around the 85-90 percent mark. Sometimes Windows puts this level down to like 20% for some reason.
5. Hit the “Stop” button when you’re finished (big yellowish square).
6. Now find all the parts you want to cut out (bad takes, baby crying, phone ringing, etc.) by highlighting that bit of audio and simply hitting the “delete” button on your computer keyboard.
7. Once you’re left with the parts you want to keep, it’s time to reduce the ambient background noise.
8. Find a section of the recording where you’re NOT talking, but the mic was recording. Usually this will be low-level computer drive noise, electronic buzz or hum, etc.
9. Select Effect/Noise Removal in Audacity and select “Get Noise Profile.” The Noise Removal window will close. You’ve just told audacity what constitutes “noise.”
10. Select the entire audio recording (double-click on the audio), open the NR tool again, and click “OK.”
This will filter out the ambient noise and leave your voice alone (for the most part).
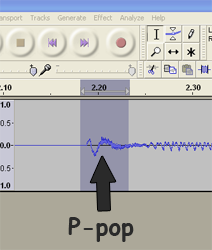
11. Listen carefully to the recording in headphones. You’ll likely have several “p-pops” or “plosives” as they are commonly called.
Zoom in to very beginning of an offensive p-pop (see:
https://www.homebrewaudio.com/how-to-fix-a-p-pop-in-your-audio-with-sound-editing-software for a bit more on this)
12. I find that bad p-pops tend to look like the letter “N” in the audio waveform.
See pic. Select just the “N” part and then go to Effect/Equalization in Audacity.
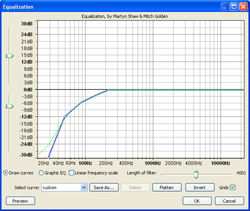
13. Create a curve on the horizontal line that starts sloping down to the left at about the 200-250 Hz spot.
Just click your mouse on the line wherever you want to create a drag-handle (4 or 5 spaced between 30Hz and 250Hz should do the trick). Then drag the 30Hz handle all the way down.
Drag the next one to the right down but not as far, etc. Continue until your curve looks like the picture above.
14. Then click “OK” and listen to the result.
The “p” sound should sound more natural and less like an explosion of air. You’ll also notice that the “N” shape is much smaller.
15. Next You’ll want to compress the audio just a smidge to even out the volume and give it some punch.
So select the entire audio file (double-click on the blue blob somewhere) and select Effect/Compressor. Set the sliders as follows: Threshold: -12 db, Noise Floor: -40 db, Ratio: 2:1, Attack Time: 0.2 secs, Decay Time: 1.secs.
Also, make sure there is a check in the box marked “Make-up Gain for 0dB after compressing.” Click “OK.”
16. Now listen carefully, through headphones, to all the audio.
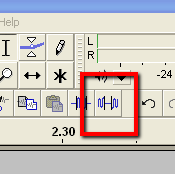
You may notice a few stray bits of unwanted noise in between the talking bits, so to fix those, just highlight them as you find them, and click the “Silence” tool button in Audacity (see Pic 3).
17. Lastly, save the audio in whatever format you need by selecting File/Export in audacity.
44.1KHz and 16-bit wav files are standard “CD quality” audio. Note that if you want to export the audio as mp3, you’ll need to download the Lame MP3 Encoder here: http://audacity.sourceforge.net/help/faq?s=install&item=lame-mp3 . That will install to the correct place automatically.
Hopefully that should give you an idea how to record a voice over, a professional sounding one, very quickly. For more in-depth info, check out our course, the Newbies Guide to Audio Recording Awesomeness.
Good luck.
Ken
