Here is a good article on vocal EQ tips. Whether you’re a voice-over person or you also record music, chances are good you’ll want to know a little something about vocal EQ (remember that EQ is short for equalization, which is one of the audio recording terms that don’t really describe what it means to the layman…sigh). If you want to brush up on what it is all about, check out our article here: What is Equalization, Usually Called EQ?
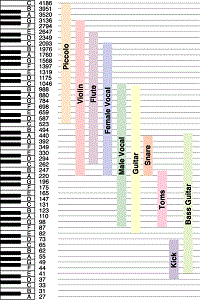 Anyway, the human voice tends to live in a very predictable place on the EQ spectrum. See the picture to the left, which should help describe this. Male and female voices overlap between 300 and 900 “hertz” (cycles-per-second or “HZ”).
In an ideal world, or more specifically, and ideal recording situation, you would not need to EQ the human voice at all. When doing voice-over work, I rarely use EQ (except to fix p-pops – see our article: www.homebrewaudio.com/how-to-fix-a-p-pop-in-your-audio-with-sound-editing-software). But we don’t live in a perfect world and few of us have that ideal recording set-up (great recording space, top-drawer gear, etc. so there are times when applying EQ to a vocal track is desirable or necessary.
Dev’s article explains those situations and gives you some ideas on how to deal with them using EQ.
Read his article here: http://www.hometracked.com/2008/02/07/vocal-eq-tips/
Voice Over Recording
What Voice-Over Equipment Do I Need?
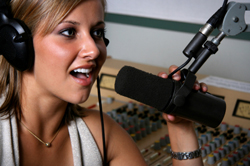 There are lots of folks who set up their home recording studios simply to do voice-overs. One of the first questions they ask is “what voice-over equipment do I need?” This post and the article at the end will answer that question thoroughly.
One of the best uses of a home recording studio is to produce voice-overs. That’s because, as opposed to a full-blown music production studio, you won’t need as much gear (so you won’t need to spend as much) or as much space in order to produce high-end professional results.
In the article below, you’ll learn about the equipment you are going to need for a top-notch pro voice-over studio, including an explanation of the different kinds of microphones, how to connect them to your computer, how you can use voice-overs (podcasts, video narration, etc.), and tips on everything you’ll need from hardware (mics, interfaces, software, out-board gear, etc.). If you still have any questions after reading this article, please post them in a comment at the end of this post and I will address them immediately.
So if you’re ready to take it all in, read the full article here.
Directional and Omnidirectional Microphones – What Are They Good For?
 Do yo have a directional microphone or an omnidirectional microphone? Are you even certain? The directionality of a microphone, that is, whether it picks up audio best from the front only, or from all around it (or some other pattern of pick-up) is frequently called the polar pattern of a mic. To get the best sound from a microphone, it’s important to understand the different polar patterns and how to use them properly. Polar patterns are also sometimes known as pick-up patterns, because their function is to ‘pick up’ the sound. There are three main polar patterns and each serves a different purpose.
Cardioid
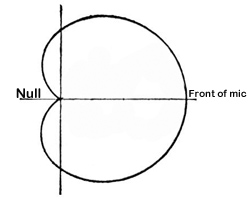 This is among the most common polar patterns that you will encounter. Meaning ‘heart-shaped’, this type of pattern will give you a good pickup to the front, with a lesser amount to the sides, and a good sound rejection to the back. Cardioids are also known as “directional” mics since they only pick up audio from one direction.
One of the main features (benefit sometimes and curse other times) of cardioids is that they can create a “proximity effect.” As the source gets closer, the audio sound will be “bassier.” You should be aware of this if you want to make your audio sound a bit deeper, especially for voiceover actors. Though sometimes you may want less bass in the audio. Knowing that you have a cardioid mic, you might be able to fix the tone just by getting further from the mic (but beware of letting more bad room sound in if you do this!) instead of futzing with EQ or other editing tools in your gear. Sometimes the simplest solution is the best.
 Cardioid polar patterns are recommended for most vocal applications, recordings and live recordings. It is suitable for venues where the recording environment’s acoustics are good, but less than perfect. This is because a cardioid rejects audio from behind it, so if you have reflections or other potentially unpleasant audio coming from behind the mic, its effect will be minimal. Sometimes the area behind a cardioid mic is called the “null” because it is sort of an audio no-mans-land. See picture on the right.
Hypercardioid microphones take the concept of cardioids one step further. It records from the front, and rejects everything to 120 degrees to the back. These work very well for on-stage live performances and live recordings that are in difficult or far-away situations.
Omni
Also called Omnidirectional, this type of polar pattern picks up sound equally around the microphone. These are meant to sound very natural and open are well suited environments that have good acoustics. They are also great in recording situations where natural, open sounds are the goal. And obviously, the main use for an omni mic would be when you want record sound from several different directions. One example of this would be if you had, say, a barbershop quartet in the studio. They could gather around the mic and each voice would be picked up equally. Setting up an omni in the middle of an acoustic group of musicians like a small classical string combo, bluegrass group, etc., is also a good use.
The biggest difference between omni microphones and cardioid microphones is that omni does not give the proximity effect. Omni polar pattern microphones are generally not recommended for live sound, as they can be prone to feedback issues, but they are great in recording studios, where the environment can be better controlled.
Figure-8
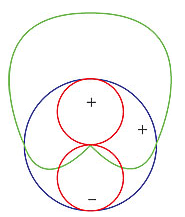
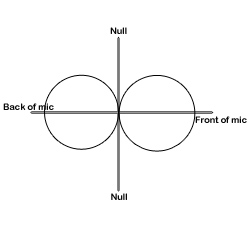 Also known as bidirectional, this polar pattern microphone will pick up sound equally from both sides of the microphone. This also means that the nulls for a figure-8 pattern are on either side, as indicated in the picture on the left.
You’ll find that the majority of ribbon microphones are configured as figure-8s. They are commonly used in mid-size recording studios. They can be sensitive, and so are not recommended for high SPL or harsh environments. They are, however, best suited for acoustic instruments, and for live recordings of jazz and acoustic groups. They are also often used for drum overheads.
Another use for a bidirectional mic is for when recording an acoustic guitar player who is also a singer. The mic can be set up so that one side is facing up at the singer’s head and the other side facing down toward the guitar.
Yet another really cool use of a figure-8 microphone is in combination with a cardioid mic to perform a stereo recording technique called mid-side (MS) stereo recording.
Mics with switchable polar patterns
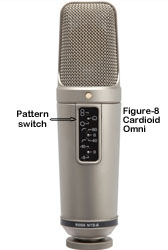
If you cannot afford to own at least one microphone that can give you all three of these patterns, you can get a mic that is capable of doing all these patterns. You just flip a switch and your mic goes from cardioid to figure-8 or omni. This is the route I took since I rarely have need of the other patterns, but definitely want the capability for those special times. The mic I use for this is called the Rode NT2-A. Take a look at the picture on the right.
Knowing which microphone polar pattern to use in each situation will ensure you get the sound you want, every single time. A basic understanding of the main types of polar patterns will help to unravel the mystery of some of this technology and give you professional quality results.
What is Ducking In Audio Recording?
 Ducking in audio recording is a technique for allowing a narrator’s voice to be heard clearly and consistently when there is other audio happening at the same time, such as background music. If nothing else, this is a rare example where the term actually describes, in plain English, what it accomplishes. Plus it’s fun to say.
So what does ducking mean anyway?
The way it works is pretty simple. Let’s say you have some background music for either a voice-over project or a video project that will have a narrator, and that this music will play at the same time as the narrator speaks. When the narrator is not speaking, the music should be clear and present – the main thing to listen to. But when the voice comes in, it should take over as the main audio, the background music becoming, well, background audio.
Sure, you can simply turn the music track volume down, but then when the voice goes away the music won’t be loud enough. You’ll have to turn it up again. This cycle will repeat as many times as the narrator stops speaking, which is a lot of work. Ick. I’m all in favor of reducing work. If only there were a way for the audio (or video) program to sense when the narrator is talking and when he/she is not, followed by the program automatically turning the music up when there is no vocal, and down again when there is. Guess what? There is! That’s what ducking is. The audio you want to be the primary thing, like the narrator’s voice, is made prominent because some other audio is “ducking” underneath it at key moments.
So how can I make my program do ducking?
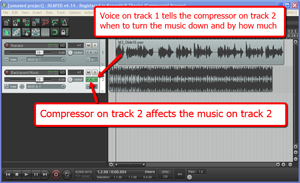 I’ll explain how to do it in Reaper, though the process is going to be the same in any multi-track audio program or video editor. There usually isn’t a tool called “ducking” in these programs since the technique uses a combination of tools working together. The main tool is compression (see our article Should You Use Compression In Audio Recording?), which is a tool that automatically turns audio down by a certain amount, but only when the volume gets loud enough to trigger it.
Usually you insert a compressor effect onto a track to control the audio on that track. So if you have a voice on track 1, and you put a compressor on track 1, the voice will trigger the compressor when its volume goes over a certain level or threshold that you set. Well the big difference with ducking is that the voice is still going to trigger the volume reduction actions of a compressor, but that compressor will be turning down the volume NOT of the voice, but of something else; in this case, a background music track. That means we have to put the compressor on the music track (say, track 2), but make it listen to track 1 for its instructions on when (and how much) to turn down the music. Pretty nifty huh? No? I lost you? Yeah, this kind of thing is much easier to explain with pictures. Take a look at the picture on the right. So it’s just a matter of having at least two tracks, putting a compressor on the one you want to get ducked, and feeding the output of the main audio (the voice) into that compressor.
Ducking in Reaper
In Reaper the first thing to do is put the compressor on the track to be ducked, in this case, track 2 with the music on. Simply click the FX button and choose the built-in compressor called ReaComp. Then close the FX window. You’ll be able to tell that the compressor is loaded up because the FX button will be green.
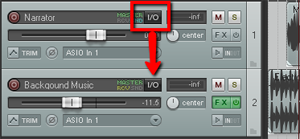 Next find the I/O (stands for “in/out”) button on the vocal track. See picture on the left. You’re going to click and drag that down to the I/O button on track 2. An I/O window will open with lots of scary-looking stuff on it. Leave everything the way it is except at the bottom where it says “1/2 => 1/2”. Just click the drop-down arrow next to the second “1/2” and change it to “3/4”. See the picture on the right.
 You have just set it up so that track 1 will send a signal to track 2. The next thing you need to do is click on the FX button in track 2 to open your compressor control. Now it’s time to tell the compressor NOT to listen to the music track for cues as to when to engage, but instead, listen to the voice on track 1. So in the compressor control window (see picture below and to the left). Find where it says “Detector Input” and use the drop-down arrow to change this from the default “Main Input L+R” to “Auxiliary Input L+R“. Now the compressor will change the volume settings of the music based on the fluctuations of the voice track. Pretty neat huh?
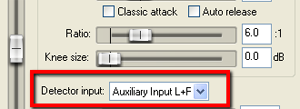 Now all you need to do adjust the compressor settings. You can experiment here by listening as you adjust. Start out with a Ratio setting between 4:1 and 6:1 and put the Threshold slider down to about -20 dB. One thing to be sure of before you do any of this is that the overall volume on the music track is already set to where you could hear the voice over it fairly well even without the ducking compressor. If the average volume of the music is so loud that the voice can’t even be heard to start with, ducking won’t help you much.
To make sure things are working properly, close the FX window and play your audio. Click the “S” (stands for “solo“) button on the music track to solo it. It ought to sound very odd, sort of choppy to you. This means it’s working. Now un-solo the music track and listen to how beautifully clear the voice is while the music is still very audible as well.
Use this knowledge for good.
Cheers!
Tips For Recording Vocals
Here’s an article about recording vocals, talking about things like how close you should get to the mic. It also talks about proximity efffect and how it can be a problem as well as a blessing. Personally when recording for voice over jobs, I like to use proximity effect (which basically says that you get a deeper, “bass-ier” sound the closer you get to certain (most) microphones) to make my audio sound a bit more intimate and immediate. But like anything else, too much of a good thing…..and all that.
Here is that article:
http://www.homestudiocorner.com/back-that-vocalist-up/