Usually when I talk about digital audio and things like bit-depth (see our post – 16-Bit Audio Recording – What The Heck Does It Mean?) and Sampling Frequency (see our post – What Is Sampling Frequency?), The presumed goal is that you want your audio to be as clear and clean (free from noise) as possible. But believe it or not, there are times, especially in modern electronic dance music (EDM) when you may WANT to do the opposite. That is, you want a nasty, distorted audio sound as an effect.
In the analog days, distortion was created when physical devices, like amps, tubes, or other components in the signal, were overloaded. This is how you get that rock and roll “power chord” sound. You did it on purpose. In the digital world, things are a bit (ha!) different. You can get distortion by lowering (when to get “good audio,” you’d think “higher is better”) things like bit-depth and sampling frequency. By doing that, you are changing the shape of the audio wave form from typically curvy, to “squared off” of jagged. It’s more to do with digital audio conversion than physical gear.
That digital audio distortion and “lo-fi” sound is often sought in electronic music, and one of the common methods is called “bit-crushing.” That basically means, for example, taking something down from 16-bit to 8-bit. Here is an article that explains that in a bit more detail:
http://www.musicradar.com/us/tuition/tech/distortion-saturation-and-bitcrushing-explained-549516
Recording Tips and Techniques
Tips For Recording Virtual Electric Guitar
 Virtual instruments are a favorite topic of mine. Sampling and modeling technology makes it possible to play and record instruments that sound real – ARE, in fact, real in many ways – without having to have the actual instrument in your studio. And never mind the advantage – in certain cases – of not having to learn to play that instrument in real life. I put violins into this category. I tried. I really did. But I never got nearly good enough to sound like the virtual violins I can trigger via MIDI and “play” with a keyboard. So there.
Electric guitar is another issue. I CAN play guitar. And I DO have an amp. But I almost never record “the normal way,” meaning with a mic pointing at the amp. I get to have tons of choices of different amps and sounds, with my amp simulator set-up, Pod Farm, from Line 6. I love it.
Here is and article with several tips on how to get the best results when recording an electric guitar without an actual amplifier. Check it out here: http://www.prosoundweb.com/article/six_tips_for_great_electric_guitars_without_amps/
Recording In A Poor Room
 I just read an article offering tips on how to record good audio if you are stuck doing it in a poor room. My definition of a poor room is a rectangular room, usually a converted bedroom in your house. By definition a rectangular is poor because the way sound bounces around in one of those, you tend to get dead zones where certain frequencies are cancelled out, and other areas where certain frequencies get artificially boosted. Those things make it worse for listening (important for mixing and mastering) than for recording, really. Probably the worst thing for recording is to have bare walls, ceiling and floors that are parallel, which make for lots of echos and reverb (yeah, technically the same thing – shh!), which you don’t want in your recordings.
We already have an article on this topic here – How to Build a Home Recording Studio: Part 2 – Four Tips For Preventing Noise, and actually here as well – Recording Vocals In a Bedroom Studio. Preventing noise is really what it’s all about. And room echo is one category of noise.
Mattress
The tips in the article I mentioned started out by saying to use a mattress BEHIND the person recording (assumption was that you are recording vocals). The logic was that the voice would bounce off the wall behind the mic, reflect again behind the vocalist, bounce off THAT wall, and then bounce back into the sensitive end of the mic. So if the mattress is behind the vocalist, the reflection off the front wall will be trapped by the mattress and not be able to bounce off the back wall to enter the sensitive side of the mic. OK, maybe. But if you put the mattress in front of the vocalist, behind the mic, the voice won’t reach the front wall, so there will be nothing to bounce off the back wall. The real truth is that it will depend on your vocalist, your room, and what kind of mattress. So if you decide to try the mattress method. Be sure to try it both ways. Heck, why not try both. If you have multiple mattresses, you could build your own mattress vocal booth.
Add Plush Furniture
The next tip from that article is to add soft, plush furniture, which is actually sort of an extension of the mattress idea, which is to have more things to absorb the sound, the logic probably being that what gets absorbed won’t be able to bounce off the walls. Again, this may or may not work. Sort of related to this is something I did once. We had a closet pole from which hung several wool cloaks (part of our medieval re-creation hobby). I positioned myself completely surrounded – almost covered – in wool cloaks. That eliminated outside noise and echo.
Use Dynamic Microphones
I strongly disagree with this one as a top tip for reducing noise. While it is true that dynamic mics offer less sensitivity than studio condensers, they also are usually (until you get into mics costing well over $300) not good enough for things like voice-over recording or lead vocals for music. The author states that the trade-off is worth it. Trust me on this one. Unless you are using one of the expensive dynamics, no it isn’t. I do voice-over work AND sing lead vocals, and I do it in a bedroom! See my articles above for the countermeasures I use. It is VERY possible to do it in a poor room. No, it isn’t ideal, but it definitely CAN be done. Now before I start getting hate mail from owners of really good dynamic mics, let me say that it is ALSO possible to get excellent vocal sound from certain dynamic mics, such as the Electro-Voice RE20 and the Shure SM7b. But these mics are $449 and $349, respectively. So at the very least, I would qualify this particular tip by saying “if you can afford it, try a really good dynamic mic to help reduce room noise.” But if you are on a budget, you can get more bang for your buck with a large-diaphragm condenser mic, which can act as a great all-around mic. The two dynamics I mentioned are pretty much designed for vocal broadcast – for radio, podcast, voice-over, etc. But I highly recommend renting or borrowing one of these mics before buying, as it may not help much, if at all, with your particular room.
Use Close-Miking
This one I absolutely agree with. It’s in my list of the top things to do. In fact, I would say it should be the first thing you try. By getting your lips very close to the mic – like 2-to-4 inches – you help to sort of “crowd out” the other types of noise. Also, if you have a mic that has a cardioid pick-up pattern, close-miking can give you increased low-frequency response, which can be pleasing for voice-overs.
Like so many things in audio recording, there are very few rules that apply to everyone and every space. Try these things out and see what works best for your voice, your room, and your budget.
Happy recording!
Creating Recordings With More Space and Depth
 One major goal of most audio recording projects is to create a natural sounding product for the listener – in much the same way that video seems to look better to us, less “flat,” when it has more depth and dimension. Note how popular it is to see movies in 3D. But even without 3D movie effects and glasses, film makers started using focus and blur, light and shadow, forced perspective, etc. to help create a more realistic space for the viewer. You can do similar things in audio.
One way this can be done, especially when recording music (since there are usually many sound sources), is to provide the listener with cues that give the audio some space – in multiple dimensions – as they are used to hearing it in real life.
Left-to-right
Most listening devices are stereo or better (surround, for example) these days. So you should take advantage of that. Multi-track recording software (DAWs) allow you to “pan” each track to the left or right by as much as you want. So you can spread things out from left to right to make them sound to the listener like the instruments are spread out as they would be in real life.
Sometimes you might want to widen a single sound. For example, a piano almost always sounds best when it is recorded in stereo. The instrument is large and wide in real life and people typically expect to hear it that way on a recording too. But what if you only have a mono recording of a piano? How can you widen it? Well, you can use a technique that plays a trick on the listener’s brain – called the Haas Effect. You can read more detail about this in our post The Haas Effect, but basically you can make a copy of a mono track, delay it slightly in time, and then pan both versions apart.
Of course certain things may be recorded in stereo – either with two mics or a stereo mic – and others in mono. Then you space things out across the horizontal spectrum to give them a more natural feel.
Front-to-back
Another thing people are used to is natural reverberation. You may not notice it in real life, when speaking to someone. But if somehow the voice of the person your were talking to were to suddenly lose all room reverberation (which is what happens when the sound bounces off the walls, ceilings, and everything around it), it would sound very odd. So in your recordings, in order to make something sound more natural (assuming that’s what you want – which you may not. For example, some kinds of voice-overs intentionally sound a bit unnatural – deep and in-your-face like it’s coming from inside your brain), it helps to add some front-to-back space using reverb effects. For example, if a voice or other instrument sounds too “up-front,” you can give the illusion of pushing it back and further away by adding some reverb.
Another way to make things sound further away is by turning them down. In real life, things that are farther away have less volume than the same sound up close. This is one of the most basic things you do when mixing sounds together.
Bottom-to-top
This idea may be more applicable to making a music mix sound more full, rather than more natural. But it does help to fill out a sound pallet for a listener. Try to provide sound that covers the frequency spectrum from low/deep sounds like bass guitar, kick drum, tympani, bass fiddle, etc. all the way to high sounds like cymbals, high-hats, tambourines, piccolos, guitars capo’d way up, etc. The middle frequencies can be filled with voices, guitars, pianos, violins, violas, etc.
The way we use this in our music recordings is to listen to a mix and decide if there is a hole somewhere, or if we are missing highs or lows. For example, we were working on a song that had a guitar with no capo, a bass, a bodhran hand drum and a male voice with male harmony. It was decidedly “low-heavy.” That told us we needed to add some higher frequency stuff to help balance it out. So we added a guitar with a capo on the 5th and/or 7th fret, a female harmony, and a tambourine. We might also have added a mandolin, flute, high fiddle, etc. Doing that really helped to provide a full and rich sound that was balanced.
So to sum up, you can really improve your audio recordings by adding more depth and dimension using several pretty common recording techniques.
Hope that gives you some tips to make your audio sound awesome!
How To Create The Most Common TV Show Sound Effect
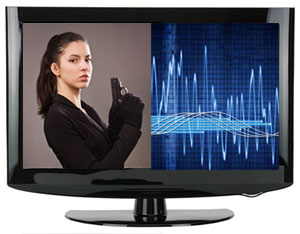
 If you’ve watched TV in the last few years, you’ve heard it. There is a sound effect, usually in cop dramas (though I heard it in an episode of Dr. Who recently!), that always comes in just after a character says something dramatic, almost always at the end of a scene. I think I first noticed it on the CSI shows. Then I started hearing it everywhere! It seems like every TV show producer feels they need to have this effect in their show about 10 times per episode nowadays. It sounds like this:
It’s a really easy sound effect to create using any recording software. I used Reaper. Here is how I did it.
Record a Single Piano Chord
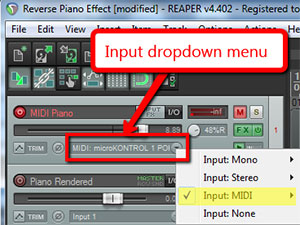
 I started out with a single track in Reaper. I used a virtual instrument – a piano – using MIDI. To do that, simply choose “Input: MIDI” from the Input drop-down menu on the track control panel (see the illustration on the right). You can use any VSTi piano plug-in. I used the one in The Garritan Personal Orchestra. Of course, you can also do this by actually recording a REAL piano:).
Anyway, just record a single hit of any chord. A minor chord works best since they always use this sound effect to increase suspense and drama. Let the sound of the piano die away naturally. If you use MIDI to do this, like I did, you’ll want to render the track, so you have an actual audio file rather than a MIDI file. Then import that back into your Reaper session on a second track. Next, you’ll want to mute the MIDI track so that you are only working withe the audio track from here on in.
Reverse the audio
Now you’ll need to reverse the audio. The reason it sounds so cool and works so well as a suspenseful sound is that the audio is backwards. That allows it to rapidly build from a quiet sound into a loud crescendo, and then just stop suddenly. To reverse an audio track in Reaper, right-mouse-click on the audio item (the blob in the track), and select Item Properties. Then put a check mark in the “Reverse” box at the bottom left of the Item Properties menu and click OK.
That will create your backwards audio. Then all you have to do is drag the left edge (left-mouse-click and hold) of the audio item to shorten it to the desired length. This effect usually only takes about 3-5 seconds.
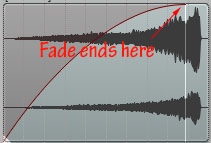
 Finally, all you have to do is create a long fade-in. Just hover your mouse over the top left corner of the audio item until the cursor changes into the “fade” icon. Then just click and drag to the right to make the fade end just before the last bit of audio.
And that’s it! I did this in Reaper, but the same steps will work in any audio software. All together, it took me about 5 minutes to do. Now you know how to create a cool sound effect for your videos if you have something suspenseful to say:). Or maybe a video producer will ask you if you know where to get this sound effect. Then you could start a whole new sound-design business with your audio recording chops. Stranger things have happened.
Cheers!
Ken