 Somebody asked a question in a forum about how to do live streaming of an event. She’d never done this before. Somebody jumped and gave her advice about the video part of the equation, but said “Ken probably has a better idea about the audio.” Thanks Phil:). The truth is that the same tips I give about getting good audio for any kind of video will also apply to a live streaming event. There are just a few additional potential situations that you may have to deal with, like if there is already a PA/sound system there to amplify the presenter.
Anyway, after I posted a rather lengthy reply, I thought it would be helpful to any of our readers who may want to live stream an event and has not done it before. So below is the advice I gave:
There are a lot of variables at play here (the person who asked the question didn’t give many specifics about the event she wanted to stream). Things depend on how the event is being presented. For example, a simple person-sitting-in-front-of-a-computer can be done using a webcam as Phil (the first person in our group to give her streaming advice) said. The webcam’s software can use whatever audio device you have connected. I recommend at least a large USB mic (not the headset kind) – something like a Samson Q1U ($38) on the lowest cost end, but preferably something more like a Samson C01U ($80) or the new Rode NT-USB ($169) (there are lots of choices these days). That’s the simplest set up.
On the other end of the spectrum is capturing a presenter who is already being mic’d through a PA and speaking in front of an audience. For that, the webcam may be insufficient and you may need a video camera/camcorder. For that scenario you have a number of options. If the camcorder has a mic input jack (many don’t!), you can put 2 mics in front of the presenter, one for the PA and one for the camera. That’s the easiest. If your video camera does NOT have a mic input, you have to capture the audio to the computer via a USB-connected (easiest and cheapest) audio interface – something like a Focusrite Scarlett Solo ($99.99), or Alesis MultiMix 4 ($79). Again, if the event is already being amplified by a PA, you could run a separate mic just for the streaming and set that up next to the PA mic. If the presenter is wearing a lapel mic and walking around a lot, you could either ask the event sound guy for a split output from his mixing board and run that cable to your audio interface. Or even simpler, just set your mic in front of the PA speaker.
Once the audio is going into your computer, it all depends on the streaming service/software you use. Many (maybe all?) of them simply use audio already coming into your computer. On the video side of things – actually getting a camcorder video into the computer for streaming live – well, did Phil mention I was the audio guy and not the video guy?:-P.
But I’ll give you my two cents on getting the view into the computer or live streaming. I was stuck in the paradigm of a “webcam” being a little thing that clips to your monitor. But there are webcams now that are tripod mountable and pretty much designed to do what you’re doing. If you’re using a laptop and can get close enough to your subject with it, a simple USB webcam is a good affordable solution. But there are also WiFi webcams that would allow you to “untether” from the computer. Of course that’s more expensive (Logitech Broadcaster Wi-Fi Webcam – about $200 ).
And if you already have a standard camcorder, it might support USB live streaming if it has a USB output (might depend on the service you’re using to stream as well). Or it may have an HDMI output. You could get/add an HDMI input for the computer if it doesn’t already have one. Hopefully you’ll be able to do what you need with all those options. Or maybe somebody who has done more live streaming of events can chime in.
One last important point about live streaming. Doing it on your personal internet connection might result in choking of your signal if more than 100 people want to watch. So you should look into a streaming service such as Ustream or Wirecast. They can take the signal onto a cloud or content delivery network that can flex with traffic and still provide a good non-stuttering signal to the end user.
Good audio is the ingredient usually missing from most internet video, including live streams. I leave you with a great quote tI found on a live streaming tutorial at Tuts+: “A high-quality audio stream can make jerky video more bearable, but terrible or distant-sounding audio can’t make up for great video quality. If at all possible, use a lapel or headset microphone for a moving source or a good quality mic close to a stationary source.” Yes!
Recording Tips and Techniques
Interview With Mastering Engineer – Thaddeus Moore
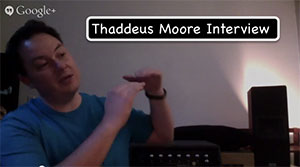
 Last night I had the pleasure of interviewing Thaddeus Moore, who is the lead mastering engineer for Liquid Mastering. We talked for an hour audio recording, mixing and mastering, and Thaddeus shared his thoughts on the best way to do (or not to do:)) these things in a home recording studio. We also get some great insights into what mastering actually is, and why it is advisable – if at all possible – to have your songs mastered by someone OTHER than you:).
We did this interview using Google Hangouts On Air, which creates a video of the event and places that video onto our YouTube Channel. This is excellent news for a number of reasons. First, it allows folks who could not attend the live interview to see the entire thing when it is convenient for them. And 2nd, it allows us to go back and watch multiple times so we don’t miss anything! I just watched the first 5 minutes again and was reminded of some important things I’d already forgotten! There is gold here if you want to improve you music recording and producing skills.
One of the most interesting answers Thaddeus gave was to my question asking for a piece of over-arching advice for recording musicians or folks hoping to get into recording their songs. He said that more important even than gear or production techniques is the song itself! “The best thing that you can do focus on content in your writing and compositions. There’s no better gear for a song than a good song.” I bet you would not have guessed something like that would be at the very top of his list!
There’s no better gear for a song than a good song.
I’m going to have the interview transcribed so I can put everything into words. But that will take a few days. So until then, you can watch the replay at your leisure below or over at our YouTube Channel here: https://www.youtube.com/channel/UCEoaZXqy26HigFAmAuO7vCA
How Do You Overdub When The Audio Is Delayed?
 Someone sent me and email asking why he was hearing his voice two seconds after he spoke/sang into the microphone (this kind of delay is called “latency,” if you care:)).
My first thought was that he must be trying to record with a really old sound card that probably came with a really old computer. But he went on to say that though he was using a pretty old laptop And he had a Focusrite Scarlett 2i2 audio interface!
What causes latency?
there are several things that can cause latency. But for the most part, it shouldn’t matter if you use an old computer (as long as it has USB ports, which is how many interface units attach) if you connect a decent external audio interface like the 2i2. The 2i2 will give you real-time monitoring, which means you can hear what you are recording in real time. No delay.
But you definitely have to make sure you plug your headphones into the interface box and NOT the computer. In fact, you should make sure that the on-board sound card is disabled. You can do that in your operating system audio preferences or control panel. If you don’t do that, you might end up recording audio both from the intended microphone plugged into your interface, AND potentially from a built-in microphone on the computer somewhere.* This is especially true for laptops, with their helpful (apply sarcasm to that last word) web cams and mics.
Is latency always a problem?
Anyway, latency may not be that huge a problem if you’re just recording a single track of audio like a voiceover. Two seconds is pretty distracting though, even for that.
But that much delay can make multitrack recording pretty much impossible. You need to be able to sing (or play) along with the already-recorded track(s). So if you are overdubbing – layering additional audio tracks to previously recorded audio – you need to address .
Below is my reply to the person who sent me the email:
Hi Joe,
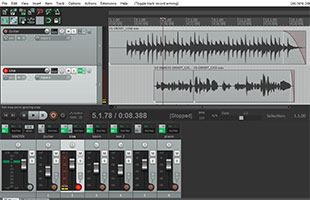
This is almost certainly not the fault of your old computer IF you are using the Focusrite 2i2. But you have to make sure you’re using ASIO as the driver type. You can check this in Reaper under Options/Preferences then select Audio/Device. In the drop down menu in that screen, next to where it says “Audio Device:” you must select “ASIO.” Then you should see your Focusrite Scarlett 2i2 as the input and playback (output) options.
Then I would double-check in your Windows settings (Control Panel then navigate to Audio Devices) to make sure your default input/recording device and playback device is the Focusrite.
One last thing – make sure your headphones are plugged into the Focusrite. If you’re trying to monitor playback through the laptop headphone jack, that could cause this problem.
If you make those changes, you should not have the latency (the term for the playback sounding delayed like you describe), we can check something else. Good luck!
So if you have any issues with latency
Ken
* This actually happened to a guy I was helping to do voiceover recording. He had a good mic (Rode NT1) and interface (Avid FasC:\Users\Studio\Pictures\Reaper_Overdub_Pic.pngt Track Solo), and yet his audio sounded noisy and really echo-y, like he’d recorded it in the kitchen from really far away, into a terrible mic. We tried several solutions to no avail. Finally, I asked him to check in the Windows 7 “Manage Audio Devices” section to see what microphones were enabled.
Different Ways To DeEss A Vocal Recording
 The term “deEss” or “de-ess” refers to editing an audio recording – usually of a voice – when the “S” (and sometimes “sh” and “th,” etc.) sounds (technically called “sibilance”) seem much too loud in relation to to rest of the vocal. It involves trying to reduce the volume or energy of JUST the S sound while leaving the rest of the vocal alone. There is a specific kind of audio editing tool for this, called a “DeEsser.” See my article How to Fix SSS-Sibilance in Your Audio With Sound Editing Software for the basics on sibilance and deEssers.
But there are other ways to tame those sibilant sounds. Below is a post from Audio Geek Zine with some ideas on several different ways to do it. This article is extra cool since it uses Reaper for the examples. Our course, The Newbies Guide To Audio Recording Awesomeness 2: Pro Recording With Reaper, shows you how to use Reaper to record and produce professional audio projects. I used Reaper in that course because that is my go-to recording software. The concepts taught, however, are certainly just as applicable to any other recording program.
Anyway, I digress. The article I mentioned about different ways to de-ess (deEss, whatever) a vocal is here:
http://audiogeekzine.com/2013/07/advanced-deessing-techniques/
The Snap Tool In Reaper: The Benefits And Possible Pitfalls
 We have a video on YouTube showing how to use a built-in tool in Reaper (ReaFir) as an excellent noise removal tool (that video is here: Hidden Noise Reduction Tool in Reaper). Interestingly, we received a comment on that video today that said “Dude – I didn’t even come here for the snap and select thing but that helped me soooo much thank you.”
That got me thinking that if the commenter felt the snap tool comments in the video, which were just there to help the viewer more accurately select part of the audio containing ONLY noise, were that valuable, maybe we should dedicate a post to just that. So that’s what’s happening right now…even as you read this:).
Snaps and Grids
The reason for a Snap tool in software that uses grids – such as graphics programs, video and audio programs, etc. – is to enable a user to accurately place a cursor onto a grid line. You literally cannot place the cursor between two grid lines. Whichever grid line your cursor is closest to is the one that it will snap to. This can be a great help in lining up multiple media items. In audio programs like Reaper, it also allows you to select audio that starts and stops exactly on the grid lines, which – when set to “bars and beats” – makes it super easy to select exactly one measure of music (assuming that music was recorded to a click-track/metronome). That, in turn, allows you to cut or copy entire bars of music, paste them somewhere else in the song, and have them be musically correct.
Of course there are tons of other uses. One such is demonstrated in our video on how to copy/paste instead of “punching in” when you need to fix mistakes while recording. See that post and video here: Quickly Fix Audio Recording Mistakes by Overdubbing.
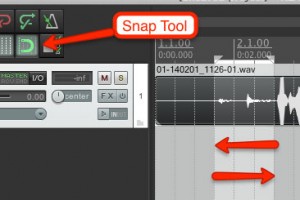
However, the downside of having the Snap tool enabled is that you give up some control. You may want (or NEED) to select audio whose edges are between grid lines. Or you may just want total control over where you put the cursor. But both of those things are impossible when snapping is enabled. Wouldn’t it be great if you could toggle snapping on and off whenever you wanted? Well you can in Reaper. It’s in the default tool panel – a button that looks like a magnet. See the picture at the top left. Also, of course, there is the video below that shows you how to use it about half-way through.