MIDI controllers are used for everything such as mixing, production and performance. Here are some of the best gadgets you can use for cool controls. Check it out here…
Recording Tips and Techniques
Where Is The Track Volume Slider In Reaper 5?
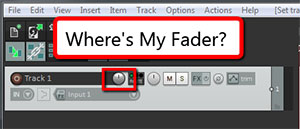
 Are you wondering where the horizontal fader or “slider” control went when the Reaper 5 update came out? You’re not alone. The default control changed to a rotary knob in the latest version. When using the track panels along the left side, I find it a lot easier and somehow more intuitive to use the slider/fader. And the controls in the mixer view (vertical controls along the bottom of the screen) still have sliders for volume.
But I often don’t use the mixer controls at the bottom, since many of my projects don’t have a huge number of tracks. I like using the horizontal track control panels instead.
So how do we get the fader back?
It’s actually really easy. Whew!
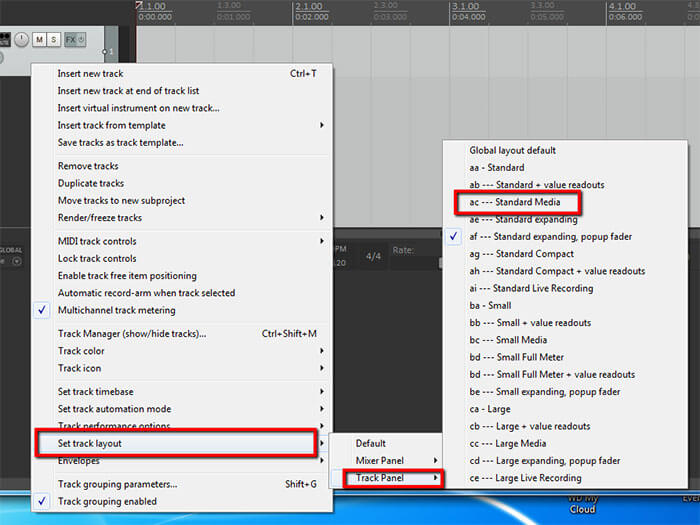
- Just right-mouse-click over a bit of the blank gray area in the track control panel (in other words – not on any of the buttons or readouts). That will give you a pop-up menu.
- Hover over “Set track layout,” then hover over “Track Panel.”
- Then you’ll see a list of 19 layouts to choose from. Select “ac — Standard Media.”
- Rejoice in the return of your slider!

The answer is really easy, but as with so many things, it totally depends on having a little bit of knowledge. Well, that or looking in the manual. I did mention I was a guy, right?
Here is a video showing you how to do this step-by-step
http://homebrewaudio.wistia.com/medias/2eqhili2nx?embedType=async&videoWidth=700
So if you were wondering where your slider/fader went, and you didn’t know how to get it back, I hope this helps!
Cheers!
Ken
How To Avoid 6 Common Mixing Mistakes
Rob Boffard sums up 6 common mixing mistakes that we can actually avoid. Mixing is not that easy and if we continue to avoid these common mixing mistakes, it will be easy for us to become a professional mixer instantly. Read more from Music Tech in this article.
How To Finish Long Voice-Over Jobs Faster
 Here’s a tip to help you record and finish long voice over jobs more efficiently (which translates to much faster). If you are lucky enough to have gotten a fairly long voice-over job, such as an audio book, documentary narration, etc., then you know that there will be little mess-ups along the way that need to be fixed at some point. There are a few ways to deal with that.
Ways to Deal With Mistakes
- The best and fastest way to produce an error-free voice track is to never make a mistake. Shya! Good luck with that. I will grant that there are freaks of nature who can do it perfect every time. But most of us need at least SOME do-overs, whether it’s because we mis-read something, stumbled over pronunciation, or just felt like the emphasis or “feel” of something was off some how.
- Stop recording to delete every mistake and re-read the part each and every time it happens. Yeah, that’s an option. But if you do it this way, you’re going to be working on that job for a very long time.
- Never stop recording. When you make a mistake simply wait a second then go back and re-read the part and continue.
Which One Is Best?
Well, as I stated above, option 1 is the best if you can manage it. But for mere mortals, option 3 is the way to go. You simply continue recording until you’re done, leaving all the mistakes in to be deleted after the fact. I realize that the quality gurus out there are going to complain that fixing an error as soon as possible is usually the best way to go, and I agree with that…for most things, especially physical operations like manufacturing. But in this case, if you use the tip I’m about to tell you about, deleting the mistakes after the fact is best.

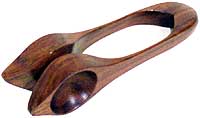
OK, so what is this tip? It involves making a loud sound right after you mess up and right before you re-read the part you messed up. How you do this is less important than that this loud sound leaves an obvious visual cue in the waveform (the blobs that appear on your screen when you record). I use either of 2 methods, snapping my finger close to the mic or using a wooden musical percussion instrument (wooden spoons) that makes a very loud “clack” when you tap any part of your body with it. I’ve heard that some people clap (lately I heard someone say they clap 3 times). Either way, the goal is to leave a visual mark in the audio (yeah, this method requires you to see sound. Don’t think about that one too hard!) so you don’t have to spend any time hunting for the mistakes while editing.
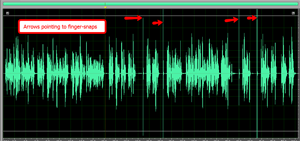
 In the picture to the left, you can see where I make the visual cues by snapping my finger close to the mic after a mess-up (no cracks about how often I mess up! That’s not the point;)). Compared to my voice narration, these quick snap or crack sounds stand out like a sore thumb. Now I can simply zoom into each mistake and delete both the snap sound and the mistake. It took me all of about 45 seconds to do that for all 4 edit-points in the job to the left.
I want to repeat here how important it is that the noise you make be LOUD and “snappy,” or it might not work. I record with someone often who, on the rare occasions that she makes a mistake, blows a raspberry with her lips, which makes no obviously different wave form cue. I tell her to read it again and continue, but when editing her finished audio, I have to listen to the entire thing to make sure I find and delete the mistake and raspberry sound.
So get in the habit of snapping or clapping, or carrying a pair of funky wooden percussion spoons, or whatever it takes. This will prevent a lot of stop-and-start when you’re recording, as well as speed up the process so you can get the voice-over job to the client and get paid. So get clackin’, or snappin’ or slappin’!
Tony, in the comments below, recommended dog training clickers like below. Thanks Tony!
3 Steps To EQ Vocals
There are 3 steps to mixing vocals to give clarity of sound, headroom and more upfront sound. An article by Recording Revolution talks about there 3 great and easy steps that we can follow for vocal EQ. Here it is..