Regardless of how long you have been creating or producing music, there will always be room to improve. Here are the first batch 10 tips to help you improve even jumpstart your craft.
Tuning your drums, changing the pitch can actually help improve the overall sound quality. Tuning up the kick drum can make it’s sound blend better with a bass guitar, same as tuning down can make it sound like the bass drum. Tune it the way you want to use it.
Templates are good, taking the time to actually create templates increases productivity helping you in the long run.
Read more here: http://www.musictech.net/2016/07/10-ways-to-improve-your-music/
Recording Tips and Techniques
Easy Home Recording Tips To Avoid Ruining Your Audio
 Here is an article that gives the kind of advice I really like. It shows you how to prevent messing something up, as opposed to figuring out after the fact when fixing it is hard or impossible. Sure, it’s great to learn from your mistakes. But it can be much faster and less frustrating to learn from somebody else’s mistakes.
This article is pretty brief and I agree with all the points. I will clarify one and add to another though.
#5 says Don’t Do Nothing, and yes, the double-negative is deliberate;). He’s talking about failing to take any actions to prevent recording bad sound from the outset. These actions, the ones you SHOULD take, include things like making sure you use the right mic, putting it on a stand, doing something to reduce the effect of room noise (my best advice for that if you do nothing else is to get your lips close to the mic – like 2-3 inches close; assuming you’re recording vocals, of course.)
# 4 says Don’t Record With Reverb. Though I agree, I think this should be expanded to not recording with any effect. Sometimes a limiter of compressor is useful – maybe – if you are VERY careful and there is no other way to control dynamics. But as a rule, avoid recording with any effects printing along with the source. Once it’s there it can’t be removed. Apply all the effects you want AFTER the pure sound is recorded.
The original article is here: http://www.audio-issues.com/recording-tips/recording-ruin/
Cheers,
Ken
How To Use An Audio Editor To Remove Saliva Noises From Voice Recordings
 Using an audio editor, you can REALLY improve your voice over recordings. This article and video shows you how to get rid of saliva noises when recording voice overs. Of course it works for any kind for any kind of vocal recording where your mouth is close to the microphone.
These saliva “clicks” – along with “p-pops,” (for how to remove those, see our article How to Fix a “P-Pop” in Your Audio With Sound Editing Software) are probably the two most common problems we experience when recording vocals.
Just this past week, I was helping a voice-over actor to improve the quality of her recordings. She had just been turned down for a job because, according to the client, there were too many saliva noises in her audio. When I listened to one of her recordings, I knew exactly what the client was hearing. I struggle with this on my own recordings, so I have experience doing everything I can to prevent that spit noise. But usually I cannot prevent it all, so some saliva noises get recorded.
So If You Can’t Prevent The Noises?
Once the noises are already in the recording, the only choice (other than trying to record again…and again) is to use audio editing tools to remove the offending saliva noises. My editing tool of choice for this is equalization (or “EQ” for short). To brush up on what EQ is, see our article What is Equalization, Usually Called EQ?
It is almost always best to prevent a problem rather than have to fix it later. So here are some things you can do to keep those spit sounds out of your recordings in the first place:
- Eat tart apple slices – This helps my wife and me quite a lot. Try different kinds of apples (or any type of food, for that matter), but we like Pink Lady apples for this.
- Drink water – This is probably the most commonly offered advice for keeping that saliva from sticking under and around your tongue. But again, try different things. I’ve heard of people using unsweetened tea and even beer for this:). That could be a fun voice-over session:).
- Mouthwash – Ironically, I find that the times when my mouth feels dry is when the saliva noises are the worst. You might try one of the moisturizing mouth rinses like Biotene to help with this. Biotene also makes a convenient moisturizing spray.
Fixing The Saliva Noises After The Fact
 Sometimes no matter what you do, your saliva finds its way into your recording. When that happens, here is what you do (which is shown step-by-step in the video below):
-
Open your audio in an audio editor
Though it is possible to do this kind of editing in digital audio workstation (DAW) software like Reaper (usually more geared toward the recording and mixing of audio), I prefer to do it in a program more focused on editing. Examples in include Adobe Audition, Sound Forge, and even the free Audacity. There are many others of course. I used Audacity in the example below, since the video is an excerpt from our course, The Newbies Guide To Audio Recording Awesomeness 1: The Free Recording Studio.
-
Find the saliva noises in the recording
Listen for where the saliva spit noises are located in the audio file and make note of where they are. Then highlight/select the first bit of audio containing the offending sound. We’re going to use EQ on as small an area as possible so we can be surgical about this. It we apply EQ to large areas of the recording that do NOT contain saliva clicks, the resulting voice could sound a bit muffled. The more we can surgically remove these noises without affecting the audio around it, the better.
-
Hit it with EQ
When we used EQ to fix p-pops, we reduced frequencies around 250 Hz and below. Those are low, bass-sounding frequencies. But for the saliva clicks, we need to focus in the higher frequencies from about 6,000 Hz (6 KHz) and above. See figure 1. You’ll see in the video how to do this using a graphic EQ setting in Audacity’s equalization tool.
As promised, here is a video showing you how to do all of this:
http://homebrewaudio.wistia.com/medias/wk6zbs5ku0?embedType=async&videoFoam=true&videoWidth=700
There you have it! Another way to clean up your audio quickly and easily, as long as you have a good idea what to do, which is what Home Brew Audio is here to do for you:).
Now go forth and produce better audio!

Adding Effects to a Feedback Loop
Feedback, something we don’t normally want to hear in any mixing or recording. When the microphone is placed in a wrong position against a speaker or system, then we hear this loud piercing sound that everybody gets annoyed or bothered by.
But using the same feedback combined with effects like a delay can create a loop that does not just sound interesting but can be useful in creative mixes and recordings. Learn to use and manipulate feedback loops combined with effects to create unending possibilities in your projects. With these simple steps you can start creating amazing mixes and projects.
Read more here: http://reaperblog.net/2016/07/delay-feedback-effects/
A Cool And Easy Way To Learn About Frequency And EQ
 Equalization – or “EQ” for short – is an extremely useful audio editing tool. In a way it’s sort of like Photoshop-for-audio. But instead of colors and brightness, etc. EQ adjusts frequency. I know! Just stay with me:).
It helps a lot to understand at least a little about what we mean by “frequency” so that you’ll have a better idea of what is happening when you use the controls on an EQ or EQ plugin. The concepts are actually pretty easy to understand. But the terminology typically used to explain them are often very “techie” sounding and confusing.
In our beginner course – The Newbies Guide To Audio Recording Awesomeness 1: The Free Recording Studio – I devoted one lesson to simply explaining frequency in a way that anybody can understand it. You can see that video below:
So What Is The “Cool And Easy” Way to Learn This Stuff?
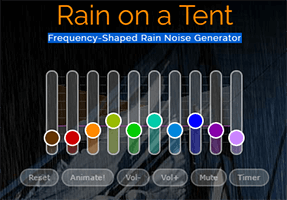
Okay, So my wife found this site called myNoisetm.net that plays background noise that is designed to help you relax, focus, sleep better, etc. But rather than just a single volume control for white noise (or whatever kind of sounds on offer on other such sites), myNoise offers something called “custom-shaped” noise machines. And by “custom-shaped,” they mean you get to control several different frequencies to tailor the sound.
If you watched the above video, you’ll have an idea what I mean when I talk about segments of the frequency spectrum using terms like “lows” or “bass,” “mids” and “highs.” Well myNoise.net lets you control (with what is basically a “graphic EQ” control) 10 such segments of the frequency spectrum for each of its noises as follows:
- Sub-bass: This is the really really low frequencies (approximately 30-40 Hz) that we almost feel more than we hear – like on a dance floor at a night club, say.
- Low bass (around 60 Hz)
- Bass (around 125 Hz)
- High bass (around 250 Hz)
- Low mids (around 500 Hz)
- Mids (around 1,000 Hz or 1KHz)
- High mids (around 2 KHz)
- Low treble (or low highs – around 4 KHz)
- Treble (highs – around 8 Khz, sometimes just referred to as “presence” range)
- High treble (high highs – around 10KHz and higher, sometimes called the “brilliance” range)
Usually the tone controls on your car’s audio system only lets you control JUST the high/treble and the low/bass – just 2 frequency controls. With 10, not only can you start to really understand what those frequency bands/segments, sound like. Ironically, hearing how one of the noises on the myNoise site respond to boosting or lowering any of those 10 frequency controls will allow you to better understand how those same frequencies apply to your music or voice. And that helps to really learn what a “low mid” or a “bass,” etc. frequency sounds like in general.
Other Awesome Stuff You Can Do
myNoise.net is incredible because not only can you use it as a fun way to learn about EQ and frequencies, they offer tons of different Noise Generators from Rain on a Tent, Ocean Waves and Cat Purr to atmospheres like Church and Nocturnal Garden. And each noise has icons next to it telling you what that particular sound is good for, such as “meditation,” “noise blocker,” and “sound therapy.”
So while you are learning about audio, you are also able to use the power of audio to improve your day:). Oh, and the best part? It’s free! And they have a free iOS app. They say Android is on the way. Though they do offer an incredible, potentially life changing tool for you, they also have a way for you to donate via PayPal, Stripe or bitcoin. This would help them keep the site running and growing without ads or paid subscriptions. Plus they offer some extra deals for donating visitors.
So go check them out at myNoisetm.net immediately. And set some time aside because you’ll almost certainly want to stay and play around for awhile.
Cheers!
Ken
