Two-time Grammy award winner James Waddell of Lyricanvas Studios shares a few things about being a successful audio engineer. James is an audio engineer, producer, and mixer from Nashville. Behind this nice southern fella are multiple success stories we can observe and learn from. Here are a few things James that paints a picture of his success.
His enthusiasm is way out there, he overflows with passion and excitement from doing his craft you can see it just by the way he speaks, the way eyes light up while doing a project. A person who shows true love for his craft.
Read more here: http://www.homestudiocorner.com/grammy-winner-james-waddell/
Recording Tips and Techniques
Tips for Recording Your Own Spooky Audio To Scare The Kids On Halloween
 It’s that time of year again. So I’m bringing this post to the top of the deck for Halloween 2017. Enjoy!
Do you like to set up scary decorations and try to scare (in a good way, of course) the kiddies on Halloween? When I was a kid, I REALLY wanted to go to the houses that were the scariest. I remember one house where the lady always dressed up as a very scary-looking witch, and I always went to her house on the night.
One terrific way to really add to the spooky atmosphere is to have scary sounds coming from your house. You can, of course, buy commercial “scary sounds” CDs at the shops, or on-line. One place to get some downloadable horror sound-effects is on iTunes – great sounds you can get with immediate gratification.
But it can get expensive to buy scary sounds. So why not make some of your own? Below are a few ways you can record your own scary sounds at home.
The Reverse Reverb
One of the most effects to make a human voice sound ghostly or otherwise creepy and/or mysterious is to use something called reverse reverb. This is used in just about every scary movie ever. Take listen below for the kind of thing I mean:
This kind of effect can be created on any recording software. I used Reaper to do this. For specific instructions on how to create a spooky vocal sound effect like this, see our post – The Reverse Reverb Effect For Creepiness. Basically, you just record the voice as normal. Then reverse the audio (so easy to do now with computer recording software!) so that it sounds backwards, which is creepy all by itself, by the way!). Then you apply a reverb effect to that backwards audio, and render that audio as a new file. Then just import that audio back into your software and reverse it again. You’ll hear the voice going “forward” again, but the reverb will be backwards – sounding like it’s sucking in at the beginning – nice and creepy:).
The Demon Voice
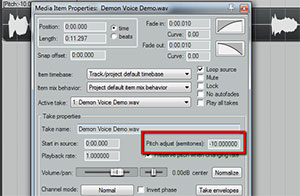 This is very easy to do. You simply record a voice saying something menacing (or whatever you think a demon would say). Then apply a stretching – sometimes called pitch-shifting – effect to it. It will sound something like this:
BTW, you can learn to do basic recording using Reaper (a VERY inexpensive, but powerful and professional program or the free program called Audacity) with our course – The Newbies Guide To Audio Recording Awesomeness. To do this (the demon voice) in Reaper, simply right-mouse-click on the audio item of the voice after you record it, which brings up a drop-down menu. Select “Item Properties.” Then about half-way down that menu, find the box that says “pitch adjust (semitones).” See the figure over there on the right. The default setting is to have all zeros in the box next to it. You can see in the picture that I have changed that to “-10.000000.” You can play with those settings to get just the right effect. If you do this in other software, just be sure to make sure that you aren’t also slowing the speed down (unless you want it to be slow). You usually have the choice to preserve the pitch and change the speed, or preserve the speed and change the pitch. You’ll probably want the latter.
That Crime Drama TV Sound Effect
You may not know it, but you’ve heard this dozens – if not hundreds of times if you’re a regular TV watcher. It usually shows up in murder mystery shows or any crime drama. I even heard it in Doctor Who last year (in 2012). It sounds like this:
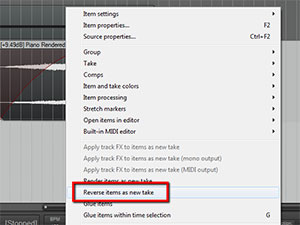 You can make this effect by using turning a sound around and playing backwards, similar to what you did to create your spooky voice above. In Reaper software, record a single strike of a chord on any instrument. I used a piano for the example. Then you just right-mouse-click the audio item and select Reverse Item As New Take. See picture on the left. There is a more detailed walk-through on how to do this over at our post – How To Create The Most Common TV Show Sound Effect.
Other Ideas
Some other things you can do include recording some bells (there are some excellent virtual instruments or sound effect collections out there that have all kinds of bells. You can also simply record people screaming at the top of their lungs. Get males and females involved. Have fun with it. Just make sure, when doing the screams, that you back away from the mic and make sure you aren’t overloading it or else it will sound distorted. But then again, a distorted sound may be what you’re looking for. In that case, be sure not to damage you mic if it is sensitive and expensive. If you have a dynamic mic, it might work better for the screaming since those are very rugged.
Also, add lots of reverb to all the things you record, which can add even more creepiness. Just about any audio recording software you use nowadays has a reverb effect built right in. In Reaper, just click the “FX” button in the track control panel on the left of the audio, Click on “Cockos,” and try “ReaVerb” and/or “ReaVerbate.”
Once you get going, you can really get creative and make up your own sounds to really add to the awesomeness of your house on Halloween.
5 Tips For Your EQ And Audio Mix Success
If you are struggling with success with EQ and your audio mixes don’t sober because you are not alone. As important as EQ is to every audio project we make, most of us know that it is also one of the most difficult things to get a grip of. Look further now because you too can be a pro and create those tracks you have dreamt of with these five tips that will surely add clarity and depth to you mixes.
EQ fits your tracks together but in order to do so each track needs to interact therefore it is not wise to use the solo button for you not to lose these interactions.
Read more here: http://blog.discmakers.com/2016/10/eq-and-your-audio-mix-five-tips/
3 Must-Know Tips For Getting Quality Audio From Your PC Recording Studio
 Ah, the pc recording studio. So many folks have one, yet so few use it to its full potential. Have you ever noticed that sometimes, a really professional-looking website with cool graphics and slick videos, will have audio content that sounds crappy? What’s with that? It seems like lots people have set up computers to record in their homes or offices, but they don’t seem to know how to create really good sounding audio, even though it is possible to do it with just a little knowledge…and not even hard knowledge. The home recording tips you’ll find at Home Brew Audio will help tremendously.
I think it has something to do with myths that still linger in the zeitgeist from the old days, when audio recording was the realm of tech geeks who did electrical engineering projects for fun. The gear needed to do professional recording back then was expensive and bulky. Most recording engineers couldn’t even afford their own gear. They mostly worked for studios with their own funding (universities, record companies, etc.).
But that has changed drastically in the past 10 or 15 years. With computers able to do so much, and digital recording (that’s as opposed to the tape recording needed in the past) being the norm, literally anyone with a computer can create good quality audio without having to spend much more than $49 or so on a moderate USB mic like the Samson Q1u USB microphone. So why is there still so much crappy audio out there?
Okay, I suppose we should have a definition of crappy, where audio is concerned. Here’s my definition: audio that sounds thin, echo-y & “far-away” sounding, noisy, hard-to understand, full of p-pops and other bass-y bumps and bruises (called “plosives,” for those who want to know) when the speaker/singer says certain kinds of words, or any combination of the above. Some may quibble with that definition, but I find it to be quite descriptive of common audio problems.
So that means that, by contrast, good quality audio should be full, clear & up-front, clean (free of any sound except the thing you want to hear), easy to understand, and free of audio glitches like plosives and hissing, and overall natural-sounding.
Some of the above requirements for good quality audio are not easy to obtain without fairly good gear, thus would be hard to do with that $25 or less set-up I mentioned. But some of the most important factors, like reducing/eliminating the “echo-y & far away” thing, ARE do-able even on the low-cost pc recording studio. Here are three tips that will drastically improve your audio regardless of how cheap your set-up.
Get Close to the Mic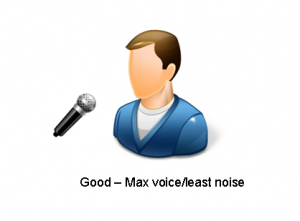
Generally speaking, your mouth (assuming voice recording) should be quite close to the microphone in order to get the best and clearest sound, anywhere from 6 to 18 inches away is about right. If you are recording a video, and the speaker is 10 feet away from the mic on the camera, the result will be what I call echo-y & far away sounding. The reason is that the voices has such a long distance to travel that by the time the actual sound from your mouth reaches the microphone, it has also bounced off of every wall, ceiling, floor, table, etc. in the room and created copies of itself. Those copies are getting into the microphone too. In visual terms, it would be like trying to film someone in a house of mirrors. Everything is all jumbled up and it’s hard to tell the real person from the reflections.
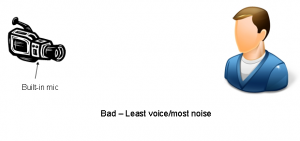 One easy answer to this is to get close to the mic. If your camcorder has an external mic input, use it! Get a microphone by your lips and run the cord to the mic jack on the camera. If the camera doesn’t have an external mic input (hard to find for some reason), just hook a mic to your computer and speak into that while filming. Then when you edit the video, add a track for the extra audio you recorded on your computer, synchronize it with the audio from the camera (the echo-y audio), then delete the camera audio track.
Get a Pop Screen
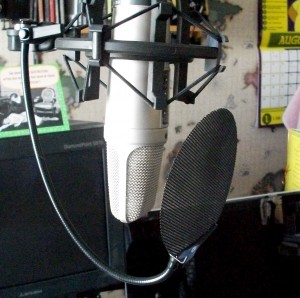 Mics are sensitive to wind. Certain consonant sounds in speech (like “P” for example) called plosives, cause a burst of wind into the mic if you’re close to it. The result is a muddy, unpleasant rumbling or bumping sound in the audio. One way to reduce or (preferably) eliminate this is to put a screen between your lips and the mic. You can buy these screens, called pop screens, or you can make them yourself with some used pantyhose stretched over a wire hanger you’ve bent into a circle or square-ish shape. For good measure, you can try to be aware of consonants that cause plosives and try to minimize the amount of air you spit into the mic. This is one of the pop filters that I have used for years: The sE Electronics Metal Pop Filter, which is the one in the picture.
Fix It After It’s Recorded
Without spending a dime, you can edit your audio after you’ve recorded it, using free software from the web. One such program is called Audacity, which is open-source. You can use editing tools like EQ to reduce or eliminate the plosives that DID get recorded, as well as improve intelligibility, reduce noise, etc. Audacity can do amazing things. There are other audio editors out there too. But if money is an issue, it really is hard to beat Audacity for the price. If you can afford to invest a couple hundred bucks into recording, you can use what I use, which is Adobe Audition.
The above tips can be applied by anyone, without having to be an engineer and without having to spend much, if any money at all. If you want better audio…more professional audio, keeping just those 3 things in mind will improve your audio greatly.
If the tip about editing audio in Audacity sounded scary and technical, don’t worry. It’s actually pretty easy. You can find video tutorials at Home Brew Audio that walk you through it. Anyone can understand it.
So go forth and do no more audio harm. It won’t cost you much, if anything. Knowledge trumps gear.
The Right Mic For The Job
Although years of experience gives one good judgment regarding what particular microphone to use for a certain project, relying on the basics and considering a few details still wouldn’t hurt.
Here is a list of know-how when it comes to selecting the right microphone for the job.
One microphone doesn’t cover it all, even if you have the most expensive microphone sometimes its just not the one for the job. It’s all about characteristics.
Complement your instrument by choosing the right microphone. Choose something that has lower frequencies than your instrument so they don’t eventually clash and battle it out.
Find out more here: http://bobbyowsinskiblog.com/2016/10/19/choosing-right-microphone/