Having a hard time thinking of the perfect gift for a DJ friend? Running out of ideas on what to give the sound engineer in the family? Everyone wants a fuss free holiday so here’s our gift guide for all the music lovers out there.
Read more about this here: http://bobbyowsinskiblog.com/2016/12/15/christmas-gifts/
Recording Tips and Techniques
Home Studio Set Up: Acoustic Treatment

Most of us think that a sound-dead (no reverb or echo at all) studio is very important. But that doesn’t necessarily make your room ideal for recording or even mixing. What you are really after is acoustic treatment.
The goal for recording is to absorb some of the sound bouncing (reflecting) around your room so that what gets recorded isn’t filled with reverb-y sound – like you recorded in a bathroom. You’d be surprised how many recordings sound like that.
By attaching acoustic foam panels at strategic places in your home studio, you can control echo-y reflections without killing natural sound.
If you have the budget, the absolute best thing to do is seek the services of an acoustician. These are experts when it comes to acoustics. Acoustic treatment can get pretty complex. Acousticians do all the math. It makes me cringe to think about it:).
But even if you aren’t in a position to hire an expert, you can help a lot by placing acoustic panels on your walls. See our article: Improve The Quality Of The Audio You Record At Home – Tip 6: Acoustic Treatment for my project in acoustic treatment. there are several before-and-after audio samples in that article so you can hear what acoustic treatment can do.
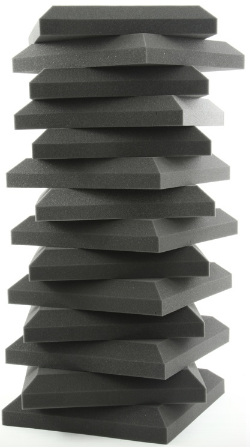
To get started, get yourself some acoustic absorption foam panels from Auralex. See picture on the left.
And for even more on the subject, check out this article from Audiofanzine: http://en.audiofanzine.com/homestudio/editorial/articles/acoustic-treatment-for-a-home-studio.html
Transform Your Home Recording Results In Two Words
Any studio owner, producer, audio engineer or musician desires the best tracks they can produce. Now if you’re are on a budget or a home studio owner, you want the best results given the limited resources you have.
We all know that great gear always comes with a price, but sometimes we are looking in the wrong places for the results we desire. The latest or the best gear doesn’t always mean great results.
According to the below article from The Recording Revolution, you just need to focus on two words to change your results whatever your budget may be. Graham starts with the words “radio ready.”
But the really important words are “Start” and “Finish.” Start now! Don’t wait for the perfect condition to begin. And without trying to be perfect, just get it finished.
Continue reading here: http://therecordingrevolution.com/two-words-transform-your-home-studio-results/
Sing Harmony With Yourself – Learn How to Record Your Voice on Your PC and Sing Along With It!
Believe it or not, it is possible to sing harmony with yourself. No surgery required:). I’m doing it in the video below.
https://homebrewaudio.wistia.com/medias/0ic40qwze9?embedType=async&videoFoam=true&videoWidth=640
Believe it or not, it is possible to sing harmony with yourself. No surgery required:).
Have you ever been singing a song by yourself, and you could just hear the harmonies that were “supposed” to be there but were not? Every time I sing Take It Easy, by The Eagles, I get to the chorus and just have to imagine that I have Don Henley and Timothy B. Schmidt standing beside me. Without the vocal harmonies, the song just doesn’t have the same punch, the same magic.

Some Songs NEED Harmony
Imagine trying to perform Kansas’ Carry On Wayward Son, solo! I don’t think so (actually I managed to do it…the intro anyway. Wanna hear it? It’s right here: How To Be Your Own Glee Club – Queen Harmony Demo.)
The same holds true for Bohemian Rhapsody, by Queen (I have not done that one yet:-P). There are certain songs that just cannot or should not be performed without those magical vocals. So what in the world do you do about it if you’re a solo performer?
What About Singing Live?
Well, for live performances, you’re pretty much stuck with having to get a few other singers for the harmonies. Actually, depending on how technically savvy you are, there are little machines that can split your voice up and play it back as harmonies, but that’s another thing for another article. And trust me, it is a huge pain to get decent results. Yes, I’ve tried it; no, I don’t do it anymore;).

Here’s How To Record Yourself Singing Harmony With Yourself
However, you can record yourself singing harmonies with yourself (yourselves?), right now if you want to, with tools you probably have around the home;-). As long as you have a computer with a sound card, head phones/ear-buds of some kind, and some sort of microphone. Those little $4.00 PC mics are just fine to start….no really, I’m serious. As long as you have the stuff I mentioned, and you want to try this out right now, all you need to do is download the open-source audio program called Audacity.
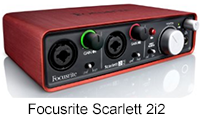
If you want significantly better audio quality, you can use a USB mic like the Samson Q2U for $59. If you already have some experience you could REALLY crank up the quality using a large-diaphragm condenser mic in combination with an audio interface, as well as jumping to the totally professional recording program called Reaper, which is free for 60 days and only $65 after that, which is completely insane for the quality and capability of this program! I used a Rode NT2-A microphone and Focusrite Scarlett 2i2 interface for the harmony demo recordings.
Headphones
The reason I said you need an mp3 player is for the headphones or earbuds, not the player itself. Plug those headphones into the green (typically) hole in your PC’s sound card. (“hole” = “jack” if you insist on using technical terms). You may have to unplug the speakers first, which is fine. Then plug the microphone into the pink hole…I mean….jack in the sound card.
You just need to set up a couple of things in the software before you start. Open Audacity and go to Edit/Preferences to open the Audacity Preferences window. Put a tick in the box next to “Play other tracks while recording new one.” Then click “OK.”
Next, go into the “Sounds and Devices” window (“Sounds and Audio Devices” in Win XP) from the Windows Control Panel. In Windows 10, accessing the Control Panel takes a few more steps. Just type “Control Panel” in the Cortana search box in the Task Bar, or ask Cortana via voice command to “Open Control Panel.”
In Windows XP
In XP, go to the tab marked “Audio,” and in the section called “Sound recording,” click on the “volume” button. That will bring up the Windows Mixer.” Find the channel that says “Stereo Mix” or “Wav Out” (depends on what sound card you have), and put a tick in the “Mute” box on that channel. Just close the Windows Mixer and you’re ready to rock!
In windows 7 or 10
In Windows 7 or 10, select the Playback tab in the Sound window. Make sure there is a green check mark in your sound card. If not, select it and choose “Set Default.” Then go the Recording tab and choose your microphone and set that to Default. Then while still on the Recording tab, click Properties. Now choose the Levels tab in the Microphone properties window and make sure the mic is set to about 75.
The video a few paragraphs down from our “Harmony Recording Awesomeness” course will clarify that stuff above:-P
[jwplayer config=”700×394 Custom Player” mediaid=”22304″]
Step 1 – The Melody

Record the melody by pressing button in audacity with the big red dot on it. An audio “track” will appear as if by magic. Start singing into the microphone. When you’re done, click the button in Audacity with the big yellow square (meaning “stop”).
Step 2 – First Harmony Part
Go back to the start of the song by clicking on the button in Audacity with the double purple arrows pointing to the left. Now you can add a harmony by simply pressing the red dot button again and singing along with your recorded voice on the first track.
Make sure you listen to the earlier track(s) on headphones while you’re recording the new track of singing. THIS IS VITAL because you can’t use the speakers or else your microphone will record what’s coming out of them as well as your voice.
You’ll end up with both the first vocal AND your harmony on the second track. This is NOT what you want. Each track must have only one part on it. So when adding tracks, either turn the speakers off, or unplug them and use headphones only.
All The Other Parts
 Do this as many times as you want to (there is no practical limit in Audacity), for 3-part or 4-part harmony. Heck, turn yourself into a choir. I once turned myself into an abbey of chanting monks!
That’s all there is to it. You just sang harmony with yourself and didn’t spend a dime!
Other Things To Make It Sound Even Better
There are lots of things you can do to improve the sound once you’re done, such as reduce the noise, pan the voices left and right, etc. If you’re interested in learning about those, and tons of other great stuff you can do with that recording-studio-you-didn’t-know-you-had, check out our tutorials here.
Other lessons in our course The Newbies Guide to Audio Recording Awesomeness will show you how to create a voice-over with music behind it, how to create loops, and how to edit audio, do multi-track recording, etc. The tutorial covering the stuff we did in the article is also there, in case you were wondering;).
If you want to see and hear some awesome examples of other cool things you can do in the harmony-singing realm, head on over to our Vocal Harmony Demos page. Cheers!
Below is an excerpt video lesson on how to do this – from our new course Harmony Recording Awesomeness.
For an example of 3-part harmony in a rock song, check out my cover of “That Thing You Do!”

How To Mix Great Music By Using The 80/20 Process
Have you asked yourself this question as a music producer “How can I ever make every instrument and vocal fit together?” You try as hard as you can yet you still cannot make everything sound anything like what you hear professionally. But did you know that with less effort you can produce a much greater sound? Intriguing? All you need is 20% yes 20, use 20% of the plugins and processors at hand. Here is a sample of what 20% might look like. EQ, Compression, Reverb, Delay, and Saturation just 5 items to be exact. Use this 20% to get 80% (even beyond) of the results to produce a great mix.
Read more here: http://www.audio-issues.com/music-mixing/the-8020-of-mixing/