In the video, we will be taught about 6 custom actions that can be used for dialog editing (podcasts and videos) plus the mouse modifier that makes area selection easy and quick.
Read more about this here: http://reaperblog.net/2017/03/area_select_actions/
Recording Tips and Techniques
How to Fix SSS-Sibilance in Your Audio With Sound Editing Software
 Why sound editing software can be your friend. One common problem with recording the human voice is sssssomething called ssssssibilance. If you didn’t already know what “sibilance” meant, my odd spelling above may have clued you in. It’s a sharp, biting hissing sound that happens whenever the recorded voice utters the “S” sound. You’ll be listening to the recording, and everything will sound great, until the speaker/singer utters the phrase “she’s a sensation,” and pierces your eardrums.
The good news is that you can use free sound editing software to fix this!
There are lots of reasons why this might happen, over-compression (see more info on compression here:Improve Or Ruin Your Audio With an Effect Called Compression and Vocal Compression Using Reaper’s ReaComp Effect Plugin), wrong kind of mic for that voice, too much reverb effect, etc. Just know that if you do any recording or audio editing of human voices, you will periodically be faced with sibilance that cannot make it onto the final version of the audio file. So what do you do?
You’ve may have heard of something called a “de-esser,” yeah? de-essers are effects that are designed to filter and tame sibilance, while leaving the non-sibilant part of the audio alone. If you are familiar with the range of human hearing and the use of EQ (equalization) tools in audio (see my article about EQ here: What is Equalization, Usually Called EQ?), you’ll know that people can only hear sounds that exist between the frequencies of 20 hertz (HZ) and 20,000 Hz.
In practical terms, most adults are going to have trouble hearing anything over about 13,000 Hz. What’s most interesting about this fact is that certain familiar sounds “live” at predictable frequencies. No it IS interesting! Don’t argue with me;).
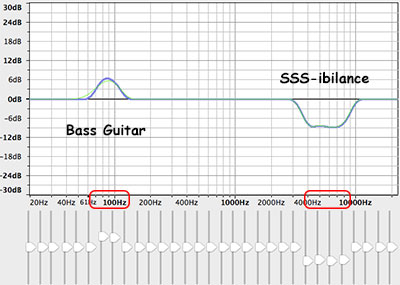 If we know, for example, that the “bass-y, boom- y parts of a bass guitar will most often be found around 80-100 Hz. So we can then we use an EQ to turn down (or up….but usually down….never mind) the bass by ONLY turning the volume down around 80-100 Hz. Likewise, high sounds like the sizzle of a high-hat, can be found hanging out around 6,000 Hz (or 6KHz for short). So if you knew that vocal sibilance mostly hung out between 4 KHz and 10 KHz, you would know where to start looking for your particular brand of hissiness so you could fix it.
A de-esser is simply a tool – found in most sound editing software programs – that zeros in on a certain group of frequencies (like 4-10KHz or 5-8KHz, etc.) and will turn the volume down in that region, but ONLY when it gets TOO loud. Smart tool huh?
As long as the “s” sounds are normal for human speech, they are left untouched. But the instant they get unnaturally hissy, they’ll get turned down just enough to make them sound normal. It takes some playing with the settings to get this just right. Overdo, though, it and your singer/speaker will develop a lovely lisp.
If you don’t have a de-esser, a compressor, or an EQ (de-essing is really just a combination of compression and EQ), there is one sure-fire way to fix sibilance which is my first choice, especially if the audio is short, like in a podcast intro or a short song. Instead of treating the entire file as you would do with a de-esser, just LOOK at the audio in an editor.
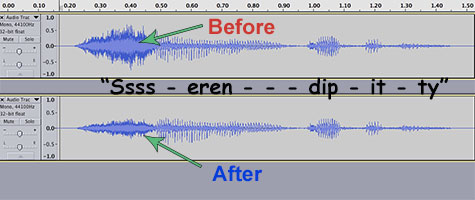 It’s so cool that we can use our eyes to edit audio now. Isn’t it? Sigh, OK I’m a geek. Anyway, you can usually see sibilance on a computer screen pretty easily, using any sound editing software available. The squiggly blobs get all bunched up and dark for a bit. In the picture, you can see the word “serendipity’ recorded. The blue blob at the beginning.
Just follow the cursor and when you hear the sibilance, you’ll likely see it as well. Now zoom into JUST the sibilant sound and highlight it. Use the editor’s volume control to turn down ONLY the “s.” Listen to the result and if that didn’t fix it all the way, or you gave the speaker a lisp, just “undo” and try again until you get it just right. Rinse and repeat for each offending sibilant sound, and voila! Your hissing snake problem is fixed!
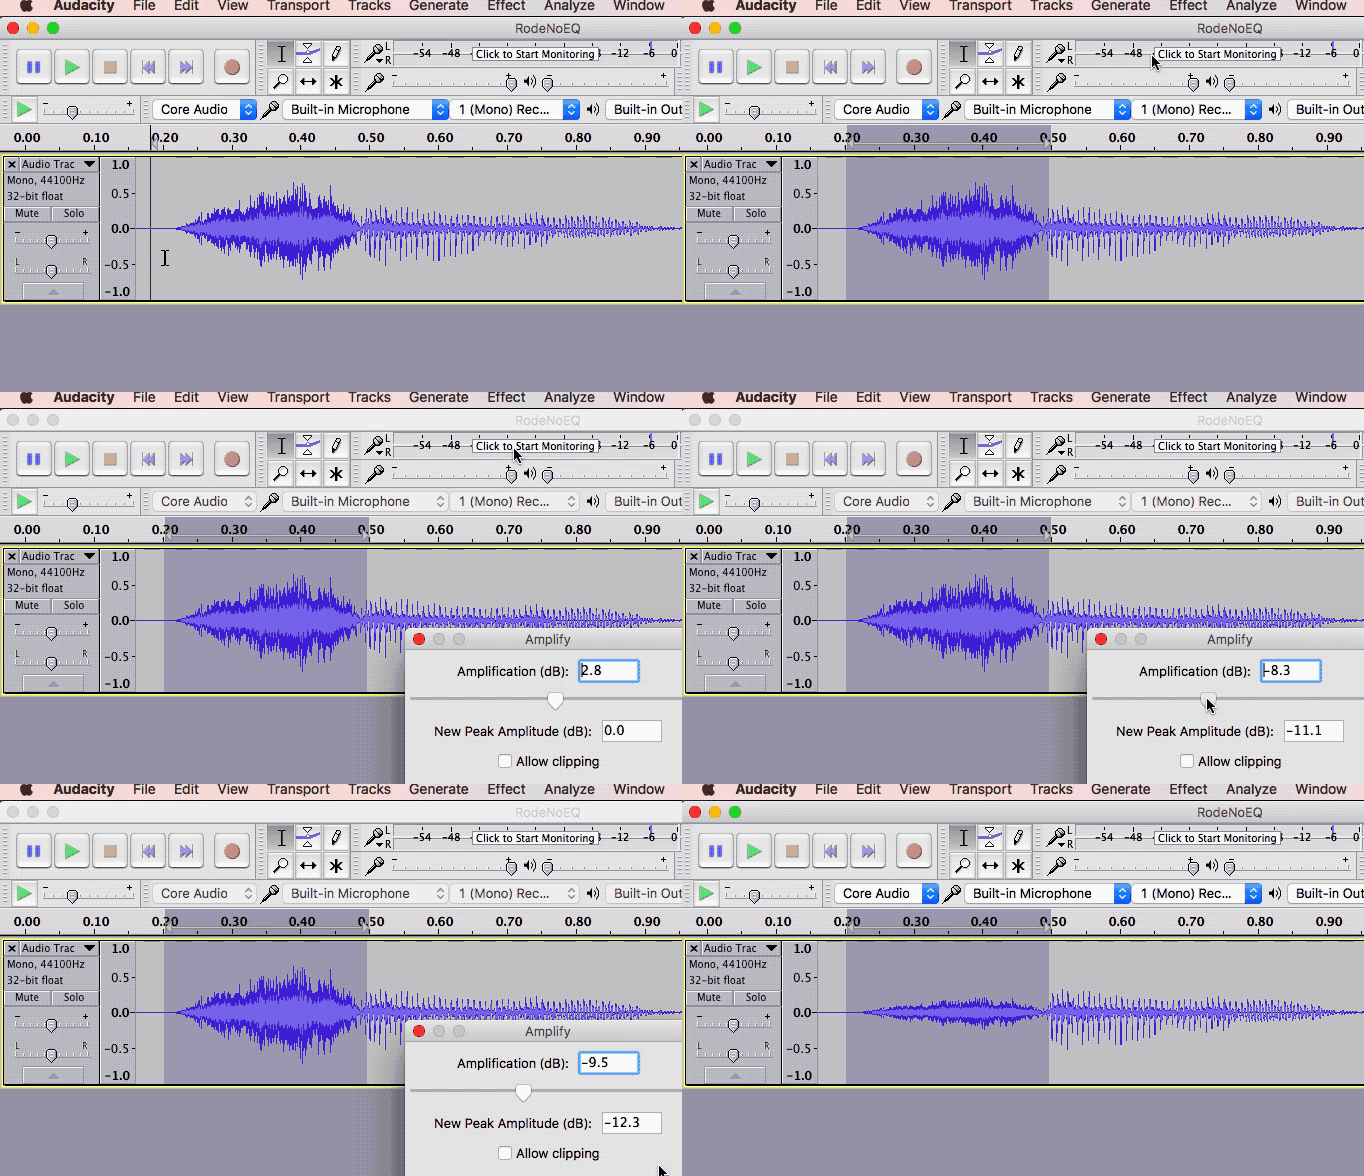
I recommend the latter method of fixing sibilance in your audio if the file is only a minute or two or less. For longer files (audio books, etc.) you’re probably better off using a de-esser.

Comparing 6 Different Microphone Positions
Mark Weiss of the audioprofiles.com breaks down and shows the difference between 6 different microphone positions. In this video, he compares this 6 positions based on voice.
The first position: Straight into the microphone
Mark places the microphone about 4 to 6 inches away from his mouth and aimed straight to his mouth, from this position the microphone is able to capture everything from the low end to the nasal quality of his voice. With this capture, you can never go wrong. The only drawback is a little jumping in the low end as there is a tendency for the microphone to be knocked off every now and then.
Watch the full video here: https://theproaudiofiles.com/video/microphone-positions-compared-on-vocals/
Voice Over Recording Tips: Editing Conversations In Reaper
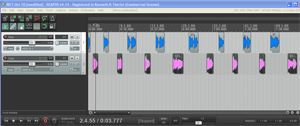 If you have ever been asked to record and edit a conversation between two people, say, for a voice over job, then you are probably aware of the logistical problems this can cause. The client usually has visions of just getting the two people together around a microphone and simply reading their parts at the appropriate time. Sure, that would be OK if you always had both people available at the same time, along with two great microphones, a large enough space for both people to occupy at the same time, etc. But these conditions are not always available to us.
Boy-Girl-Boy-Girl
So for the sake of the example, let’s say you only have one microphone and you have to present the client with a conversation between a man and a woman. This is a situation I had monthly a while back and it seemed to take forever to get it right. Also, the boy (me) recorded all his lines in one long take, creating one long audio item in a track, and likewise for the girl. One segment of the job required that the bog-girl voices alternate with exactly 3 seconds between them. That made the job even longer, especially since I was doing it manually, clipping and trimming each bit of dialogue, and then using the grid (set to seconds and minutes) to drag each clip into place and ensure a 3-second space between each. Yikes!
Time Saving Tips
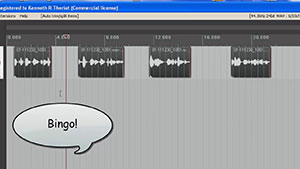 By the way, we’ll be using the excellent audio recording software called Reaper for this example, but similar tools can be found in other multi-track recording programs.
The first lesson I learned was to color-code. I used blue for boys and pink for girls. Yeah, yeah, it seems sexist but it works! Besides, my wife (the “girl voice”) likes pink. Anyway, in Reaper you simply right click on the audio item which opens a pop-up menu, go to Item Takes and Colors/Set Items to Custom Color. If you end up putting both voices on one track (which is easier when putting a 3-second gap between each), this becomes very helpful.
Slice and Dice Automagically
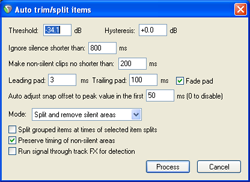 The next bit of time-saving automation was the Auto Trim/Split function. What this does is allow you to slice one continuous audio file into several separate audio items in a track based on when there is silence and when there is speaking going on. This was huge! I had been slicing (using the “S” keyboard shortcut) just before and just after each phrase, and then dragging the edges of the resulting clipped audio item in to get rid of the silence. That was 4 different operations (2 slices and 2 drags) for every phrase! Multiply that by dozens of phrases for each voice and you have a LOT of work. But with Auto Trim/Split, you select the entire long audio item in the track and hit one keyboard shortcut (you can set your own – mine is “ctrl+~”) and boom! Every phrase becomes its own item, perfectly trimmed on either side. See the picture at the top of the article where this has been done to each voice). That one discovery saved me about 20 minutes per voice!
Below is a video that shows you step-by-step how to use the Auto Trim/Split tool in Reaper to save you huge amounts of time.
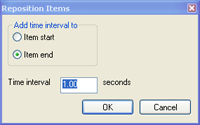 The other thing that was taking a long time was spacing each voice, alternating boy-girl-boy-girl, with exactly 3 seconds between each phrase. As I mentioned earlier I was doing this manually until I discovered the Reposition Items tool in Reaper. [Update: Reposition Selected Items (as it is now called) is not part of the native Reaper set of tools. You need the free extension set – SWS extensions – by just going here: http://sws.mj-s.com/ and downloading the SWS extensions file and installing it by executing it. Then it will be added to the Actions list in Reaper]. You select all the phrases in a track, open Reposition Items, and simply tell it how much space should be between the items. This is very like the “distribute” function in many graphics programs. To put 3 seconds between the boy and girl voices, though, requires both blue and pink to be on the same track. But that was pretty easy. Just space them out and slide them until they are well and truly between the blue phrases in the adjacent track, select all the pink phrases, and simply drag them up onto the track with the boy/blue phrases. Now that they are all on the same track, select them all (you can lasso them all by holding down the right mouse button and dragging over them), open Reposition Items, and put 3 seconds into the Time Interval window.
With those tools I was able to cut my processing time for this job by about 50%. Even if you don’t have to space them out evenly or put them on one track, I’m sure you’ll find a combination of these tools to be very helpful if you have to produce a voice over job with more than one voice.
Cheers!
Ken

Mastering According To Latrell James
Rapper-producer Latrell James is well known for his sharp lyrics and his expansive and poetic vocabulary, as a producer, he has made quite a name especially when it comes to Boston Hip-hop. Behind all the fame Latrell is also a mixing and mastering engineer basically his foundation of where he is right now in the industry. iZotope recently had the privilege of interviewing Latrell James
iZotope recently had the privilege of interviewing Latrell James and here are a few pointers he ahs to say when it comes to mastering.
James recalls how he once thought of recording as simple as not making it too loud.
Read more here: https://www.izotope.com/en/community/blog/artist-stories/2017/03/what-is-mastering-latrell-james-two-slices-of-bread.html