One thing you will not find in a hit record is a poorly mixed vocal, it just doesn’t go together. Call it as it is but a poorly mixed vocal will just not cut it big time. And now that you know it, you are one step closer to recording your first hit. Understand that recording the vocals can go from simple to complicated so here are a few tips how you can do it.
Since your vocal is the loudest and the most important part of your mix you need to bring it in as early as you can.
Read more here: https://theproaudiofiles.com/7-simple-tips-mix-vocals-like-pro/
Recording Tips and Techniques
What Is A Side Chain In Audio Recording?
 You may have heard of the term, “side chain” or “sidechain” in audio recording. As with so many things in the audio recording realm, the term sounds more complex than what it actually means.
So what DOES “sidechain” mean already?
Okay, let’s start with a basic description of how an effect (think compression or EQ) is applied to an audio track.
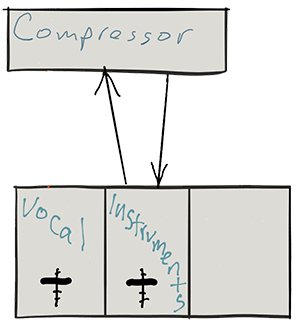
Let’s say you want a compressor (see my post “Should You Use Compression In Audio Recording?“) on your musical instrument track. You would connect the compressor by sending the music on a round trip from the music track to the compressor. When the music comes back FROM the compressor, it is now compressed. See pic below.
How a compressor knows what to do
A compressor only applies its effect when it is told to by the incoming audio. For a review on this see my post Vocal Compression Using Reaper’s ReaComp Effect Plugin. For example, it will compress only if and when the incoming audio gets louder than a certain “threshold” volume. At all other times, the compressor does nothing.
Now usually the sending and receiving signals are from the same track – instruments from the instrument track go into the compressor and compressed instruments go back to the instrument track.
But what if you fed the compressor a DIFFERENT input?
Say you could get the compressor to compress the vocal track based on instructions from a track that is NOT the vocal? whoa, that’s some mad scientist stuff right there! But maybe you could do some cool things.
Let’s say you have music on a second track. What if you sent THAT audio into the compressor to control how the voice is compressed? Well. that is exactly what happens when you “duck” an audio signal. When the voice is singing/talking, it pushes the music out of the way. You guessed it. I have a post on ducking too:) – What is Ducking In Audio Recording?
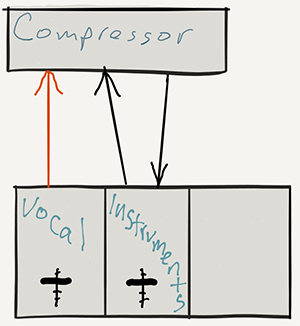
You still have the instrument track sending the music on a round-trip to the compressor. But the compressor no longer takes orders from the instruments. It listens to a new master whose input comes in a side door:). Hence the moniker “side chain.”
That side door is where you send the signal from the vocal track. So the instruments still get compressed (turned down when the control signal gets loud enough), but it’s now the vocal volume acting as the control. So when the vocal goes above the threshold, the compressor turns the volume down on the instruments. Pretty cool huh?
Other cool things you can do with side-chaining
- Make a tempo-based tremolo by sending the side chain of a gate effect a click track so the gate on an instrument track opens and closes in time with the click track
- Make pumping dance tracks by putting a compressor on to the bass and sidechain the kick, so the kick will push through the bass every hit
- Put a compressor on the bass track and then have the kick drum activate the compressor via a sidechain. When the kick drum hits it will dip the bass line in the mix, allowing the kick to cut through the mix and sound more clear
- Anything your imagination can come up with
Hopefully this gives you an idea what sidechain (side-chain, or however you spell it) in audio recording means.
CLA-2A Compressor Limiter Plugin
The CLA-2A provides smooth, frequency-dependent behaviors that have made it a favorite as it is modeled from the legendary electro-optical tube compressor. This plug in is great for bass, guitar and even vocals.
Read more about this here: http://www.waves.com/plugins/cla-2a-compressor-limiter
Four Tips For A Thicker Snare
How to Fix a "P-Pop" in Your Audio With A Sound Editor
 Here is how to fix a p-pop in a recording using sound editing software. If you do any voice recording at all, you’ve probably noticed this. No matter how hard you try, your “P” sounds (called “plosives”) will sometimes sound like small explosions in the audio.
These plosives sort of distort the audio recording for a second, sounding a bit like a low-frequency “splat.” Not pretty.
What causes it?
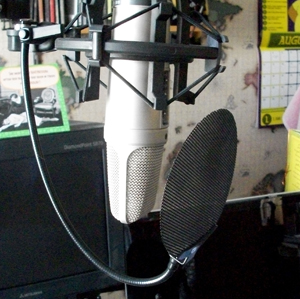
It’s what happens when a burst of wind hits a microphone. It’s especially pronounced when using a large diaphragm condenser mic like the one in the pic on the left – a Rode NT2-A. There are things you can do to minimize or prevent (shya!) them (like a pop filter), which is the best medicine. But when they do get recorded, you’ll want to know how to fix it after-the-fact. For this we use editing software. One of the wonderful things about audio editing in the computer age is that you get to use your eyes as well as your ears. I have edited so many p-pops (caused by what linguists call “plosives”) that I can recognize what they LOOK like on a computer screen even before I hear them. For my voice, the come out looking like a capital letter “N” in the waveform.How to fix it once it is recorded?
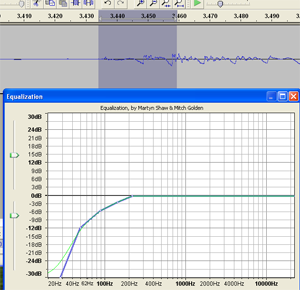
Since the plosive problem is basically caused by a rush of air from your lips hitting a microphone capsule fast and hard, what you have is a problem of volume. The plosive was too loud compared to everything around it. Not only that, but most of the too-loud bits are in the low end…the bass frequencies. So the fix would be to turn down the volume of your voice when it is hitting the “P.” In an audio editor, like Audacity (which is open source) you zoom in on the plosive and select everything right up until the voice actually becomes audible. In other words, if the word was “pot,” try not to get any of the -“ah” sound in your selection. You only want the “P” sound. Then you just use a volume reduction tool to turn down JUST the “P.” You may have to experiment (“undo” is the magic-bullet of computer audio editing!) with how much you turn it down, but that may be all you need to do.What if changing the volume doesn’t work?
Time needed: 5 minutes.
How to Fix a P-Pop in Your Audio
- Find the p-pop
Find where the p-pop happens in your recording by listening in headphones
- Highlight JUST the “p” Sound in Your Editing Software
Zoom in and highlight ONLY the “p” (or other plosive sound like “b,” etc.). Be careful not to select any of the vowel sound that comes after the “p” sound.
- Apply EQ Effect
Apply an equalizer effect (EQ) to the “p.” Reduce the low frequencies in a slope going down and to the left, starting with about 200 Hz.
