For those audio enthusiasts who have been mixing for quite some time now, we know that there is more to an EQ than simply turning knobs. And with the evolution of technology, something new is always just around the corner. Here is a list of EQ tips and tricks that will maximize your potential and your EQ’s as well.
If you think you have done it all you can still enhance your stereo sound with mid / side EQ. With this tip, you can turn your stereo EQ to frequency-specific stereo width adjustment tool. The next one is a multi-step process involving spectral matching EQ.
Read more here: https://theproaudiofiles.com/5-advanced-eq-techniques/
Recording Tips and Techniques
Why You Should Not Use A Mixer In Your Home Recording Studio, Pt 1

Should you have a recording mixer as part of your home studio? I say no. I know, I know. You experienced recording folks are going to say “why shouldn’t I have a mixer as part of my home studio?” Well as with most things, the idea of a recording mixer is one of those “it depends” type of situations.
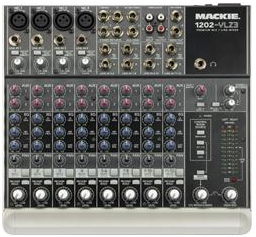
If you truly understand all the routing (gozintas and gozouttas, as I’ve heard them described), then using a mixer as part of your home studio CAN be useful. I use one to receive inputs from several sources (computer sound card, two different audio interfaces, etc.) and it is only for listening. My mixer, a Mackie 1202 VLZ Pro, sends nothing out except a signal to the speakers/headphones. Most importantly (for this type of mixer), it does NOT send any signal into the computer for recording purposes. And of course, if you’re recording a live band (straight to stereo – not doing multi-track recording), you’ll want a mixer for that.
But my general advice is this: you don’t need a mixer for a computer-based home recording studio; and trying to add one to your set-up may well cause more confusion and trouble than it’s worth. You should either be using a USB microphone plugged straight into your computer, or have an audio recording interface into which you will plug your microphones and/or instrument inputs. To hear and monitor playback, you’ll either use your computer’s speakers, headphones (preferably plugged into your interface and not your computer sound card), or monitor speakers plugged into your interface. There will be (on a vast majority of recording interface units) a volume knob to control playback.
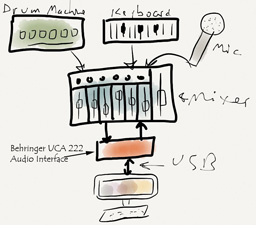
So why am I writing this article? A reader recently sent me an e-mail asking for help with his home recording studio setup. He was using Reaper recording software (excellent choice!) on his computer, along with a mixer, a drum machine and a keyboard synthesizer, along with some mics plugged into the mixer as well. He wanted to be able to record several things simultaneously (or sequentially) onto their own tracks. But he couldn’t manage either. He said he’d record the drum machine on track one, and try to record the keyboard onto track two. But track two ended up with BOTH the drum machine and the keyboard.
 Now this can be caused by any number of things, but as soon as I saw that he had listed a mixer as part of his home studio set-up, I was pretty sure I knew the cause of his trouble. I asked him if he could tell me how he had everything plugged in. Basically it was as seen in the picture on the left (which I drew using the Paper app on my iPad – free and very cool! But I digress).

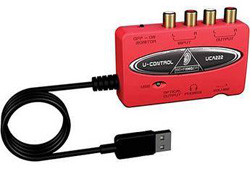
He had an audio interface, but a very limited one, called the Behringer UCA 222, which is not designed for multi-track recording, but rather for you to plug in line-level signals from things like tape decks, mixers, and other consumer audio devices, as well as electronic instruments like keyboards, drum machines, etc. There are only 2 inputs, but they are designed to accept a stereo pair (inputs are L and R) of RCA plugs. There is also a pair of outputs to connect speakers/headphones to). So you can only plug in one thing at a time. Also, and this is important, there is no preamp in the UCA222 (see our article about what a preamp is here: What Is A Mic Preamp ). That means in order to plug a microphone in, you must first plug it into the mixer to use it’s preamp, and then plug the mixer’s output into the UCA. The trouble with that is the preamps in a mixer like the 1202, though decent, are pretty cheap by necessity. There are 4 of them on a 1202, and if they used top-notch recording quality preamps, it would drive up the cost of the mixer by a lot. The 1202 is mainly designed for live sound, not recording.
So the thought process goes like this. I only have a pair of stereo inputs on this interface (UCA222). But I also have a mixer that has lots of inputs! I can plug everything into the mixer and then just take the main mixer outputs (left and right) and plug those into the UCA222). Then I’ll plug the outputs from the UCA back into the mixer, and hook up my speakers to the mixer as well.
There is a major flaw in this set-up though if you want to do multi-track recording (have each instrument/sound be on its own track). Raise your hand if you see the problem. Exactly! Everything, including the playback, is going into the mixer, which is perfectly designed to – well – mix. [end of part 1 of this article. See part 2 here].
Home Recording Studio – Setting One Up On Your Computer – Part 1
 This is the first in our “how to build a home recording studio” series, designed to walk you through how to build a computer-based home studio. You’ll also learn how you can get the best possible audio for the lowest possible cost.
Setting Up a Home Recording Studio on Your Computer – Part 1
What do you think you’d have to do to record professional sounding audio for music, voice-overs, etc? Do you think you need expensive microphones, interfaces and other gear? Most people do.
Maybe you think you have to go into a commercial recording studio and pay their expensive rates? Well, you’re not alone. Most people do.
Here is the truth. With some basic knowledge (and not even “hard” knowledge) you can get professional sounding audio with gear less than $100. That is assuming you already have a computer – a normal, every-day computer.
Before we talk about gear and how to set things up, this is really important to know – good audio is NOT guaranteed just because you bought a Neumann microphone and Pro Tools recording software.
Knowledge Is More Important Than Expensive Gear
Regardless of your home recording studio set-up – If you know what you’re doing, you can get decent audio from the cheapest gear. But LACK of knowledge causes lots of folks to make crappy recordings even with expensive gear. I’ll give you 4 tips for doing this (the getting decent audio part). First a disclaimer. It is true that better quality/higher priced mics and other equipment can create better audio than the cheapest gear. But ONLY if you know a bit about what you’re doing!
If you know what you’re doing, you can get decent audio from the cheapest gear. But LACK of knowledge causes lots of folks to make crappy recordings even with expensive gear.
On the other hand, if you DO know what you’re doing, you can do something amazing. You can produce better audio with a plastic PC mic than someone with no experience using a set-up worth 100 times more!
How can I be so specific? Because during the first Home Brew Audio podcast, we compared the sound quality of some spoken-word stuff made with gear costing $5.00 against a setup costing $500. The result was obvious to even the most casual listener. The $5.00 studio was better! If you’d like to hear that for yourself, check out our post where there are two audio samples of what I’m talking about: The $5 Mic Versus the $500 Mic.
If your primary purpose for recording audio is to create voice-overs, podcasts, or video narrations, the news is even better. You’ll need a lot less gear compared to a music recording studio. So the path to truly excellent audio quality is much shorter and less expensive.
What Are The Basics of Recording On a Computer-Based Home Recording Studio?
- A microphone captures the sound
- A sound card or audio interface converts the sound to ones and zeros (digital audio).
- A recording program reads the digital audio, allowing you to edit, save, etc.

The most important stuff often happens before the sound even reaches the microphone – such as preventing noise, for which we have a few important tips coming up. But first I’d like to introduce the basic home studio configurations.
The 2 Home Recording Studio Configurations
We see computer recording studios as having one of two set-up configurations:
Configuration 1: A microphone plugged directly into the computer, either via the sound card or a USB port.

Configuration 2: A microphone plugged into an interface box or other 3rd-party device designed to accept a standard 3-pin microphone cable.
 So the most basic home recording studio will be a computer microphone plugged into a computer sound card (configuration #1), along with recording software on the computer. You can do that for $5.00 if you use a common plastic pc mic. But it would be really hard to get pro quality audio from that.
OK then, how do you improve audio quality regardless of what configuration you use? The answer is all about the noise. Noise -Noise- Noise!
First, we do as much as possible to prevent noise – preventing it before the sound gets to the mic, then preventing as much of the internal noise as possible, like electronic stuff (buzz and the like) from the computer, cables, interface, etc. Then we reduce and/or eliminate as much of the noise that inevitably does gets recorded as possible using audio software.
Why The Emphasis on Noise?
The goal of recording, say, a voice is to capture what that voice sounds like as accurately as possible. The more noise there is in the recording, the less of the pure voice you will hear during playback. So the biggest enemy of good audio is noise; and I don’t just mean hiss and lawn mowers and barking dogs and electrical hum and static, etc. “Noise” is anything that is not the thing you are trying to record (that is called the “signal“), and it can also include echos of the signal. This is usually referred to as “room sound,” which turns out to be the most common and oft-offending noise there is. This is the most common problem for any home recording studio.
Prevent The Noise
In a perfect world, you would have a great recording space where the room sound actually complements the signal. These types of spaces are rare, especially for those of us recording at home where we mostly use converted bedrooms and the like. The second best option is to have a vocal isolation booth, treated with materials designed to absorb echos to dampen room noise, allowing you to record only the signal.
If you can’t obtain (buy or build) a properly treated booth, the next best thing is probably to use products that help block or otherwise interfere with room sound noise. There are several products, like the sE Electronics Reflexion Filter, that are made of acoustic-affecting materials that you can mount on microphone stands.
In the next installment of this series, we will take a look at some examples of booths and baffles mentioned above.
See you then!
By the way, I created a video of this series. This 2-part video encompasses all 5 parts of this series of articles. Part 1 is below:
Getting The Low End Right
Mixing low end may not be the easiest thing to do but getting it right will surely bring satisfaction to you. Getting it right requires that you always consider different factors that may affect your recording in one way or another. Factors like your room, your speakers, and even your headphones. Here are 8 tips to getting your low-end right and have a better kick and bass. The “Basics” – this is always the best place to begin, understanding the basics and starting it all from there. Begin with room set-up and balancing, you can never leave the importance of these two.
Read more here: https://www.musicianonamission.com/mixing-low-end-kick-bass/
Record Drums Like A Pro: Find Out How
Professional audio engineer Matthew Weiss recently teamed up with Pro Mix Academy to come up with a brand new training on Drum Recording. “Recording Drums” with Matthew Weiss is an in-depth training course with touring drummer Matt Star. This training will cover from tuning your drums to choosing the right microphone to placements and miking techniques and everything else you need to know to come up with that perfect drum sound for your track. The training is a step by step guide that will provide you tools, techniques, and tips that even those who has never done a recording before would find it very useful.
Read more here: https://theproaudiofiles.com/recording-drums-matthew-weiss/