Finding the right place to put your mic when using a snare drum is very crucial. Even just an inch of difference can totally change the sound that you’re getting from your snare.
Experimenting on mic positions is necessary to get the perfect sound from your equipment. Try different angles, use more mics and make changes as the music changes as well. The only way for you to find the perfect position for your mic is if you experiment.
Read more about this here: https://www.sweetwater.com/insync/how-to-mic-snare-drum/
Recording Tips and Techniques
The Basics Of Mastering
What dos it mean to master a song? Let’s hear from an expert.
Known for his 20 years of experience in the music industry, with artists like Lady Gaga and Rhianna just to name a few, music producer Marc JB breaks down the art of mastering. He also breaks down the techniques you need need to create your own epic tracks.
Although it often made to seem a mysterious, tedious and expensive thing, mastering is quite simple once you understand its nooks and crannies.
Marc JB describes good mastering as balanced, clear, present and loud. If it sounds good on a variety of systems then that’s a success.
Mastering is basically just stuff you do in the final stage after a recording is mixed down.
Read the tips from Marc here: http://www.musictech.net/2017/07/get-hands-on-with-mastering-the-basics-part-1/
You might also be interested in our posts: Mastering a Song – What Does It Mean? and Home Recording For Non-Engineers – It’s Not Hard Or Expensive
Improve Your Mix With These 3 Plugins
There are a lot of factors to consider if you want a well polished and professional sounding recording. And choosing the right plugins plays a major role for this. Graham Cochrane of The Recording Revolution claims you can make that huge improvement with just 3 plugins.
In his video, he walks us through the beginnings towards the results of choosing these plugins. Although you may still be needing more to cap up your work you can already feel the boost these plugins can give your mix.
Graham is even generous enough to show his exact settings so you can have a starting point.
Watch the full video here: https://www.recordingrevolution.com/top-3-plugins-to-start-a-mix/
Master An Electronic Music Track Like A Pro
If you want to know how to professionally master an electronic music track the way a mastering engineer does it, here are a few tips you can follow.
First things first – Your goal when mastering is to make sure that entire mix is balanced, that all parts of the mix come out clearly and distinctly. You will be needing a reference track that is mastered well and is somewhat similar to what you are trying to achieve This will ensure that you are working towards a professionally mastered sound. Also, ensure that this track peaks between 3 and 6 to give you enough room to process.
Read more here: https://music.tutsplus.com/tutorials/how-to-master-electronic-music–cms-28982
Audio Normalization: What Is It And Should I Care?
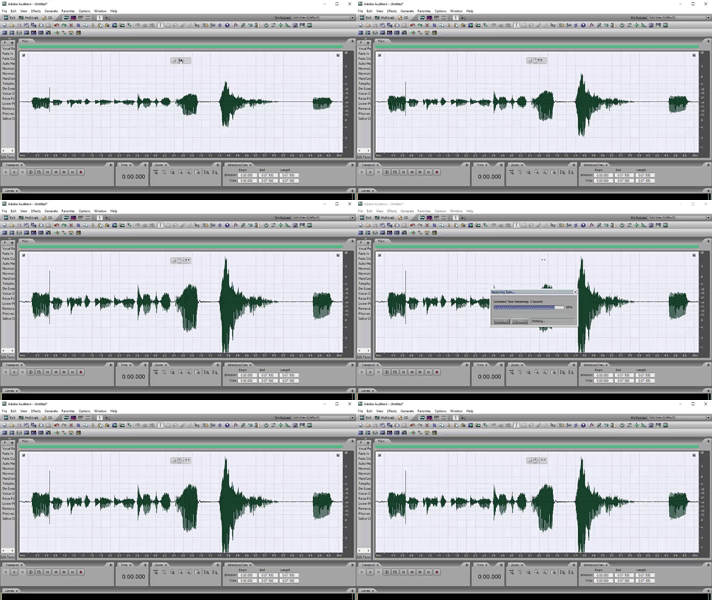 If you’ve heard the term “audio normalization,” or just anything like “you should normalize your audio?” you may well wonder “what the heck does that mean? Isn’t my audio normal? Do I have abnormal audio?” And you would be right to wonder that. Because the term is not really very self-explanatory. So what else is new in the audio recording world?
To answer the questions in the title – let’s take them one at a time, but in reverse order, because it’s easier that way:).
Should I Care What Audio Normalization Is?
Yes.
That was easy. Next.
What Is Audio Normalization?
You COULD just use the definition from Wikipedia here. But good luck with that. As is typical with audio terminology, that definition is super confusing.
It’s actually pretty easy to understand and not really that easy to put into words. But I’ll try. When you “normalize” an audio waveform (the blobs and squiggles), you are simply turning up the volume. Honestly, that’s really it. The only question is “how much does it get turned up?”
The answer to THAT takes just a little tiny bit of explaining. First, let’s recall that with digital audio, there is a maximum volume level. If the audio is somehow pushed beyond that boundary, the audio gets really ugly because it distorts/clips.
Some Ways That Digital Audio Is Weird
This maximum volume level I mentioned is at 0 decibels (abbreviated as “dB”), by the way. Digital audio is upside down. Zero is the maximum. Average levels for music are usually between around -13 decibels to -20 decibels, or “dB” for short. Really quiet levels are down at like -70 dB. As the audio gets quieter, it sinks deeper into the negative numbers.
Yeah, digital audio is weird. But as long as you buy into the fact that 0 dB is the loudest the audio can gt before clipping (distorting), you’ll know all you need to know.
So Ways All Audio Is Weird
In case you didn’t know this, sound/audio is caused by waves in the air. Those waves cause air molecules to vibrate back and forth. The way a microphone is able to pick up audio is that those “air waves” ripple across the surface of a flat thing inside the mic. That causes the flat thing to move back and forth (in the case of a dynamic mic) or to cause back-and-forth electrical pressure in the case of a condenser mic. For more detail on this, check out my post What Is the Difference Between Condenser and Dynamic Microphones?
Some What Is The Weird Part?
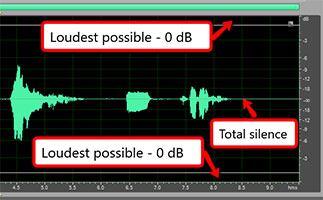
Audio waves show up in audio software in a weird sort of way. For instance, you might expect the quietest audio to be at the bottom and the loudest to be at the top. But that isn’t the way it works with audio.
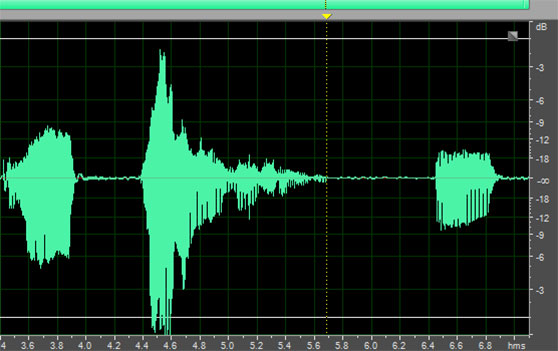
Because of the fact that audio comes from waves – the back-and-forth motion of air molecules – the loudest parts of audio are shown at the top AND bottom, and absolute silence is in the middle. Since pictures make things easier, see Figure 1.
So rather than thinking of the maximum allowable volume level as a “ceiling,” which is what I was going to do, let’s think of it like a swim lane. And in this swim lane, BOTH edges are boundaries not to be crossed.
This also means that when looking for the loudest part of your audio, you have to look both up AND down. Admit it. That’s a little weird. As it happens, the loudest part of the audio in our example below is in the bottom part of the audio.
Normalization Math
OK, back to normalization. Let’s get back the the question of how much audio is turned up when it’s being normalized. The normalization effect in audio software will find whatever the loudest point in your recorded audio is. Once it knows the loudest bit of audio, it will turn that up to JUST under 0 dB (you can set this in the Normalize controls to be AT 0 dB or whatever level if you want). So the loudest part of your audio gets turned up to as loud as it can be before clipping.
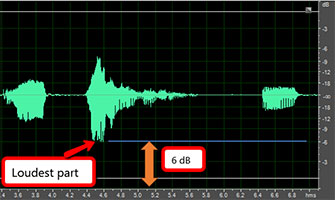
Let’s say the loudest part of your audio, which is a vocal recording in our example, is a part where you shout something. See Figure 2 for an example.
And let’s say that shout is measured at -6 dB. The normalization effect will do some math here.
It wants to turn up that shouted audio to 0 dB. So it needs to know the difference between how loud the shout is, and the loudest it could possibly be before distorting.
The simple math (well, that is if negative numbers didn’t freak you out too much) is that 0 minus -6 equals 6. So the difference is 6 dB.
Now that the software knows to turn up the loudest part of the audio by 6 dB, it then turns EVERYTHING up by that same amount.
Let’s look at a “before” picture of our example audio.
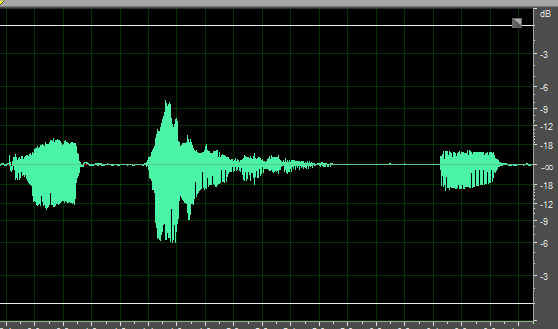
And here is what it looks like AFTER normalization.
That’s It?
Yeah. That’s it. Remember I said that audio normalization was really just turning it up? I know it took a fair amount of explaining, but yeah. The only reason to normalize your audio is to make sure that it is loud enough to be heard. That could be for whatever reason you want.
Use With Caution
As I have preached again and again, noise is the enemy of good audio. Before you even normalize your audio, you’ll want to be sure you’ve gotten rid of (or prevented) as much noise as possible from being in your audio recording. See my post series on how to do that here: Improve The Quality Of The Audio You Record At Home.
The reason it’s so important is that by normalizing your audio, you are turning it up, as we have seen. But any noise that is present in your recording will ALSO get turned up by the same amount. So be very careful of that when using this tool. Audio normalization is powerful, and so can also be dangerous.