As heretical as it sounds, I champion the use of the “zero-to-five-dollar” budget for folks to get started in recording audio at home. I’m not dissuading anyone from purchasing gear they can afford (and understand!), but I know what kind of audio quality can be produced with the cheapest of equipment, and it’s better than what a lot of folks are turning out with gear costing hundreds of times the budget I recommend.
In a nutshell, I encourage people to start out with stuff they probably already have: a computer with a sound card, an internet connection, an mp3 player (for the headphones only:)), and a microphone. I even want those new to recording to start with the cheapest PC mic they can get their hands on. Computers used to come with them. If you don’t have one, you can remedy that for about $5.00. If you do have one, then you’re one of the lucky folks who get to start using the recording studio they didn’t even know they had!
The only other thing, other than a sense of adventure and a little time, you’ll need is some audio recording and editing software. “Aha!,” I hear you cry. “We knew there had to be something expensive in here somewhere.” Sorry to disappoint you, but the software I’m talking about is free of charge! This is why I wanted you to have an internet connection. Do a search for Audacity audio software, which is open source (not shareware!), then install it.
OK, so this is the “starter” studio, and you can do amazing things with pretty darned good audio quality at this level. You’ll just have to do a little more work in order to clean up the noise that comes with those PC microphones plugged into the pink input of a sound card. It’s not a problem, since Audacity has noise reduction tools you can use. Hey, if you’re broke, what’s a few more minutes to get decent audio right?
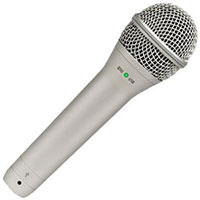
But if you just happen to have 25 bucks you can contribute to the audio cause, you can get your first audio quality “level-up,” heck, “quantum leap” is more like it. For $59 (as of April 2019), a USB microphone such as this Samson Q2U can be had, and boy is it worth every red cent!
I just ran a test using the cheap plastic mic to record my voice, then using a USB mic to do it. The quality difference is awesome! The biggest difference is how quiet the playback of the recording made with the USB mic is compared to the old-style PC mic. At the same time, my voice sounded full and present, a little less “hollow” than with the plastic one. And to top it off, this means you won’t have to spend nearly as much time cleaning up hissy audio after the fact.
Check out my review of the Samson Q2U – with audio samples, so you can hear what it sounds like for yourself – here: Review Of The Samson Q2U Microphone – Hear The Test Audio For Yourself
Many folks will be satisfied with what they can achieve with the “zero-to-five-dollar” budget studio. But isn’t it nice to know that the next “upgrade” is only $49 away. And subsequent upgrades in quality and capability for your studio are also in increments of $25-$50. There is no need to run to the music store and plop down a thousand dollars gear and software, unless you have money to burn.
Recording Tips and Techniques
Learn Home Recording On a Budget
Learn home recording on a SERIOUS budget at Home Brew Audio! How about starting with a budget of $0-$5?
So how can Home Brew Audio help you?
– We can give you the knowledge you need to make a living recording and producing audio from home.
– That knowledge can then be used to make a living not just as a voice-over actor, but doing ANYTHING that requires this skill-set, like becoming a record/CD producer, starting your own music/record label, starting your own recording studio, audio content provider, movie score composer, etc. The list is huge!
– We can teach all of these skills without requiring you to buy expensive…or ANY gear, assuming you have a computer with a sound card, an internet connection, and a microphone. In fact our first set of tutorial videos assumes a “$0-to-$5 gear budget,” depending on whether you have a microphone already or not!
– We also provide advice on recording equipment choices; access to huge libraries of audio content such as music loops, sound effects and royalty-free music; and provide you with continuously updated advice and information on how to apply your skills to earn money.
FAQs:
Do we offer you a free-lunch? Nope. Remember that second secret I mentioned above? As with anything worth doing, it takes effort. But the rewards can be life-changing. They were for me.
Who will benefit from our offer? Anyone who is serious about working from home, working for themselves, and willing to put in the effort.
Do I have to be good at technical stuff to learn audio? Not at all! I am not a “tech” person. And it is BECAUSE of that that my teaching style in the HBA tutorials is geared toward regular people. The skills are NOT hard, they just come across that way when engineers and tech folks try to teach it.
Do I have to become a member of Home Brew Audio? No. We offer tutorials and other audio products on a “pay-as-you-go” basis as well. If you’re a fan of “try-before-you-buy” of just like immediate gratification, there’s something at Home Brew Audio for you. But I have to say that if you do become a member, and put in the time to learn, you’ll be thankful in the end!
If you’re currently unemployed, or if you’re ready to stop working a dead-end, Monday through Friday, 8-5 job; and you have a computer with an internet connection, visit http://www.homebrewaudio.com right now to start learning how to work for yourself from home.
http://www.youtube.com/watch?v=axXo_70g_Lo
The Secret To Good Quality Audio In Your Home Recording Studio
You wanna know the secret to getting good quality audio on your home recording studio? Learn to cut tomatoes. Okay, that was confusing. Here is what I mean. Everyone has their favorite tool for doing certain kinds of jobs. For example, I use the large chef’s knife to slice tomatoes, but my wife likes the paring knife for the same job. They both work. And if I lost my knife, I could use my wife’s. Nobody likes change, but at the end of the day, as long as you know what the job is (smite the tomato into tiny pieces), any knife will do.
What does this have to do with recording audio at home? Here’s what. Surf around the internet for advice on setting up a home recording studio and you’ll get all kinds of advice about what gear you NEED to have. If you look at the blogs and forums where continuing tips and tricks are being doled out, you’ll find that most of the time, the advice is how to use a certain piece of gear or software. That’s great if you HAVE that stuff. But the focus isn’t on getting you the knowledge. It’s about how to use the tool first. IF you happen to pick up the “why” you’re using the tool at some point, it’s almost by accident.
That doesn’t work for me for several reasons. First, my eyes glaze over and I start slipping into a coma when I read too much technical jargon all at once. And boy-howdy, the audio recording literature is chock-full with the stuff. Second, if you know you can slice a tomato with any knife, you won’t feel like you have to buy the 70-dollar Henckels knife if you’re already holding the paring knife that’s been in your kitchen since you were…oh, much younger.
OK, enough with the metaphors. The bottom line for me is that I want to finish a job properly for the lowest cost possible. I can’t afford to go out and drop $800 for recording gear when a USB mic and some free software will get the same job done. Now, before you say something like “but you can’t get the SAME job done with a low-end studio,” let me point out that it totally depends on what your goal is. It is true that you won’t be able to score a film with virtual instruments, etc, on the $5.00 PC studio. But if all you need is an intelligible voice-over or a song demo, you likely CAN.
So you’ve waited all this time for me to reveal the “secret” to making good recordings on your home studio. That secret is “knowledge trumps gear.” Say it with me! Knowledge trumps gear. If you know the basics of audio recording, it doesn’t matter whether you use Pro-Tools or some other software. You’ll be an audio ninja, able to squeeze every last drop of quality our of the cheapest gear. This was driven home to me when I was starting out in recording, and didn’t like the sound I was getting. I kept buying more and more expensive machines, only to be stuck with the same sound. After a lot of frustration, I heard a recording from a series called “Readers Tapes” in Recording Magazine. It was done on a 4-track cassette recorder, and it RAWKED! It was along-side of songs recorded on thousand-dollar rigs that didn’t sound a tenth as good. I continue to see this every day.
If you understand the basics….I’m not even talking about all the electrical engineering and wave mechanics stuff, just the big 6 or 8 things that factor in to audio quality, you can save yourself boatloads of money and time.
So if you are looking to the internet for advice on how to start a home recording studio, be wary of the folks telling you that you have to spend much more than $25 or so! Heck, at Home Brew Audio, we start you out at the zero-to-five dollar (depending on whether you have a cheap plastic pc mic or not) with The Newbies Guide To Audio Recording Awesomeness 1. You can learn all the basics at that level. Then you build on that as you need to. Then when you’re ready to take it to the next level, you’ll be using much a more professional software program called Reaper), but one that will only cost you $60 (after you evaluate it with the fully-functioning 30-day trial that doesn’t actually stop working after 30 days;)) in The Newbies Guide To Audio Recording Awesomeness 2: Pro Recording With Reaper. So remember, knowledge trumps gear. There are lots of people making crappy recordings on expensive gear. We want you to be the exception – the ones making great audio with the lowest-cost gear.
If you’re not ready to jump into our video training tutorials, there is still a LOT to learn in all the free articles on the site here.
Good luck and have fun!
Ken