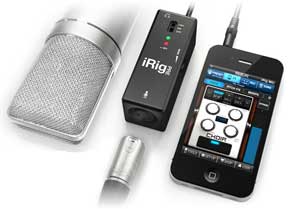
Meet the new iRig PRE from IK Multimedia, a microphone preamplifier (preamp) that works with the iPhone, iPad and iPod Touch. This thing is, as usual from IK Multimedia, awesome. It allows you to plug any microphone (I’ll say that again in case it didn’t sink in…”any microphone”) into your iOS device.
So how is this different from the iRig Mic (see our review of that product here: Review of iRig Mic)? the big difference is, in case you missed it above, that whereas the iRig Mic is a special microphone you get from IK Multimedia that can plug into your iOS device, the iRig PRE is a piece of hardware that allows you to plug any microphone into your iOS device. See the picture to the left. The iRig PRE is the thing in the middle, the little box that has an XLR (standard 3-pin mic connector) female receptacle on one side, and the cord that fits into your iOS device on the other. There is also (and this is ever so cool) a gain control knob/wheel on the iRig PRE.
It uses a 9-volt battery, which also serves as phantom power to condenser mics. The battery life is 40 hours with dynamic mics and 15 hours with condensers.
You can use it with the two free apps iRig Recorder and VocaLive by IK Multimedia. But you should also be able to use it with any app that accepts audio input.
Perhaps the best thing about the iRig Pre is its cost, which is only $39.99. To find out more, or to order your own, Click Here.
Recording Tips and Techniques
Tips for Vocal EQ
Here is a good article on vocal EQ tips. Whether you’re a voice-over person or you also record music, chances are good you’ll want to know a little something about vocal EQ (remember that EQ is short for equalization, which is one of the audio recording terms that don’t really describe what it means to the layman…sigh). If you want to brush up on what it is all about, check out our article here: What is Equalization, Usually Called EQ?
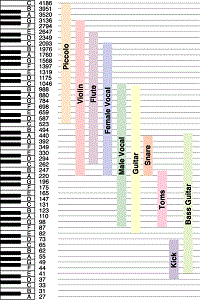
 Anyway, the human voice tends to live in a very predictable place on the EQ spectrum. See the picture to the left, which should help describe this. Male and female voices overlap between 300 and 900 “hertz” (cycles-per-second or “HZ”).
In an ideal world, or more specifically, and ideal recording situation, you would not need to EQ the human voice at all. When doing voice-over work, I rarely use EQ (except to fix p-pops – see our article: www.homebrewaudio.com/how-to-fix-a-p-pop-in-your-audio-with-sound-editing-software). But we don’t live in a perfect world and few of us have that ideal recording set-up (great recording space, top-drawer gear, etc. so there are times when applying EQ to a vocal track is desirable or necessary.
Dev’s article explains those situations and gives you some ideas on how to deal with them using EQ.
Read his article here: http://www.hometracked.com/2008/02/07/vocal-eq-tips/
What Voice-Over Equipment Do I Need?
 There are lots of folks who set up their home recording studios simply to do voice-overs. One of the first questions they ask is “what voice-over equipment do I need?” This post and the article at the end will answer that question thoroughly.
One of the best uses of a home recording studio is to produce voice-overs. That’s because, as opposed to a full-blown music production studio, you won’t need as much gear (so you won’t need to spend as much) or as much space in order to produce high-end professional results.
In the article below, you’ll learn about the equipment you are going to need for a top-notch pro voice-over studio, including an explanation of the different kinds of microphones, how to connect them to your computer, how you can use voice-overs (podcasts, video narration, etc.), and tips on everything you’ll need from hardware (mics, interfaces, software, out-board gear, etc.). If you still have any questions after reading this article, please post them in a comment at the end of this post and I will address them immediately.
So if you’re ready to take it all in, read the full article here.
32-Bit Floating Point – Huh?
If you’ve spent any time looking around in any recording and/or audio editing software, you’ll likely have come across several options for audio files. If you’re anything like me you saw a lot of options and terminology that made you think you’d better just leave everything at the “default” settings until you can understand what some of the gibberish meant. One of the terms that really seemed confusing to me at first was the term “32-bit floating point.” It almost sounds more like a medical condition:). It is, in reality, a digital audio term (go figure). It you’re curious about how bits figure into digital audio, see our article here: https://www.homebrewaudio.com/16-bit-audio-recording-what-the-heck-does-it-mean
Here is an article from Emerson Maningo that will help you to understand what 32-bit floating point actually means: http://www.audiorecording.me/32-bit-float-recording-bit-depth-vs-24-bit-complete-beginner-guide.html
Recording Engineer, Mix Engineer and Mastering Engineer – Oh My
 In the professional recording world, audio engineers typically specialize in one of 3 areas (even 4 areas if you count those who do live audio): the recording engineer, the mix engineer and the mastering engineer. It isn’t because one person can’t do the job of all three; it’s because each plays an important role in the recording process and can focus on one given task. When you can specialize in one area, you can typically do a much better job and the end result will be sensational as opposed to just okay.
In the pro world, record companies and big-time producers can afford to hire three different services for these things, which allows the engineers to specialize and still make a living doing it. But where does this leave the solo home recording folks like most of the folks reading this? We are going to have to do all three jobs ourselves. But just knowing about how the pros specialize can still help us. The “take-away” is that we should treat the different phases of recording differently, putting on a different mindset for each, which can help us attend to the different things that are important for these different tasks.
Recording Engineer
As the name implies, this person is responsible for setting up all of the microphones and recording all of the sounds. Their sole focus is to make sure that they get the absolute best sounding audio possible, with clean and accurate tones, recorded. They will record multiple tracks, working directly with the person or band being recorded (of course). This part of the process typically takes a long time as the engineer and “talent” work together to create all the necessary tracks need to crate the final product. The engineer will then typically create a rough mix and then export all the audio so that the mix engineer can open all the files and have them already be in the proper tracks with the proper timing. This is much easier to do these days, especially if both he/she and the mix engineer use the same program (Pro Tools is pretty much the industry standard). In the old days when everything was on a great big thick reel of tape, the logistics were definitely harder. But once the transfer is done, it’s time for the mix engineer to take over.
Mix Engineer
This person is responsible for creating the final version of the song or whatever audio is being produced. Once all of the sounds, instruments and voices have been recorded by the recording engineer, he or she ‘mixes’ the elements together, producing a balanced piece with volumes of vocals and instruments balanced together and frequencies for each sound tweaked on each track. They are also responsible for other factors such as effects and pan positioning (meaning that some sounds are made to sound like they come from the left, and vice versa). They then render (or mix down) all the different sounds and tracks into one stereo (usually) audio file.
Mastering Engineer
The mastering engineer (for a review of what “mastering” means, see our article Mastering a Song – What Does It Mean?) takes the product that the mix engineer has created, usually in the form of a single stereo wav file, and using specialized gear (along with pristine listening rooms/spaces) and polishes the mix into the final product mainly using such techniques as EQ and compression. These folks use highly specialized (and usually quite expensive) gear that the other types of engineers usually don’t have). The goal here is to create a masterpiece that is ready to be heard by the consumer. They will enhance or reduce frequencies where needed and make sure that the file (already mixed-down/rendered) has the proper energy and ‘punch’ in the right places, and also that any problem frequencies and imbalances in the final mix are fixed.
In an ideal world, all three jobs would be done by three different professionals. The reality is though that in a home recording situation, the solo home recording engineer has to wear all three hats. If this is the case, then it’s important to understand the goals of all three jobs. In order to get the best results possible, perform the recording engineer’s tasks first. Take a break before mixing the material, and take another break before mastering the final product for the client/end user. If you try to do everything at once, you may lose focus and miss key elements of each task.
Now go forth and create a useful split-personality.