This is part 2 of the article – Why You Should Not Use A Mixer In Your Home Recording Studio. In part 1, I spoke of a problem one of our readers was having with his home studio set-up. He routed everything, including the playback, through his mixer, and wondered why he couldn’t do multi-track recording.
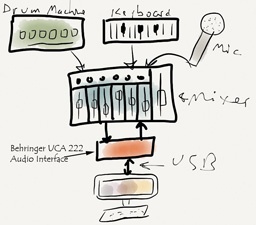 His set-up looked like the picture on the left. I finished part 1 by asking who could see, by the set-up on the left, why the owner of this studio couldn’t seem to get even sequentially-recorded sounds to be by themselves on their own tracks. Here is the problem.
With this set-up, if you record one instrument first, say the drum machine, all will be well. The drum machine goes into the mixer that sends the signal to the UCA222 interface, which sends the signal to the computer and onto a Reaper track. But now you want to record the keyboard part on track 2 in Reaper.
So you arm track 2, disarm track 1, and hit the record button in Reaper. Track 1 is playing back, of course, so you can monitor it and play the keyboard along with it. But you’ve plugged the output of the UCA222 into your mixer, which is blending the drum machine playback with the keyboard you’re recording, and sending both sounds to the main mixer output, which as we know, goes to the inputs of the interface.
And just like that, you’ve recorded BOTH the drums AND the keyboard onto track 2. This is exactly what my reader was complaining about. He wanted ONLY the keyboards on track 2, and the drums on track 1. And yeah, that is how it should be. But you can’t do that with his set-up.
The reader also said he wanted to do simultaneous recording of multiple instruments, and was concerned that Reaper couldn’t do this. First of all, Reaper most definitely CAN do this. But you need an interface capable of receiving multiple inputs, which the UCA222 is not. And once everything is blended (mixed) in the mixer, Reaper certainly cannot separate them again.
He is definitely constrained by his interface to recording only one thing at a time. This is really not a big deal. Lots of folks record this way. But like this reader, there are lots of folks who might expect that they can record multiple instruments/sounds simultaneously (onto their own discrete tracks) just because they have a mixer they can plug everything into. Clearly not so.
One solution might be to NOT plug the USA222’s outputs into the mixer. You could connect your headphones or speakers to the UCA222, making sure to disconnect the interface’s outputs from your mixer. That way you can monitor playback separate from the mixer, and it won’t be fed back into the inputs of the UCA when overdubbing. But then you are still left with the problem of having to use the not-so-great-for-recording mic preamps when you want to record vocals. And if you have speakers plugged into the UCA222’s outputs, you’ll have to disconnect them or turn them off (assuming they have an off switch) when you record the vocals, otherwise the playback of the music will be picked up by the mic. Sigh. These are not terribly difficult work-arounds. But life would be so much easier, and you would have a lot fewer problems if you simply stop using a mixer altogether.
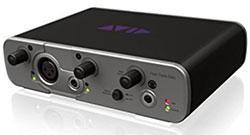
Instead, get yourself a decent recording interface such as an Avid Fast Track, which has a nice-sounding preamp designed for recording. If you need to record more than one sound/instrument simultaneously, get an interface with as many inputs as you need. For example, I use the Focusrite 2i2, which has two mic inputs. Focusrite also makes the Clarett 4Pre and the Clarett 8Pre, with 2, 4 and 8 mic inputs, respectively.
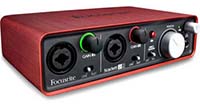
In effect, these interface units are mini-mixers in themselves. You control the input levels of each sound source like you would on a mixer. That, combined with your multi-track recording software’s mixing controls, gives you all the mixing you should need for simple, hassle-free high-quality recording. Forget the mixer. 90 percent of folks don’t need it.
Recording Tips and Techniques
The Disc Makers $999 Home Studio Guide
The CD Duplicator and replicator company Disc Makers recently released part 3 in their PDF series called “The $999 Home Studio Guide.” This series covers things like actual building (unlike our recommendations for putting together a home recording studio, which shows you how to put together a pro-audio-capable computer-based studio you can set up quickly and for between 2 and 4 hundred clams) – as in hammering nails into planks. Uggh. But hey, if you are inclined to build things like rooms and walls and lay down floors, etc. this is a great idea. You could definitely eliminate that common problem we have when record in bedrooms with parallel walls, floors and ceilings (that causes bad “room sound” because of reflections and sound wave interference, etc.). The guide does talk about gear as well. Plus it gives you tips for optimizing your mixes, which tells me that their primary audience is the music-making crowd. That’s fine though. I happen to be in that crowd. But I also recognize that a large number of folks interested in recording are voice-over folks, which is why I try to balance my message in the articles and training we provide.
Anyway, if you’re interested in checking it out, here is the link:
http://links.mkt845.com/ctt?kn=21&ms=MzkyNjY4MjgS1&r=MTcyNzU5NjgzNwS2&b=0&j=MTQ0NTg3MzY0S0&mt=1&rt=0
How to Build a Home Recording Studio: Part 2 – Four Tips For Preventing Noise
 This is part 2 in a series called How to Build a Home Recording Studio, where you learn how to set up a computer-based studio capable of recording pro-quality audio.
In part 1, I left off in the section talking about ways of preventing noise in our recordings. The best way to do this is to record in an acoustically ideal space. One that not only is dead quiet, but does not affect the audio in a negative way either.
What are my options?
Since those spaces are really hard to come by, the next best option would be something like a purpose-made vocal isolation booth. You need the kind treated with acoustic materials to prevent and/or absorb echos, allowing you to record only the signal. Let’s take a look at some of these.
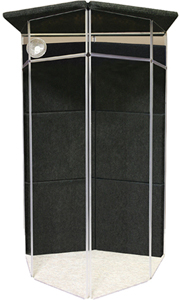
You can buy a full-blown vocal booth, such as the Clearsonic IsoPac, which will run you about $1,100. You can also build your own, or convert a closet for the purpose.
I do NOT recommend trying to convert a closet in your room into a vocal booth. Yes, it will be quiet and block out external sounds. But simply blocking out the lawn mowers, trucks, and barking dogs is not enough. The room sound in even a tiny room can sound bad, especially in the case of a square or rectangular closet. Either stuff it full of very absorptive materials so no sound can reflect of the walls, or make sure there are no parallel surfaces – preferably both.
For most of us, it is often impractical or too expensive to have either a very quiet recording space, or a good sounding isolation booth. Most of us do our recording in a spare bedroom, and bedrooms are notoriously effective at producing “bad” echos that when added to the signal, make the audio worse.
Why do bedrooms sound so bad?
Sound bounces off of hard surfaces all over your room, combining with each other to amplify and/or reduce certain parts of the sound. Then all these different mutant versions of your voice arrive at the microphone along with the direct signal. The results are echo-y at best, and likely will also sound unnatural and funky (sounding muffled, tinny, or like it came over a telephone – or even all of these).
If you’ve watched a lot of internet videos where someone is narrating, you have almost certainly heard the echo-y room sound thing. In fact it is way too common that a very slick and professional looking video has poor audio laid over the top. Usually it sounds like the person is speaking in a bathroom or something.
In the case of talking-head videos (a person talking to the camera – not the 80s rock group:)), this is almost always caused by the fact that the narrator is relying on the built-in camera mic, which is several feet away. The further your sound source is from the mic, the more room sound will be recorded.
Alternatives to sound booths
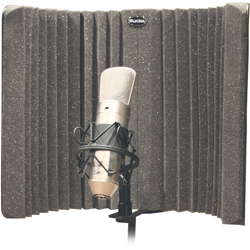
One alternative to a full isolation vocal booth is a small and portable boundary or isolation “shield” that can be placed behind a microphone, such as the sE Electronics Reflexion Filter, or the Aurlex MudGuard Isloation Shield.
These have several different types of acoustic treatment materials to prevent your voice from bouncing off the walls, and helping to block any reflections from getting back into the microphone. These are usually semicircular and protect the areas behind and to the sides of a mic. But something like that won’t work for a talking-head video.
So the first thing we have to do is deal with room noise before any sound reaches the mic.
If you can afford acoustic absorbing foam on your walls, it will be so much easier to reduce room noise. A good place to start is with Auralex products. But if you do not have any acoustic foam on the walls, the following tips will help immensely.
If you don’t have any acoustic foam on the walls…
Tip #1: Use a mic with a cardioid pickup pattern.
Fortunately, most mics default to that pattern. Cardioid mics record only what is in front of them. They reject any sound coming from behind it and most of the sound coming from the side. These can help reduce room noise a lot.
Tip #2: Get your mouth close to the mic – like just a couple of inches.
This will help the mic get mostly your voice (the signal) and less of the reflected sound. This is probably the most important thing you can do if your recording space is less than ideal. This is doubly true if you are shooting “talking head” video. See our article, 3 Must-Know Tips For Getting Quality Audio From Your PC Recording Studio for more on this.
Tip #3: Make sure you record as loud as possible without distorting/clipping.
A LOT of people make this mistake. They record their voice at a low level, and then they raise the level after the fact. The problem is that they are also raising the noise when the do this. So make sure to capture as high a level as possible of your voice in the first place. You can use the gain level on your interface (if you have one) or use the software mixer panel controls to do this.
Tip #4: Noise Reduction.
The next step in producing clean audio is to reduce the noise that will inevitably be in our recording when our rooms are less than perfect. The way to do that is to use tools in recording software called noise reduction.
What NR does is sample a section of the audio that is ONLY noise (when there is no voice talking), so it knows what to turn down. Then the program separates the noise from the signal and gets rid of it, ideally leaving the signal/voice unaffected. That last bit is really hard to do. There is often some “artifact” left behind after NR is performed. It usually sounds like swirling water. So you have to play with the settings to find the right balance of noise reduction without making the signal sound too weird. And the more noise there is to start with, the worse that swirly artifact is.
If you do all four of those things, you can get the best possible audio out of the cheapest possible gear. It’s what I did in the $5.00 vs $500 thing.
That is the first answer to the question of how we move toward pro audio from the $5.00 setup – having a basic understanding of how to limit noise.
In the next installment of this series, we’ll talk about digital audio what kinds of microphones can be used to give us even better sounding audio.
Level Types – What is The Difference?
Your home recording studio hardware, namely mixers (if you have one) and/or audio interface boxes will have places where you can poke cable plugs into them. Not surprisingly these are called inputs. But lest you think that’s the end of the story, just a simple hole designed for one and only one kind of plug/cable carrying one and only one kind of audio, you’d better think again. There are frequently choices to be made by pressing a button down or leaving it in the “unpressed” position, depending on what kind of “level” you are dealing with. These types are usually line, instrument or microphone (mic) levels.
Here is an article explaining what the difference is:
http://www.audiorecording.me/whats-the-difference-between-line-instrument-and-microphone-levels.html
How To Be a Famous Singer
 If you are asking how to be a famous singer, you will probably get a dozen different answers from a dozen different people. But one thing you can be absolutely sure of is that you will need a recording of yourself singing. This article will show how you can do that.
Last night’s excellent episode of Glee (the Saturday Night Fever one) posed some fantastic questions that hit a little too close to home (yes, I was in “vocal band” in high school, which is what passed for the kind of glee club or show choir they have on Glee). I so wish I could send this article to my high school self. Anyway, the teacher, Will Schuester, was worried about some very talented seniors in the glee club – NOT because they weren’t talented, but because though they wanted to be famous, they didn’t know how.
Santana, was totally sure that she would become famous. She just couldn’t tell anyone how or for what. Mercedes knew for sure she wanted to be a famous singer, but she didn’t know what to do to make it happen. So many kids have the dream of being famous singers. They just don’t have a plan. Since there are so many paths to this goal, I’m not going to espouse any particular one. But no matter what path you decide to take, you’re going to need a demo recording at the very least, and a preferably an entire album that people can buy.
How To Record Your Own Album or Demo
In the past there was really only one way to record your singing, and that was to go to a recording studio. It was expensive then and is expensive still, typically around $40-$50 per hour. It takes a long time to record just one song, so the cost gets really high, really fast, especially for a full album.
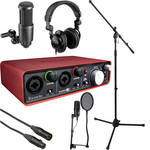
Until very recently the only way to get truly professional quality recording done was via the above commercial studio route. In fact, there are people who still believe that. They are wrong. Here is what you will need to record professional audio from home.
- A computer – In 2013, just about any computer will be all you need.
- An audio interface – This is a small box that plugs into your computer (usually) via USB. You’ll plug your microphone into this. Get the Focusrite Scarlett 2i2, which has two mic inputs ($150).
- A microphone – There are lots of types. You’ll want a studio condenser type of mic such as the Audio-Technica AT2020 ($82).
- Recording software – There are lots programs. Get one called Reaper, which is awesome and only $60. Download it now.
- A few extras – Get a mic stand, a mic cable, a pop screen, and a pair of headphones.
The above represents what I consider to be a starter studio capable of producing pro audio at the lowest cost. Everything above will run about $300, which would be about the same amount it would cost to record 2, maybe 3 songs at a studio. I worked with B&H Photo-Video-Audio to create a home recording starter bundle – pictured on the right – for only $260.25. CLICK HERE for more info or to purchase that.
So many kids have the dream of being famous singers. They just don’t have a plan. Since there are so many paths to this goal, I’m not going to espouse any particular one. But no matter what path you decide to take, you’re going to need a demo recording at the very least, and a preferably an entire album that people can buy.
Recording Your Songs
There are too many variations in music styles to go over every possibility, so I’ll describe how to do it with an acoustic guitar and singer, a very basic and simple example.
Open Reaper software and create one track. See this video on how to do that (plus a few other things to get started with Reaper) – Reaper Tutorial Video.
Record the guitar part (if you don’t play guitar, obviously you’ll need to ask a friend who does to come over) using the same method from the video. Just face the mic about 6-10 inches from the part on the guitar where the neck meets the fret board or around the 12th fret.
Once the guitar part is recorded, disarm the record button (just press/click it until the red light goes off) on the guitar track, and open a second track so you can record your voice. Again, the video shows how to do this (open a second track). This time make sure any speakers are turned off. Otherwise the guitar playback will get picked up by the mic when you are singing. Of course, you’ll need to hear that guitar track somehow in order to sing along, right? That is what the headphones are for. Plug those into your interface box (the Fast Track or whatever kind you have) and put them on your noggin.
Now arm track 2 for recording (make doubly sure track one is NOT armed to record) and record your voice by singing along while listening to the guitar part. I recommend doing this step (recording your voice) 2 or 3 times (on tracks 3, 4 and 5, for example) so you can choose the one that sounded the best.
Once you have a vocal track that sounds good, mute (click the “M” on the track control panel) or even delete the vocal tracks that were not keepers. Then play your song and adjust the volumes (yes, this is shown in the video too:)) of the guitar and voice until they sound good together.
Save the song in Reaper, and do this again for the next song, and the next, until you have all the songs for your album or demo recorded. Save all the songs (called Rendering in Reaper) as 16-bit stereo wav files and put them all in the same folder on your computer.
Creating and Selling Your Album
Burn your songs to a CD
This used to be so hard and now it is incredibly easy. I love living in the 21st century:). OK, so what to do with your song files – decide what order you want them to be in and then simply burn them to a CD using a program like NERO or even Windows can burn CDs now.
Album Art
Once that is done, you’ll need some album cover art. You can do this in any graphics program like Photoshop, Gimp or Paintshop Pro.
Create Album in Kunaki
When you have the songs recorded and the artwork done, go to a site called Kunaki, which is an incredible service (a FREE service!) that lets you upload your songs and artwork, and then they create the album for you! You can get physical copies of that CD mailed to you for $1.00 per CD, and the artwork looks fantastic! But don’t get too many physical copies just yet. Remember that we live in the digital age. You’ll want to make your album available on iTunes and all the other digital stores. Here’s how to do that.
Make Your Album Available on iTunes
Once you have received at least one copy of your physical CD from Kunaki, and made sure there were not typos and that the CD plays OK, it’s time to go to CD Baby, another awesome internet service that costs just $49 per album. You simply visit the site and follow their directions for setting up your album. Send them a copy of your CD, which is easy with Kunaki. Just tell Kunaki to mail a copy to CD Baby. Once the album is all set up on CD Baby, they do all the work of making it available not just on iTunes, but also Amazon, Spotify, Facebook, CD Baby itself, and 2000+ record stores. How’s that for awesome?
Now all you have to do is tell your fans or soon-to-be-fans how to get your CD/album/mp3s. You can send them straight to your page on CD Baby, or to you iTunes link, or to your Facebook page. They can listen to clips of your music for free and then buy either the entire album or individual song mp3s. CD Baby even has an awesome widget that sets up a store for you on your Facebook page. When someone buys the physical CD from CD Baby, they (CD Baby) will handle the order processing and shipping (excellent!). Periodically, CD Baby will ask for more CDs. When they do, just have Kunaki ship them.
That is really all there is to it. You now have an album/CD people can buy. Yes, this was a simple album example. But the process is the same regardless of what kind of music you record. You may have to buy some extra and different equipment to suit your individual needs. If you have a full band you want to record, for instance, you might want an interface that records 8 or more tracks at a time.
Here at Home Brew Audio we are constantly posting new articles on how to do recording. Right now we have well over 200 articles available to anyone to peruse. We also have video tutorials available, such as our courses, The Newbies Guide To Audio Recording Awesomeness, How To Build A Home Recording Studio, and more. If we don’t have an article or tutorial that shows you how to do what you need to do, please let us know by the comment section below and I will make sure we get one done ASAP.
There are many roads to becoming a successful singer, but they will all involve having your own recording. Now you know that you don’t need to save up thousands of dollars for a recording studio whenever you want to record. Learn how to do it yourself in the comfort of your own room at home. We’ll show you how.
If you’d like to see and hear some examples of songs recorded on my modest home studio right here in a converted bedroom, check out the following:
Cover of That Thing You Do!
Cover of My Eyes (from Dr. Horrible’s Sing-Along Blog)
Harmony examples (where I sang all the parts) – click the “music” player on the top of the page
Ken Theriot CD Baby page – This is my music, all recorded as described in this article and an example of what you can have on CD Baby