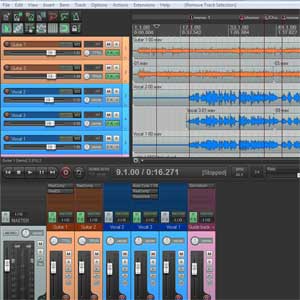
One of the many great things you can do when mixing with software, as opposed to the old-school way when you had to use and actual physical mixing board (shock, horror!) is the ability to easily drag, move and color-code tracks around for easy organizing.
In the below video from WinkSound, Michael White shows you how to quickly color code tracks and groups of tracks in Pro Tools. He demonstrates by giving the percussion/drum tracks one basic color scheme, the guitars a different color, and so on.
Of course you can do this in Reaper as well. Simply select a track by right-clicking in the track control panel of a track (or a group of tracks) and selecting Custom track colors in the drop-down menu. Then just pick a color from the palette. This will change the color of the track item and the track title/name, but not the track panel background. To also color the track panel background, go to Options, Preferences, Appearance. Then put a check mark into both Set track label background to custom track colors and Tint track panel backgrounds.
Below is the WinkSound video on color coding tracks in Pro Tools:
Recording Tips and Techniques
How To Remove Vocals From a Song So You Can Sing Along
 Have you ever wished you could remove vocals from a song so you could use the music behind YOUR voice? Perhaps you want to make a CD for a karaoke party, or you just want to try it because it’s cool. Well in this computer age, it is possible (usually) to do just that.
Before I tell you how, I should quickly mention a couple of things. This technique won’t work with every recording you try it on. Much will depend on how the lead vocal was mixed by the original producer. the only 100% guaranteed way to do it perfectly is to have the original tracks to the song (not likely if it’s a popular song). But you can usually get close enough. Also, speaking of the original producer, if you do manage to remove the lead vocal the remaining recording still is under copyright. So a review of copyright law may be prudent if you hope to publish the recording.
Okay! So how can you get this done? First you need audio editing software. If don’t already have your own, try Audacity, which is open source freeware that you can download from the web. For this you’ll also need a plug-in (also free) for Audacity called “Center Pan Remover.” Then you just put that file into the Plugins folder in Audacity. There are instructions on the Audacity website on how to do all this.
 Now open Audacity, and open the song from which you want to remove the lead vocal. Next, you’ll notice that the song is a stereo track (has two waveforms, left and right). The reason this process works is that usually, a lead vocal in panned into the center of the stereo field. So if you can somehow isolate and cancel that center part, you can usually remove the lead vocal. For songs where the lead vocal is NOT panned to the center, which isn’t very common, this process won’t work very well. In that case, I recommend trying something like Singing Superstar
 (and you can download it right now!), which does some amazing things, including removing vocals from your favorite songs on your CDs, mp3s, etc.
All you have to do now (back to the Audacity method) is select the entire song by clicking in the area around the pan and volume controls on the left side of the track, go to the Effect drop-down menu, and choose Center Pan Remover. The default setting ought to work just fine. But if not, undo it and try some different values in the “frequencies above” and “frequencies below” windows. I recommend 250 Hz for frequencies above and 3,000 Hz for frequencies below.
If everything went according to plan, you now have the music without the lead vocal. Now you can sing along with your favorite band.

This doesn’t always work well with Audacity. Other audio editors can do it better, such as Adobe Audition. Just load up the song in the edit window and apply the Center-Channel Extractor effect.
If you don’t have access to Adobe Audition or other high-end editor, try any of the programs out there designed specifically for this purpose, like Singing Superstar.
Have fun!
Learn more cool things to do with your home recording studio with our video tutorials.
Preparing To Mix The Song – More Listening And Less Doing
 Once you’ve mixed enough songs, you start to develop automatic habits that can be real time-savers. For example, You might always arrange the tracks so that the guitars are on tracks 1 and 2, the bass on track 3 and the lead vocal always on track 4, etc. You might then also have automatic habits like immediately reaching for certain effects (EQ, compression and so on) on your tracks and even start dialing up settings for those effects before you’ve really even listened to the mix.
But it might be prudent to stop all that and just listen first before you do anything. Take stock of what you’ve got when everything is raw and do more listening before you do any acting. This is good advice that I will be taking for my next mix since I read Graham Cochrane’s article this morning – Stop And Think Before You Mix.
Check out his article here: http://therecordingrevolution.com/2012/11/12/stop-and-think-before-you-mix/
Audio for Video Tutorials By Sennheiser
 One of the biggest opportunities for improvement in audio almost across the board – amateur to professional videos – is the audio quality on videos. For some reason it just seems to get ignored. I preach from this soapbox a lot. See my post Audio For Videos: Do Not Let Bad Sound Ruin Great Video. Well, Sennheiser, maker of excellent quality microphones and headphones (see my review of the Sennheiser MKH 416 shotgum mic – my “desert island” mic), has been running a series of video tutorials on getting good audio quality on videos. See the first video below, where the talk about shogun mics like the MKH 416, as well as other kinds of mics good for video production.
Mobile Recording – Choosing An Audio Interface For Your Laptop
 I was reading an article this morning about how to select a sound card for your laptop if you plan to do pro-sounding recording on the move. For the most part though, when you say “sound card” in relation to professional sounding recording, what you’re really saying is “audio interface,” or external sound card. In fact, most interface units aren’t “cards” at all, but usually boxes that plug into the laptop either via USB or Firewire (more USB these days). Anyway, the more I read through the article, the more I realized that for the most part, any interface you choose for your laptop would also be great for your regular non-mobile computer. So the questions you ask yourself about mobile recording interfaces are largely the same as you’d ask for your home studio recording interface. These days, unless you plan to become a commercial recording studio, the interface units for a computer based home studio will be small boxes, i.e. the same as would be appropriate for mobile recording.
So what are the questions you should be asking? According to the article in question, they are:
1. Is portability a concern?
2. How many inputs and outputs do yo need? In other words, will you need to record more than one thing at a time – a guitar and voice simultaneously, for example?
3. Will you be recording with a microphone or using “outboard gear” like a MIDI keyboard.
4. Do bit-depth and sampling frequency really matter? This one I really like the answer to, because it is definitely what I believe as well. That is basically that though it makes a technical/objective difference, a vast majority of people won’t be able to tell the difference between some of the more affordable interface units and the super expensive ones if the main difference is bit-depth.
5. What other accessories might you need? This refers to speakers (notoriously un-mobile), headphones, mics, cables etc.
Here are a few examples of good mobile interface units. All of these have phantom power, by the way – something you need if recording with a condenser microphone, and connect to a USB port.
The cEntrance MicPort Pro
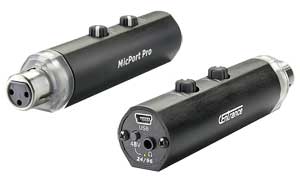
The cEntrance Mic Port Pro is really the ultimate in portable interfaces. It records very high-quality audio, plugs right into a USB port and has a headphone jack. See my review of it here (includes audio samples): https://www.homebrewaudio.com/review-of-the-centrance-micport-pro-audio-interface/. $149.95.
The M-Audio Mobile Pre

The M-Audio Mobile Pre is lightweight, has two combo (mic or line-level) inputs, and is definitely a great-sounding interface. $111.71.
Focusrite Saffire 6 USB
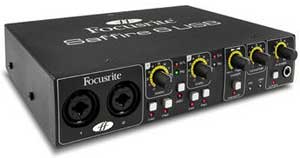
Great quality from a famous name in audio for a great price. It has 2 combo inputs with the same preamps as all the other Focusrite Saffire series interface units. $174.99.
M-Audio Fast Track
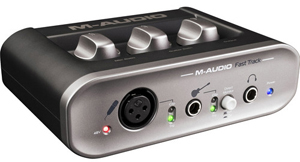
And of course, the M-Audio Fast Track which is very portable, has a mic and an instrument input, and costs just $99.99.
Of course there are dozens more out there.
Check out the article I’ve been referring to here: http://blog.dubspot.com/mobile-music-production-finding-the-perfect-audio-interface/