Most small guitar amps have the control section – the part with all the knobs – on the same box as the speaker cabinet. It’s all one single unit. But there are also amps that have a separate “brain” unit that is separate from the speaker cabinet. They connect via a cable that you can plug and unplug, the same way your guitar plugs into the brain. Well, these 2-part amps can be a real advantage when recording. The reason for that is that you can run a long cable between the brain and the speaker cabinet, placing the cab in a more sonically desirable room or space while the player (who is often also the recording engineer in home recording situations), can sit by the computer or other recording console, monitoring the guitar with headphones.
Here is an article that shows you how to do this:
http://en.audiofanzine.com/recording-mixing/editorial/articles/isolating-your-speaker-cabinets-for-the-best-guitar-sound.html
Recording Tips and Techniques
Creating Subgroups In Reaper and Pro Tools
 I just watched a video tutorial showing how to create instrument subgroups in Pro Tools. I was very pleased to see (in a petty kind of way) how much easier it is to do the same thing in Reaper;). But first, a bit of an explanation.
What is an instrument subgroup?
If you have 10 or 11 tracks of drums (one for the kick, one for the snare, one for the hat, and so on) in your song mix, it might be really handy once you get the relative mix of the drums just right (the volumes of the kick, snare, hat, etc. working well with each other) to control the volume of ALL the drums with just one volume slider when working to get the volume of the drums to work well with the rest of the tracks (vocals, guitar, bass, etc.). Well that’s exactly what a subgroup does. You set it up so that all the drums feed into a single new stereo track that you can call “Drums,” and then when you move any control on that new Drum track, it will affect ALL the drums. And it isn’t just the volume you can control this way. You can apply effects like reverb or compression or EQ to the Drum subgroup track, and those effects will be applied to all the drums. So now, not only can you control all the drums with just the controls on a single track, but you can save load on your computer’s CPU, since the effect is loaded only once (for the Drums subgroup track), rather than 11 times – once fore each individual drum track. And an added benefit is that you can make the drums sound more cohesive by putting them all through the same effect with the same settings.
Creating a subgroup in Reaper

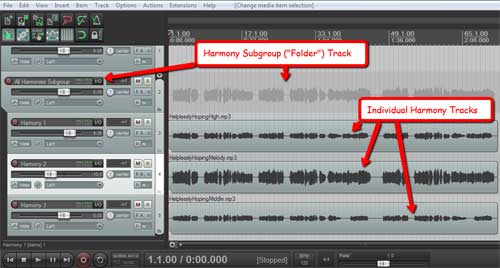
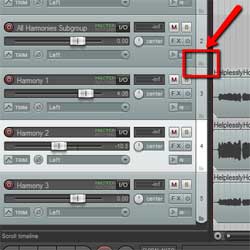
Let’s start with 3 harmony vocal tracks that you’d like to control with just a single subgroup track. Just create a new track above the 3 harmony tracks like in the picture on the top left. In the bottom right corner of the new, blank soon-to-be subgroup track (called a “Folder” track in Reaper) you’ll see a little folder-shaped icon. See Figure 2. All you have to do is click on that little folder button and it’s done! Every track underneath it gets indented to indicate that they are now inside that folder track, so to speak, and you can now control the volume and everything else – mute, solo, effects, etc.) of all the harmony tracks with just that one new subgroup/folder track.
One thing to be aware of here is that if you have other tracks below/after the harmony tracks that are not harmonies, tracks you don’t want in the folder, then you’ll need to click the folder icon (bottom left of the track control panel) for the last harmony track to tell Reaper that it’s the last track you want in the folder. This is because as I mentioned earlier, clicking the folder icon indents (incorporates into the folder) all the tracks below/after it be default.
Creating a subgroup in Pro Tools
In Pro Tools you still need to create a new track, and tell Pro Tools . Then you have to tell Pro Tools to use “aux (auxiliary) input.” Then you have to select an input for the new track, a “bus” input. Then you have to change the outputs of all the drum tracks (can do this at once by selecting them all) to the bus you used as the input for the subgroup track. You can see all this in the video below from PureMix. By the way, this video shows color coding of tracks. You can also do this in Reaper, which I show you how to do in my article here: Color Coding Tracks To Organize Your Mix
How To Remix "Upon a Summer's Day" For Two Couples
 Many recorded versions of traditional music require a particular number of dancers for the number of measures of music. What if you have more, or fewer dancers? For example, the standard number of repeats of Upon a Summer’s Day from Playford’s The English Dancing Master is correct for 3 couples, as the dance is described. But what if only 2 couples want to dance? Many recorded versions of traditional music require a particular number of dancers for the number of measures of music. What if you have more, or fewer dancers? For example, the standard number of repeats of Upon a Summer’s Day from Playford’s The English Dancing Master is correct for 3 couples, as the dance is described. But what if only 2 couples want to dance?
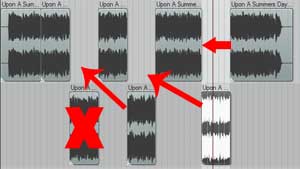
Fear not! With modern technology you can slice and dice the song on your computer to your heart’s content. For example, the recording we have for Upon a Summer’s Day has 3 repeats of the chorus section per chorus, which is perfect for 3 couples, but won’t work for 2. So we need to slice out 1 of the chorus repeats for each of the 3 times the chorus occurs in the song.
In this video, we take you step-by-step using the excellent recording software called Reaper, and show you how to slice out those 3 sections of the song, making sure that the remaining pieces fit back together seamlessly without skipping a beat.
You can use this technique to create “mash-ups” of several songs combined into one, slice, dice and remix, etc. to create something new out of just about any audio. But as usual, take care not to violate any copyright laws by publishing anything that isn’t public domain, or that you do not control rights for.
Have fun!
Making A Weak Vocal Track Sound Stronger And Punchier
Lead vocal tracks almost always benefit from at least some compression. See my tutorial on using Reaper’s ReaComp compressor plugin to see a video of how to apply compression to a vocal track here: Vocal Compression Using Reaper’s ReaComp Effect Plugin. In that tutorial I applied mild compression and I only did it once. That’s pretty much the norm. But you can use more compression if the vocal track is very weak, tentative, and/or particularly uneven (volume-wise).
But how do you avoid the nasty side effects of over-compression, which include things like hyped sibilance, pumping or just very flat-sounding audio? One way is to use something called serial compression. What that means is that you apply subtle compression to the vocal track, but you do it multiple times. That way you can get the desired effect of more-than-usual compression without ass the side-effects.
Bjorgvin talks about what that is and how to use it in his article here:
http://www.audio-issues.com/music-mixing/vocal-compression/
Tips For Improving The Sound Of A DI Bass

Many people, including me – since I’m not a truly bass player – record bass guitar using a direct inject (or DI for short) box instead of using a microphone on a bass amplifier. For one thing, you don’t have to own a bass amplifier and when you have a small recording space, that’s pretty important. In a perfect world, you’d always plug electric guitars and basses into guitar and bass amplifiers because those amps are designed to accept the high impedance outputs of electric guitars and basses. The problem is that most recording interface preamps do not have high impedance inputs, so the sound that gets recorded is pretty bad due to the impedance mismatch. A DI is a box that gives you that hi-impedance (hi-Z) input. DIs also take the unbalanced input of an electric guitar (potentially noisy) and make it appear as balanced to the preamp/recording interface. Still and all, even using a DI can yield pretty flat and thin sounding bass.
But there are some things you can do to improve the sound of a bass recorded through a DI box. Using a combination of EQ, compression, and a tape saturation effect in Pro Tools, Graham Cochrane shows you in the below video how to bring this improvement about. The difference is subtle, so if you have headphones you might be able to hear the improvements better.
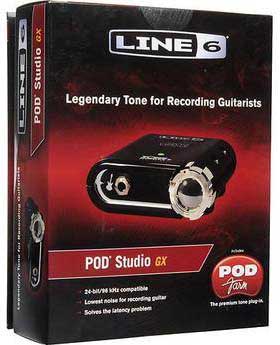
Some DI boxes are part of guitar and bass recording packages that include software that does the stuff Graham talks about and much more. For example, I use a TonePort DI from Line 6, such as the one in the Studio GX (see picture on left) that comes with POD Farm software, which contains dozens of amplifier simulators and pedal effects. Purists will still say you will always get better sound with a real amp, but I think most people wouldn’t be able to tell after recording with a system like the Line 6. Meh – to each their own.