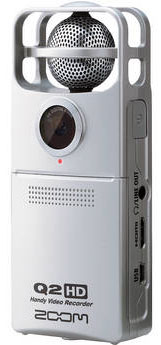
 Most videos on YouTube have crappy audio. That’s because video cameras almost never have good quality microphones built in. But that’s all changed with the Zoom Q3 Handy Video Recorder note: this has been replaced by the Zoom Q2HD. It’s not only got a high-quality studio mic built in, it’s got two! They’re arranged at the top to give you excellent stereo sound to go with your video. This is an excellent piece of field or home recording gear. Of course, you can use it either as a video camera that has great audio, or as simply a hand-held digital audio recorder by switching modes and telling the Zoom not to record video – only audio. The Q3 (now Q2HD) is a very handy (ha ha, get it?) piece of recording equipment.
Just point and shoot, and when you finish with the high-quality stereo recording along with your video (or just the audio part if you don’t really need the video), plug it straight into your computer with the built-in USB cable. How’s that for awesome as well as convenient?
You should keep in mind on this, however, that if your are far away from the source, especially in a rectangular or otherwise “echo-y” room, the sound will still not be quite as good as if the Q2 is only a few feet away.
For more on how the quality of your audio is affected by how far away the source is on a video, see our post How To Get Good Audio On Your Videos, where you can hear examples of this in the video in that article.
Music Recording
Are You a Gleek? Want To Get That "Glee" Sound?
 Are you a “gleek?” (if you have been hiding for the past year, a “gleek” is someone who is a fan of the show Glee). I confess that I definitely am. I love music, recording, singing harmony, and ….well, OK, not high school. What a horror show-except for the music! Choir, musicals, my rock bands, singing Beach Boys and Asia harmonies at Carl’s Junior with my friends–THOSE were the things I loved about high school. And that is what Glee is mostly about. Plus there’s the hilarious Jane Lynch as Sue Sylvester to keep the show from sliding into a pool of syrupy glurge.
But I digress. Have you noticed anything odd about how all the singers sound on that show? The cast members were selected because they could really sing (apart from looking the part and acting and all that too). But when they produce the musical numbers, the voices sound a bit artificial don’t you think? Every note is perfect–maybe too perfect. It sounds kind of, well, computer-y to some folks. Love it or hate it, this is down to the popularity of an audio processor called Auto-Tune, and its ilk. And it pretty much defines what I am calling the “Glee sound.” and you can have it too, if you want to.
Antares Auto-Tune Vocal Studio Pitch Correcting Software is an awesome tool that can really help in the studio, though like anything else, it can definitely be over-used, and frequently is. The program has two modes that can be used to treat a vocal track, the auto mode and the graphical mode. In auto mode, all the singer’s notes are run through Auto-Tune’s processor and corrected automatically. The entire track gets washed through a filter that snaps the vocal track’s pitch to a musical grid similar to the way a graphics program snaps shapes to a visual grid. The auto mode is much faster to use. You basically just flip a switch. But when you wash an entire vocal track through the processor, you usually get a somewhat artificial and computer-y sounding product.
The graphical mode is like having the “snap-to-grid” option turned off in a graphics program. It may take longer to get certain things lined up, but at least you can put everything exactly where you want it. You can SEE the grid in graphical mode, but you choose which notes to correct and which ones to leave alone by dragging the pitch curve from the recorded voice closer to a grid line. You also have several choices as to how intense the corrections you make should be. Generally the smaller and less extreme the correction (just bumping an off-note a bit closer to the target pitch, say) the more natural it sounds. This mode is much more hands-on and takes a bit longer. But it can result in a much more natural sounding product.
If you would like to have that “Glee sound,” all you need to do is add the Auto-Tune plug-in to your pc recording studio software. Don’t have your PC recording studio set up yet? No problem. You can do that in about 30 minutes by following the instructions in the free tutorials at Home Brew Audio, which you can access by clicking right here.
From one Gleek to another…happy recording!
After Audacity Download Reaper Home Recording Software
Home Brew Audio starts you out learning home recording on free recording software called Audacity. The first several video tutorial teach you how to use Audacity to learn the basic audio recording techniques. But though we teach you the basics on Audacity, many of you (especially musicians) will want to move on to something more powerful and capable, such as a program called Reaper.
Reaper focuses on the multitrack recording aspect of audio, allowing you lots of capability for over-dubbing, mixing MIDI tracks with audio tracks, editing the midi tracks, and applying tons of cool effects on any or all of the tracks in your project. There is a bit of a learning curve with Reaper, but the good news is that their manual is VERY details and helpful, and their user forum is extremely active and filled with really helpful people.
Last but not least, Reaper’s “fair pricing” scheme is downright unheard of. You start with the 30-day trial, like usual. But after the 30 days are up, you’re on your honor to buy the license! And there are two licenses to pick from, both of which give you identical capability. The “personal use license is only $60. If you don’t make more than $20,000 a year using Reaper, that’s the one for you. The professional license is $220. Let me say that again. If you don’t finish testing Reaper after 30 days, you can keep using the trial…for as long as you want, though you will be reminded that Reaper is not free, and that you should purchase a license. Once you decide to buy a license, it’s up to you to be honest about which one is appropriate for you.
So here is the order in your home recording training plan. Download the free home recording software called Audacity. If you’re a musician, or just have the need for more capability, download Reaper and use it for 30 days. You will have spent no money on recording software at all. If you’re just starting out, you can buy Reaper for $60. It’s a really sound plan right? Nod your head;). Now you know.
Happy recording!
How to Record Yourself As a One-Person Band on a $5 Budget
 Do you play several instruments? Can you sing harmony? Would you like to record yourself doing all those things at the same time? Are you broke?
If you answered yes to all the above, there may be some very good news for you. I know a way you can record yourself doing one thing, then record yourself doing something else along with that first thing. This used to be called “sound-on-sound” recording. More often these days, it is called “over-dubbing.” All you need to over-dub several tracks of audio is a computer with a sound card, and a microphone to plug into the computer. Even one of those cheapo $5.00 plastic PC mics will get you started. Would you not agree that a LOT of folks have that stuff already? Or they could have it after a quick trip to the local office-supply store (for the mic). Once you have all that stuff, all you need to do is download an open-source audio program called Audacity from the internet, and install it on your computer. You now have a home recording studio!
So how do you do the one-person-band thing? Let’s imagine you play guitar and sing. First, you would plug the mic into the pink jack of the sound card. Then open Audacity. Click the button in the tool bar that looks like a big red dot, which means “record.” Your studio will now be recording. Play the guitar part to a song you know…JUST the guitar part; no singing just yet.
Once you finish the guitar part, you’ll need to stop recording (click the “stop” button, which looks like a big square in the toolbar), and make one change to your studio set-up. Turn the speakers off and make sure you plug some headphones/earphones into the sound card’s green jack. Did I mention you’d also need some sort of earphones? Do you have an mp3 player…or do you know someone who does? Just use the ear-buds or headphones you use for those.
Next, “rewind” Audacity back to the beginning by clicking the button that has two backwards purple arrow-triangles on it. Then click the record button again and sing along with the guitar. You now have a vocal track and a guitar track. If you want to add harmonies, you just repeat the above step as many times as you have harmonies in the song. You could also add percussion, other instruments, etc. and voila! You have a recording of yourself as an entire band.
You’ll want to use Audacity’s editing tools now to make sure the tracks are synchronized, which you can do by zooming in and dragging the tracks left or right until they sound right. You will probably also want to mix the volumes and pan some tracks left and right, all of which you can do with the tools that come with Audacity. Export a stereo file from Audacity, and you have just recorded a song on a $5.00 budget.
The audio won’t be super high-end, but it CAN be surprisingly good. If you want to hear an example of something like this, check out the Home Brew Audio website for a demo video and several tutorials on how to get the most out of the lowest budget.
Myth: It is Expensive to Learn to Use Your PC for Recording Sound That Sounds Good
 Before we talk about recording sound, let me ask you a question. Have you ever avoided doing something because you believed there to be some sort of barrier or consequence you didn’t want to deal with (like “recording sound at professional quality is expensive)? Then have you ever found out….perhaps years later…that your belief was incorrect, and you could have done that something after all? That feeling really sucks. I found out at a high-school reunion that I was WAAAY more popular than I would ever have imagined while I was going through it. My belief about myself was that I was a scrawny, funny-looking geek that was too embarrassed and shy to ask girls out on dates. Then 10 years later I find out that I could have gone out with almost anyone! To hear people talk about how popular I was, and how my self-image was completely wrong, was at once wonderful and hugely frustrating.
So what does that little story have to do with recording sound from home? I have heard time and time again from many people that they are going to someday learn how to do home recording, but they don’t have the time or money right now. But guess what? Getting good quality audio is more about learning a few tips and techniques than it is about buying expensive gear and/or going to recording classes. Knowledge trumps gear! And that knowledge isn’t hard or expensive for a vast majority of the folks who let this myth stop them.
Let’s say you’re a singer/songwriter with the barest of computer skills. You need demo recordings constantly and you’d really like to record a CD of your own. But everything you’ve read says you can’t do this yourself. You need a commercial recording studio where you can rent time (for anywhere between $40-80 an hour!). So you either put it off, or try to save money for a day in the future when you’ll have 5 or 10 grand to record a CD. Then 10 years later, you find out that you could have set up a home studio on your PC and learned the techniques for using it to create professional audio for under $100 bucks. That’s right.
Well don’t wait 10 years! The knowledge you can gain for how to do JUST the minimum required to record your music and release your own CD is a fraction of what you need to know to become a professional recording engineer. Since you just want to record YOUR music, there’s no need to learn a huge majority of what a pro audio engineer needs to know.
So how can you acquire this knowledge? One great source on the web for tutorial videos, articles and other resources focused on recording sound from your PC is Home Brew Audio. It won’t take long. It will be fun. And in 10 years, you’ll have one less regret. So when you get a chance, check out Home Brew Audio and other great sources on the web. Good luck!