EQ (equalization) is a very useful concept and tool in audio recording. If you want to brush up on what it is all about, check out our article here: What is Equalization, Usually Called EQ? When first learning how to use EQ, it can be confusing to understand what settings to use for what sounds. It is often very handy to have a a guide that tells you where to start for common sounds, like voices and tons of different instruments. The entry at the below link will give you such a guide. Not only is this a great reference, but it can help you start to learn where on the frequency scale these sounds live, in general, giving you a foundation for understanding how to shape your sounds for the best possible audio.
http://www.audiorecording.me/complete-eq-settings-to-start-when-doing-audio-mixing.html
Music Recording
Review of iRig MIDI by IK Multimedia
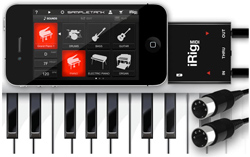
IK multimedia has added yet another cool product that can turn you iPHone, iPod Touch or iPad into a professional audio recording tool. This time it’s the iRig MIDI interface ($69.99), which allows you to connect a MIDI keyboard (or other MIDI device like drum machines, guitar and floor controllers, etc.) to your iOS device. For my review I used my iPhone 4. The iRig MIDI works with iPhone 4S, iPhone 4, iPhone 3GS, iPod Touch 3rd and 4th generations, and both iPad versions. The primary use for this thing, at least from a home recording perspective, is as a virtual instrument. You can use it with several different instrument apps for the iPhone/iPad, but IK Multimedia’s own SampleTank app was designed specifically to work in connection with it. The standard, computer-based SampleTank virtual instrument program costs close to $200. But with the iRig MIDI you can start using it free by downloading the SampleTankFreeapp onto your device. SampleTankFree comes with 8 sounds (2 drum kits, 1 electric piano, 2 bass guitars, 1 guitar, 1 keyboard synth, and 1 oboe). If you download the full SampleTank app for $19.99, you get 72 instruments.
Connecting Everything
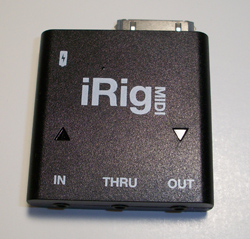 The main hardware is called ultra-compact on the IK Multimedia website. It is a square plastic housing measuring 1.75 inches by 1.75 inches with a standard male iPod/iPhone connector, a power input, and 3 midi ports (IN, THRU and OUT). Make sure you have ample space to connect everything. My home recording work space is pretty small by design, and my MIDI keyboard (Korg microKontrol) takes up most of the room. My mouse, mouse pad, monitor stand and desktop microphone take up most of the remaining space. This became a logistical problem when trying to hook up the iRig MIDI.
The main problem I had was with the power plug for the tiny unit. You can charge it up with the included micro USB cable, but I had just opened the box, so I needed to have it plugged in to use it, which was a problem because the cable is only 15 inches long. In the end I had to bring a laptop computer into the studio and grab a TV tray to set next to my keyboard in order for the cable to reach AND to keep my iPhone in front of me. You can avoid this if you charge the little device up before hand though.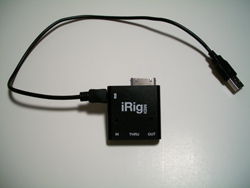
The other main connections remaining were the MIDI cable and headphones, which you technically don’t need, but to really appreciate the awesome sounds in SampleTank you should use them. Alternatively you can connect them directly into your audio mixing setup if you have one. Anyway, I used one of the two provided MIDI cables (standard 5-pin MIDI connector on one end and tiny RTS (ring/tip/sleeve) pins on the other). Here’s where I ran into another glitch, which is not a slam against the product, but was something I didn’t know until I spent a bunch of time doing trial-and-error. My Korg keyboard has both USB and standard 5-pin MIDI cable connections. The USB connector also can power the keyboard. So I had packed a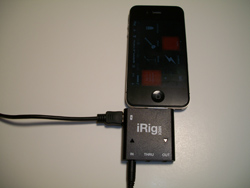 way my power cable. No problem I thought, I’ll simply plug the iRig MIDI cable into the Korg’s MIDI OUT jack and we’ll be in business. Not so. The iRig MIDI has a triangular light above both the MIDI IN and MIDI OUT ports to indicate when data is being went or received. With my Korg connected to the iRIG MIDI IN port, the light above that port should have been blinking red. I even went and got the the power cable for my Korg and hooked it up. Still no blinking red light. Next, I moved the switch on the back of the Korg. Still nothing. It wasn’t until I physically disconnected the USB cable on my Korg keyboard that the light started to blink. It would have been helpful to know this in advance, though it is not unreasonable for IK Multimedia not to have specs on every conceivable MIDI keyboard out there.
Now I was ready to rock and roll.
Playing The SampleTank Free Instruments
Now it was time to play. The free SampleTank app comes with 8 instruments as I listed above. However, you can listen to ALL of the sounds play loop patterns, even the ones you don’t technically “have.” In the “Sounds” window you can tell which sounds you have because it will appear in white, plus it will have the word FREE next to it (which are yours if you just have the Sampl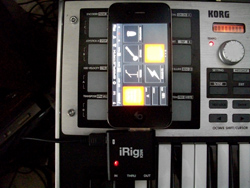 eTankFree app). Well, yours truly did figure this out for about an hour. I couldn’t figure out why I couldn’t play the sounds with my Korg keyboard, especially since I could hear the sounds using the Play button in the Sounds screen. After much confused frustration I noticed that the sounds I didn’t technically own were grayed out. Normally when something is grayed out on a computer screen, it means it cannot be selected or used in any way, which as I mentioned, was not the case with the SampleTank app. The grayed-out instrument sounds could both be selected AND heard if only to audition. Hence my confusion. When I finally selected one of the FREE sounds, voila! I was able to play the sounds with my Korg keyboard.
Now that I finally had crested the learning curve for getting started, things were very cool. I played around with the acoustic guitar for awhile. Take a listen to some of what I recorded here:
[jwplayer config=”Custom Audio Player-250″ mediaid=”8659″]
This is only one of the instruments, obviously. The built-in recorder allows you to overdub and do 4-track recording, with a different instrument in each track (“part), like bass, drums, guitar, and piano.
You can record your performances and then export them as stereo AAC audio files, either via e-mail or the iTunes File Sharing app.
This
Virtual Drumming – Use Your Computer to Drum Without Drums
 One of the coolest things about computer-based home recording studios is the wide-open world of virtual instruments. And of all the different kinds of instruments we can play via MIDI on our computers, drums are probably the most used. And why not? You can have a drum track on your song without even touching a drum. Technically you don’t even have to know how to play drums (though I think it helps a LOT if you can) in order to have them in your recordings. And perhaps the biggest benefit for my wife – I don’t have to make all the racket in the house that a drum kit would create. This is also a plus if you live in an apartment and drums would generate neighbor complaints. One of the down-sides to all this is that it’s actually fun to play drums for real! But finding a place for the kit to live is hard if you don’t have a lot of space in your house. Plus, even though it’s a lot of fun to play drums, recording them is typically not easy.
In order to record live drums, not only do you have to have a kit (space issues), and a drummer good enough to be on your recording, you have to have a bunch of additional microphones. For example, the kick drum needs a certain kind of mic (like an AKG D 112, for example) that is very different from the snare drum (typically a Shure SM57 or two), which is very different from what you’d need for overheads (2 large diaphragm condensers like the Rode NT2-A). So by using virtual drums, you’re saving yourself a lot of money for mics if nothing else.
So what is virtual drumming anyway? Well, if you’re recording a song, you can load up a software plug-in/program (into your multi-track recording software like Reaper), which contains recorded samples of actual drums (usually – though there are synthesized drum programs as well), and have your computer play these drums via MIDI. It’s like having a drum machine inside your computer.
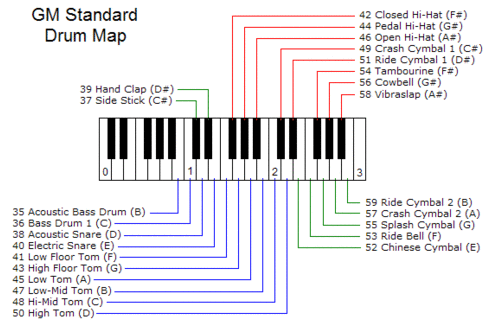
There are several different ways you can build a drum part. For those of us who are control junkies, you can do it like me. I like to build my tracks one measure at a time using my MIDI keyboard (I use a Korg controller). Drum programs (I like to use StormDrum by EastWest) will typically assign each drum in a kit to a specific key on a MIDI keyboard. See Figure 1. I will turn on the metronome in Reaper to keep me on the right tempo, and play, say, the kick (bass) drum part for a measure or two by simply playing the “C” key on my keyboard. Then I’ll do the same for the snare drum part, using the “D” and “E” keys (note: sampled drum programs typically deviate from the GM standard mapping by putting 2 different snare hits, left hand and right hand, on the “D” and “E” keys to allow your to play them like you had a drum stick in each hand. This allows for much more realistic sounding drums). I will repeat the above procedures for high-hat, toms and symbols until I have my song’s drum part composed for the entire song.
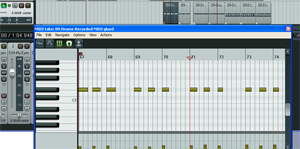
One of the greatest things about MIDI is that you’re not recording audio. You’re recording “on” and “off” messages (along with some additional information like how hard you hit the drum, volume, etc.), so it is super easy to correct the beats if you were a little ahead or behind or hit the wrong drum, when you played them on your keyboard. You just go into Reaper’s MIDI editor (See Figure 2) and drag a bar left or right (for timing) or up/down, which changes the note/drum being struck. By the way, I go into more detail on this in our first article on virtual drumming if you’d like to dig into this a bit more.
So that is one way to do virtual drumming, which is admittedly a bit time-consuming. Here’s another way to it that is definitely faster. There’s a program called Jamstix that has a sort of artificial intelligence. You load the program on a track in Reaper, open it up, and then select a type of drum kit. There are multiple genres, like R&B, Rock, Jazz and Latin), and several different kit-types within each genre. For example, the Rock genre contains such variations as Big Kit, Classic, Deep Loose, Deep Modern, Dry, Fat, Boom, etc. Once the kit is loaded, you can select a preset song like “12-Bar blues,” “808 Hip Hop,” “Metal,” etc. and voila! Just hit “play” in Reaper and the drums will start playing at whatever tempo you have set in Reaper currently. Jamstix use modules (Intro, Verse, Pre-Chorus, Chorus, Bridge, Middle-8, Drum Solo, Silence, Link, Breakdown, and Ending) to build songs. You can build your own songs (especially great for composing) or use the presets by selecting modules and putting them in whatever order you want. Of course you can also customize your songs in detail if you wish. Jamstix is awesome.
There are lots of methods in between loading up preset songs and building your own beat-by-beat. And there are lots of different programs you can use for this. Different drum programs will have different ways to do your virtual drumming.
Here are a few other quite popular drum programs that are known to work well with Reaper:
– Toontrack EZ-Drummer – Virtual Drum Module Plug-In
– Addictive Drums – Complete Drum Production Studio
– FXpansion BFD – Software Instrument for Acoustic Drums
(added on Nov 4th, 2012) – My new favorite drum program – Drum Experience
So there are some ways you can use virtual drumming to put drums onto your recordings without actually possessing a single actual, physical drum. With the quality of recorded drum samples available today, a large percentage of folks listening to your recordings won’t be able to tell that your “drums” aren’t real. This is a great time to have a home recording studio:).
Happy (virtual) drumming!
Tips On Improving Your Music Mixes
In this article, Des give some really practical advice, and even better, cheap-to-implement advice on improving your home recording studio mixes. Several of these tips are things I espouse and use myself, such as listening to your mixes on lots of different systems. I do a lot of critical listening in my car:). A lot of people will listen to you mixes in their cars too. Anyway, that plus some really great over-arching advice like not sticking to dogma so “dogmatically” I also find appealing.
Check it out here: http://www.hometracked.com/2008/05/31/improve-your-recordings-and-mixes-on-the-cheap/
AmpliTube iRig by IK Multimedia
IK Multimedia have been putting out some awesome music products for iOS, specifically iPhone, iPad, and iPod touch. I reviewed the iRig Mic and how to use it to record using the apps iRig Recorder and VocalLive here: iRig Microphone Review
So what is the iRig?
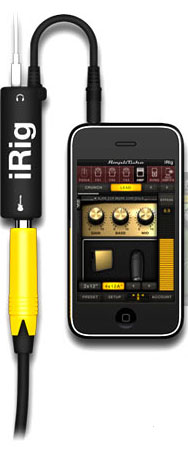
Today I’m reviewing the AmpliTube iRig, which is a small device that looks like a little tube that you hook up to your iOS device, allowing you to then plug your electric guitar or bass and headphones into your device. See figure 1. The yellow-sleeved plug is the guitar input and the white plug at the top is for the headphones.
Once everything is hooked up, simply go to the iTunes App store and download your free version of AmpliTube, the app version of the guitar amplifier modeling program called AmpliTube Free. This is free guitar amp modeling software. There are paid versions too, such as AmpliTube LE for $2.99 and the full version for $19.99. Everything is pretty intuitive from there, which is good because I don’t like reading directions – a personal flaw maybe. Anyway, so first things first, put on your headphones. Then under the tools menu is the first thing I was looking for, the tuner, which will deliver a clean guitar sound (meaning all the amplifier settings and effects will be bypassed…don’t forget to turn the tuner off when you’re done tuning!) for more accurate tuning. After I was all tuned up I headed for the fun stuff.
The Fun Stuff
I tapped the icon that says “AMP” and started playing around. The amp head has knobs for Gain, Bass, Mid, Treble, Presence, Reverb and Volume. After a short time turning those up and down, which you do by tapping a control and then sliding your finger up or down on the meter display, I saw the “Preset” button. Ooo, that looks like fun. There is a Preset pack built in with 6 factory presets that rock…literally. THAT is where the fun began. I tried every preset and holy cannoli did things sound awesome.
Basically I now had an amplifier for my guitar for the price of the iRig, which is $39.99. What?! An awesome sounding amp that doesn’t weight anything (important!!!) for $40? Where were you, oh iRig, when I was in all those bands? OK, it was the same place that iPhones and iPods were, but you get the point.
Next I decided to record a little bit of my playing. Yeah, didn’t I mention that there is a recording function built in? Yup. Just tap on the icon of a tape recorder that says “Rec.” It does exactly what it says, with a cool little animation of a cassette tape rolling as you play and/or record.
Once you’re done recording you can save your song and even export it to share or use it in your own home recording studio project. The program allows you to either e-mail it to yourself (in m4a format) or “file share” it, which creates a wav file of your recording that you can access by connecting your device to iTunes and downloading it from your device (under the “apps” section of the device). You can also simply record the audio file straight into your computer by connecting a 1/8th-inch stereo plug into the iRig’s headphone output and connecting the other end to your sound card or other recording interface. That is what I did with my little riff recording. You can hear what that sounded like below. I did nothing to it at all in terms of editing it. What you hear is exactly what Amplitube in my iPhone produced.
What does It sound Like?
Take a listen! Here’s my riff recorded using only AmpliTube iRig
[jwplayer config=”Custom Audio Player” mediaid=”7023″]
So how would you use the iRig on stage? I mean, sure, it’s all fine and well to be able to strum (or shred) in your headphones. But it is another thing entirely to be able to play a live gig as a guitarist and not need to schlep an amp with you. Can you do that with iRig? Well, if you’re group has a PA you can plug into, yes…yes you can. Like I mentioned above, all you need is a cable with a 18th-in. stereo plug on one end and two 1/4-in. mono plugs on the other end, which you plug into a stereo input (or two mono inputs) on the PA mixer and voila! Amp-less-ness. Well, technically you still have the amp inside your iPhone. What you don’t have is 20 or 30 pounds of boxy bulk to lug around. Sweet!
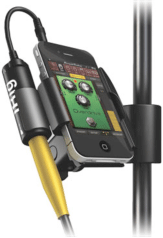 By the way, I highly recommend adding the iKlip MINI (or iKlip for iPads) to your iRig setup. The iRig MINI allows you to connect your device to a mic stand for easy access, plus it comes with an attachment for the AmpliTube iRig. How cool is that? See figure 2.
Under The Hood
AmpliTube Free comes with 1 amp and 3 stomp-box effects – delay, noise filter, and distortion once registered. That is just about all the basic band guitarist needs a lot of the time. The full version comes with 11 built-in stomp-box effects and 5 amps to choose from. You can also start with the Free version and then add the effects pedals and other amps as you need them.
There are tons of other details and specs that you should check out on the IK Multimedia Site here: http://www.ikmultimedia.com/irig/features/
Summary
Well here it is. The AmpliTube iRig is a professional sounding guitar amplifier that will fit inside your iPhone, iPod Touch, or iPad. For $39.99 you can hook up your guitar to your iOS device and practice, record, or play live with basically the same amount of gear (namely an amplifier with 3 stomp-box effects) I used all through my rock band years by starting out with AmpliTube Free guitar amp modeling software. You’ve heard just one of many possible sounds in this article. I didn’t even scratch the surface. If you have an electric guitar or bass AND a compatible iOS device, there just is no reason in the universe I can think of why you shouldn’t get yourself an AmpliTube iRig. It RAWKS, plain and simple.