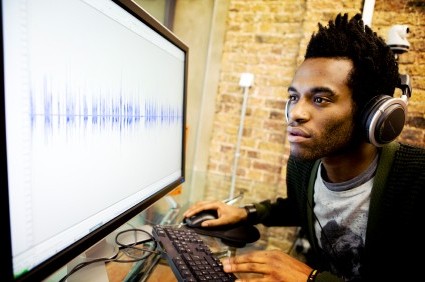
 Setting Up a Home Recording Studio – The Newbies Guide To Audio Recording Awesomeness is our 1st video-tutorial course, and will show you how to start a home studio in less than an hour and have you producing professional sounding audio from it. The cost for the studio? How about $5.00 (for a PC mic if you don’t already have one)? Once you’re ready to crank it up a notch or three, the 2nd in our Audio Recording Awesomeness series awaits – The Newbies Guide To Audio Recording Awesomeness 2: Pro Recording With Reaper. That course moves into the professional realm of audio recording using the incredible software, Reaper, and delving into move advanced topics like MIDI and virtual instruments, loops, and several time-saving voice-over production techniques like quickly slicing one file into many, saving each with it’s own file name, and rapidly creating multi-character dialogue projects.
This is awesome stuff. Enjoy!
Ken
ps-for more on home studio recording, check out this interesting article: http://www.stanford.edu/group/ccr/blog/2010/11/the_future_of_music_production.html
Recording Software
Doing Dubstep On Your iPad
Here is a cool video of how to create a dubstep drum/rhythm track on you iPad using the Korg iMS20 app. The app gives you a classic Korg synthesizer (looks just like the real thing) and sequencer. It is so amazing what you can do in the audio recording arena just using iPad and other iDevice apps these days.
Anyway, I’ll step aside and you can just watch the video:
How To Build A Home Recording Studio: Part 4 – Software
 This is part 4 in our How to Build a Home Recording Studio series that shows you how to set up a computer-based studio capable of recording pro-quality audio. In part 3, we talked about microphones and sound cards and other type of interfaces. Today, let’s talk about audio software.
The Software
I left this part until the end because if you get everything else right, the software is probably the least important part of the equation. There are tons of programs to choose from, so it can be tough to figure out what you should get and how much you should pay. My suggestions will be based on my experience and will enable you to sound professional even with a limited budget.
Audacity
 For most voice-over stuff, you can probably do most (if not all) you need to do with the free program called Audacity, which you can download from the web and start using right now. For a free product, Audacity is pretty amazing, capable of just about any basic audio recording and editing function, including multi-track recording.
But it is a bit hard to use, not very intuitive, and some of the editing tools aren’t great, especially the noise-reduction tool, which as we have mentioned, is important for voice-over recording. By the way, our “recording 101” course called The Newbies Guide to Audio Recording Awesomeness – Part 1” uses Audacity to teach you the basics of recording. Part 2 of the course (due out this summer) will use Reaper.
Reaper
 I always recommend Reaper, by Cockos, which is incredibly powerful. I use it for everything, even my music studio. Make no mistake, this is professional software that rivals programs 10 times more expensive. From basic voice-over recording to full-blown multi-track music recording, including MIDI, virtual instruments, etc., Reaper can do it all. I’ve recorded 5 CDs (for Raven Boy Music) using it, and have several more in-work.
I mention this next bit only because I made such a big deal about noise reduction in this series. Even though it isn’t labeled as such, there is a tool in Reaper that is one of the best noise reduction tools available, called ReaFIR (FIR=finite impulse response). It actually works better for reducing noise than many programs designed for the purpose! And ReaFIR is just one of dozens of effects that come bundled with Reaper. That’s just a bonus tip;). I put up a post with a video on ReaFIR here.
Cockos also has a “Fair Pricing” scheme for Reaper that is unheard of in any kind of business. Unless or until you start making on the order of 20 grand per year with the audio you produce using Reaper, you don’t have to buy the commercial license, which costs $225. You can use the “discounted” license, which is only $60. And the software is the same!
Also, the 30 day trial is a completely un-crippled, full version of the software – the exact same as the commercial license version – and will never stop working. Though after 30 days you’ll start getting pop-ups reminding you that the product is not free. They understand that it sometimes takes more than 30 days to evaluate audio software, especially if you’re just getting into recording. All of this is on the honor system. Who does that? Well, I can’t think of any other business off-hand. I recommend Reaper all the way.
Adobe Audition
I use Adobe Audition along side Reaper to edit individual files and final project renders (aka mix-downs). Audition started out as just an audio editor called Cool Edit back in the 90s. It didn’t do multi-track recording, but rather focused on making changes to a single audio file.
You could analyze, filter, and apply treatments by the dozens – multiple kinds of EQ, compression, reverb, echo, noise reduction, clicks-and-pops reduction (really helps with recordings transferred from old LPs), and tons of other things. These edits were “destructive,” which doesn’t mean “bad.” It simply means that once you apply them, they affect the underlying file.
Cool Edit Pro added the ability to do multi-track recording, was bought by Adobe and had its name changed to Audition. Now you can pretty much do it all with Audition – destructive AND non-destructive editing, MIDI, virtual instruments, the works. It, like Reaper, is decidedly professional software. Though it used to be a stand-alone program (and you can still sometimes get DVDs on Amazon for older versions), it’s now part of the Adobe Creative Cloud.
Some words about the editing thing
I use Adobe Audition strictly as an editor – I usually don’t record audio with it. Though you can do most things, including editing (non-destructive), with Reaper, I prefer to finish every project with a full-fledged editing program like Audition or Sound Forge (Audacity can be used as an external editor with Reaper as well).
These programs have more specialized tools for really getting down into the bits (literally) of an audio file, as well as music mastering and CD authoring, and some things simply cannot be done in Reaper such as redrawing a waveform with a pencil tool to get rid of a glitch in the audio.
But it isn’t only that. There is a different mindset to working on the final audio from a project. It’s like taking off the recording and mixing hat and putting on the final editing and mastering hat. To me it is a workflow thing.
For example, let’s say you had several tracks of audio in a Reaper project. in voice-over work you might have the voice on one track and music and/or sound effects on other tracks. You can’t send it to a client until you render (mix down) the project into one audio file (mp3 , wav etc.).
That final audio file is what I then open in Audition. It’s where I put on the headphones and really listen to the details, doing things like clipping out odd mouth sounds like breathing or what I call “saliva clicking” (don’t dwell too much on that last one:)), editing and eliminating offending p-pops, fading in and out on specific phrases, evening out overall volume with compression, and controlling maximum volume with normalization.
Finally I can save the audio as any number of different formats quickly and easily. It’s polishing and finalizing the audio before it goes to a client or onto a CD or some other sale-able form. Some of these things can be done in Reaper, but I find them faster and easier in Audition. In the end though, whether you use an external editor comes down to need and personal preference.
The software mentioned in this article, though there are dozens of others out there, should be enough to do anything you need to do from recording, mixing, editing and final mastering. Join us for the final installment of this series on building your home recording studio when we’ll talk about the accessories such as mic stands, pop filters, shock mounts, speakers and headphones.
Cheers!
Ken
ReaFIR Madness – The Hidden Noise Reduction Tool in Reaper
Reaper 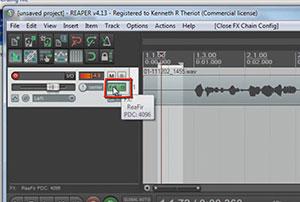 audio recording software is awesome, and is what I recommend to everyone. I use it every day. And I also seem to learn something new about it every day. It has an incredible noise reduction tool built right in that I just discovered recently. The reason I didn’t know about it sooner is primarily due to the fact that reducing recorded noise is not its only or primary function. It just happens to do it REALLY well, and non-destructively (if that’s not a word already, I hereby create it). The tool is called ReaFIR. I know! Who’d have thought to look for noise reduction editing chops under a moniker like that?
Review of What Noise Reduction Does
First though, let’s do a quick review of what noise reduction does for us in the world of recording. There is almost always a bit of background noise in recorded audio. It is especially noticeable in recordings of just one thing, like a single voice. The noise usually comes from a combination of stuff happening in the space/room where the recording takes place, and the electronics of the microphone and other gear involved. Recordings sound much better if you can reduce the noise, and that is what noise reduction tools are designed to do.
But since the noise and the voice are both together in the same recording, it isn’t a perfect process. What noise reduction tools try to do is filter and removing as much noise as it can without also removing too much of the voice. In order to do this, the software has to know what noise looks like so it can separate it from the signal (voice). So you have to highlight a section of the recording where there is ONLY noise, and no voice, and feed that sample to the noise reduction tool. Once it has the noise profile, it can do its thing.
Enter ReaFIR
Reaper names its effect plugins by using “Rea” as a prefix (for Reaper), and then the name of the function after it. So ReaFIR means Reaper FIR. So what does FIR mean? It stands for Finite Impulse Response. If you would really like to geek out on what it really means, including all the scary math involved, you can read about it at the Finite Impulse Response Wikipedia page. But the simpler definition for ReaFIR itself from the Reaper manual is:
ReaFIR is a EQ and dynamics plug-in that includes an FFT spectrum analysis window. Amongst other things it can be used as a precision EQ, a gate, a fast attack/release precision compressor, a noise reduction tool.
Obviously it is that last thing we’re interested in. In the video above, I walk you through how to use ReaFIR to reduce the hiss noise that happened when I recorded a short voice over. BTW, this video is and excerpt from our new (to be released on May 1st, 2012) recording tutorial course, The Newbies Guide To Audio Recording Awesomeness – Part 2.
How Does It Work?
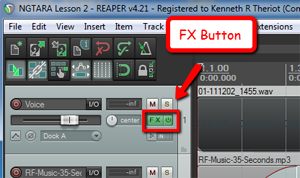 So see it in action in the video above. But here is is a written summary of how it works. Once you have recorded some audio onto a track, click the FX button in the track control panel. Then select VST: ReaFIR from the Cockos collection of FX plug-ins.
Next, go ahead and click the “OK” button and then close the ReaFIR window by clicking on the red X in the upper right corner.
Now just highlight/select a section of the voice-over audio that has no voice actually saying anything. In other words, pick a small area that was only noise. Then click on the Toggle Repeat button (down by the Play and Stop buttons). This is important because it will prevent any of the actual voice signal being played when sampling the noise for ReaFIR. With that area still highlighted, click on the FX button again to open the ReaFIR window.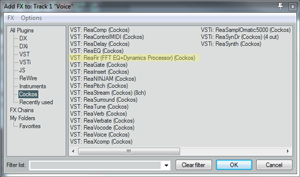
In the Mode window of the ReaFIR tool, select Subtract, and put a tick into the Automatically build noise profile box. Now hit the Space bar on your keyboard (which will play the audio, which is just the noise at this point). You’ll hear it for a second and then it will be gone. That’s ReaFIR getting rid of the noise. Now hit the Space bar again to stop playback.
The next part is very important! Uncheck the box that says Automatically build noise profile. Otherwise ReaFIR will try to grab your voice and anything else on the track, and treat it as noise. Once you’ve done that, go ahead and close the ReaFIR window. Now all you have to do is click on the Toggle Repeat button again to turn it off, and listen to the entire track.
Voila! The noise is gone and only the voice remains. Pretty darned cool huh? And I think the result is better than a lot of tools dedicated to removing noise. I didn’t hear much, if any, of the weirdness that sometimes happens after noise reduction. The audio takes on a kind of swirly, under-water-y artifact sometimes. But I didn’t hear that in this example. However, there noise we got rid of was a low-level and consistent hiss type of noise. The louder the noise and the more varied the noise (if it contains lots of frequencies and intermittent clicks, pops, etc.), the more likely you are to have that swirly artifact left over after noise reduction.
So now you know about the secret noise reduction tool at your disposal if you use Reaper. Use it wisely.
Digital Performer 8 Will Work on Windows
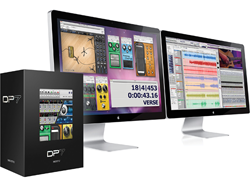 Mark of the Unicorn (MOTU) Digital Performer, one of the top audio recording workstation software programs in the industry, has traditionally only been available for the Mac. But the next incarnation, Digital Performer 8, will be available for Windows also, both 32 and 64-bit versions. This is fabulous news for PC owners who have wanted to get in on the MOTU magic.
DP 8 was announced at the NAMM trade show (the National Association of Music Merchants) in Januar, 2012. The release date was said to be “Spring.” Well the blue bonnets are in full bloom here in Texas and as of today (March 21st), it is not available to the general public yet. Sigh. Well, it’s available now! Click Here to find out more or buy your own copy!
Features
There are tons of new features in DP8, including a new thing called Punch Guard, which records 4 seconds of audio both before and after you hit the record button. This is designed to make you punch-ins fit in without cutting off any of the audio either of the already-recorded stuff, or of the thing you’re punching in.
In addition, there are 15 new plug-ins including guitar amp models, pedals, multi-band EQ, a kick-drum enhancer, and lots more. And of course, it still has the awesome editing, notation, and music-for-film tools that have set DP apart from other DAWs.
Keep your channel tuned to this space for updates on when Digital Performer 8 will be available. DP8 is here now, and for $499 it can be yours. Click Here to get it. If you already have an earlier version, look for special upgrade pricing.
Yay for multi-platform audio recording software!
Ken