You’ve heard me promise that Home Brew Audio could teach you to record audio from home from home in less that an hour….even if you have NEVER done recording before. Well it’s true….no really! All you need is a computer with an internet connection (a pretty good bet if you’re reading this;)), a sound card, and any microphone (you probably got one with your computer), and you have all you need to record audio from home. If you DON’T have a mic at all, you might have to add the time it takes you to run to the nearest Target, WalMart, Radio Shack, etc. to pick one up for $4.00. Then go to our video tutorials page, where you will find video tutorials that will walk you through it.
In a nutshell, those first 3 video lessons show you how to download the “free” recording program from the internet, called Audacity, record a voice-over, then mix a piece of “royalty-free” music (also free on our site) with the voice to create a sample podcast intro. You’ll be shocked by what you can produce RIGHT NOW, with tools you probably already have!
If there is one thing we have learned on our 30-year journey to learn audio recording, it is this: knowledge is more important than gear! We squeezed some great sounding recordings out of the cheapest gear because we had no other choice! Can you get better sound with better gear? Sometimes. But I have seen (over and over and over and over…..get the idea?:)) people who managed to procure $10,000 worth of recording equipment turn out recordings that sounded like &*%$##!@! That’s because they didn’t understand the BASICS of recording audio.
So if you want to get started learning those basics, check out our video tutorials at https://www.homebrewaudio.com/products-page
See you there!
Ken
Recording Software
All About Reverb And EQ
In reverberation, spectral content is very crucial. Processing at the frequency level can happen at three distinct points in the audio path: before, during or after reverberation. But now, the topic i’m going to share about focuses on the preverb EQ. Check it out here.
Guide to Improving Your Home Studio Acoustics
Anyone can have their own home studio, buying some cheap monitors and speakers, but what makes it different is when you’ve got the ability to make the right tweaks. Are you interested to know how? Here are some tips from Resonics on how to improve your home studio acoustics.
Best Gadgets for Music Production Without A Computer

There are lots of gadgets that can be used out there for production, especially sound production. We usually rely on computers, but hey there are some gadgets that we can use even without computers! Check them out in this article by Music Tech.
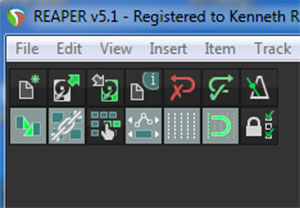
The Buttons In Reaper's Tool Bar – What Do They Do?
 We have put out several Reaper tutorial videos over the past few years. But apparently (no “apparently” about it:-P) none of them have ever explained ALL the tools in default Reaper tool bar. Somebody commented on a video in the Home Brew Audio YouTube Channel yesterday asking for a video explaining what all those buttons are in Reaper’s tool bar, and what they do. So I thought that would be a good idea for post and a video.
Reaper is an incredibly powerful audio recording software program – technically, a digital audio workstation or DAW, for short). And even though it is undeniably “professional” software, nothing beats their pricing plan. See the Reaper site for details. We use it to teach folks how to create professional recordings in our course the Newbies Guide To Audio Recording Awesomeness 2: Pro Recording With Reaper.

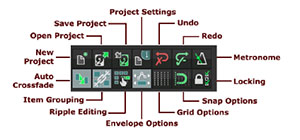
Okay, so about those buttons in the toolbar. Here is a summary of those buttons and their functions. But the video will demonstrate those functions in a “picture(or video, in this case)-paints-a-thousand-words” kind of way. For all the nitty-gritty, you can dig into the Reaper User Guide.
Button Names
New Project – What it sounds like.
Open Project – Again, pretty much what it sounds like.
Save Project – Yeah, again…..
Project Settings – This is where you set or change a bunch of settings for your project such as Beats Per Minute, Time Signature (those clearly for music recording), sample rate, what audio format to save new recordings in, where to save project and its media, and dozens more.
Undo – Self-explanatory
Redo – If you have an Undo, you gotta have a Redo, right?
Metronome – Let’s you listen to a click track, which plays according to your Project Settings. You can customize it in a lot of different ways, such as to change its volume, the relative vlume of the downbeat versus other beats, what sound to use, etc.
Auto Crossfade – If/when two or more media items (I am using the term “media” because these actions apply to both audio and MIDI items) overlap on a a track, their edges will automatically crossfade. This just means that the first audio will fade out as the second audio fades in so that it sounds like a smooth transition.
Item Grouping – This give you options for putting multiple media items (even across multiple tracks) into a single group. This way you can apply edits to the entire group in one action.
Ripple Editing – This is a fairly common video and audio track-based function. When enabled, moving one media item left or right ALSO moves every item downstream (occurring later) in the same way. Be careful with this one. Make sure you know when it is on or off, or you could accidentally move audio and MIDI items around unintentionally.
Envelope Options – Envelopes are points and lines that you can make appear under a track to automate things like panning, volume, effect parameters, etc. This action allows you to connect the envelope edits to the media item so that if you move that item, the envelope edit points move with it. The default is “off.” So if you use envelopes, you should know about this or you could lose you edits.
Grid Options – Reaper displays a vertical grid according to the Project settings, depicting either beats and bars or time intervals like minutes and seconds. This button can turn the grid off or on. The default is on.
Snap Options – If you’ve ever used a graphics program, you might be familiar with the Snap (or Snap to) function. It locks your cursor and/or the edges of media items to the grid and/or to each other. This can be super helpful when recording music. I use it all the time, turning it off and on a lot. You need to have it turned off to do fine tuning, trimming, media time-shifting, etc.
Locking – This allows you to lock any of several different aspects of your projects so that you won’t accidentally shift it. The video shows an example of locking and unlocking a time selection.
Here is the video.
http://homebrewaudio.wistia.com/medias/7u6ey67uh9?embedType=async&videoWidth=700
