There is a new software from iZotope called Dialogue Match. It is a tool designed to automatically learn and match the sonic character of a source dialogue recording – such as the reverb/atmospheric sound, EQ, etc. Then it applies those characteristics to a new vocal recording so that they sound like they were recorded in the same session. This is an incredible time-saver for long recording projects that take place in different locations, perhaps with different mics, different angles and distance from the mic, etc. It’s also obviously a great tool for ADR – the practice of replacing or adding dialogue for film after the fact in the studio.
iZotope merged it with their machine learning with reverb technology from the Exponential Audio product line.
This software would significantly reduce the time in the post-work process. Moreover, to learn and match the tonal and spectral characteristics of dialogue, they added an EQ Module leverages which is the EQ matching mechanics of iZotope’s Ozone 9. It is available in different bundles but as a stand-alone AudioSuite plugin, it retails for $599 (U.S. MSRP).
Read more about this here: https://www.prosoundweb.com/izotope-launches-new-dialogue-match-tool-for-audio-post-production/
Recording Software
Accusonus Voice Leveler Only $9 During Halloween Sale
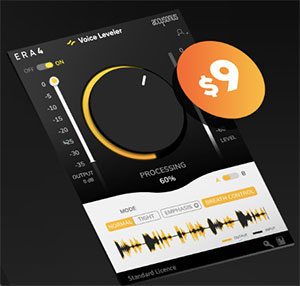 Accusonus has put their Voice Leveler plugin product on sale for only $9 as part of their Halloween sale. That’s crazy, considering Voice Leveler normally sells for $59!
The sale runs from today (Oct 25th, 2019) until Nov 8th.
So what is Voice Leveler?
Well, like ALL the plugins in the Accusonus ERA Bundle, is a single-knob plugin that makes it insanely easy to apply. Voice leveler, as the name implies, allows you to easily and quickly even out inconsistent volume in a vocal recording.
Why would I need it?
So let’s say that while you are recording a vocal, you make some mistakes and have to record it with several takes. It is super common for the different sections to have different loudness levels. That’s because you might not have been exactly the same distance from the mic every time you recorded a section.
This problem gets even worse when recording over several days. I JUST finished a long video project where I was narrating a tutorial. When I exported the audio for editing, the levels were VASTLY different from one day’s recording to the next. This same thing is really common with audio books, podcast recordings, or any vocal recording where it isn’t all done in one single “take” or session.
Normally you’d have to manually select each section and try to adjust the volume to match that of the previous audio. This can take hours.
With Voice Leveler, select all the audio and with one click of the button, you can even out all your audio at once. And the single knob makes it unbelievably easy to dial in just the right amount of the effect.
CLICK HERE to find out more and snag your Voice Leveler plugin for $9 before the sale is over. You can watch a video about it and hear Voice Leveler in action.
Voice Leveler is part of the Accusonus ERA Bundle, which I reviewed just a few weeks ago.
Accusonus Releases Rhythmiq – Revolutionary AI-Based Beat Assistant Tool
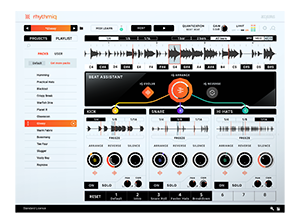 Accusonus has released released Rhythmiq, a ground-breaking tool that uses A.I. to help you turn your tracks into a performance.
Massachusetts, U.S.A. (8 October, 2019) – Accusonus announce the release of Rhythmiq, a revolutionary beat-assistant for electronic musicians, producers, live performers and DJs. It uses A.I. to help you turn your tracks into a performance in a way that was previously thought impossible. Rhythmiq is fundamentally different from anything else you’ve seen. It allows you to re-shape your loops in real time and safely improvise with them while performing live. It’s your new ‘bandmate’ who learns from you! Ιt will boost your inspiration and it will help you create unique live-evolving compositions.
Rhythmiq is the result of over 2 years of development and several tech breakthroughs. It was created to solve the eternal problem of lack of flexibility and freedom, when jamming in the studio or performing electronic music in front of an audience. As a producer, you don’t want to fixate over which button to press and which knob to turn – you want to take spontaneous decisions and stay in the flow.
Rhythmiq analyzes and understands your beats and instantly allows you to create new arrangements. You get unlimited, musically structured and fun rhythms, by turning a simple knob. Generate and save pattern variations, for instantly playable breaks, fills and build-ups. Enable the A.I. Beat Assistant and let it perform your loops in real-time. The Beat Assistant injects your beats with everything from nuanced micro-variations to musical, evolving changes. Although Rhythmiq uses ground-breaking A.I. technology, it is still controlled by you. Launch it while you are playing live or jamming in the studio, tell it how much variability you want and you will experience a new way to jam with your beats and find inspiration.
With Rhythmiq, you’ll be able to;
-
Use A.I. to jam with your beats and finish your tracks
-
Generate infinite breaks, fills and build-ups from the same beat or layered stems.
-
Perform your beats live, no finger drumming required
-
Enable your A.I. Beat Assistant and let it create endless variations of loops in real-time.
-
Create musical rhythmiq variations just by turning a simple knob.
-
Use simple knobs to control rhythmiq’s decision making in real-time
-
Turn off your screen and experience the future of real-time beat manipulation
*Accusonus will be exhibiting at AES/NAB 2019 (10/16-18, Javits Center), booth 304b. Please reply to this email to arrange a product demonstration at the show floor*
Compatibility
Ableton Live 10
Apple Logic Pro X
Currently Tested in:
ImageLine FL Studio 20
Presonus Studio One
Cockos Reaper
Pricing and Availability
|
Intro Price (until 31st Oct 2019) |
Regular Price |
|
$99 |
$149 |
For more information or to purchase Rhythmiq, please visit https://accusonus.com/products/rhythmiq
Free, fully functional 14-day trial of Rhythmiq also available by visiting
https://accusonus.com/lp/rhythmiq-download
Rhythmiq Product Videos
[1] : “This is Rhythmiq” – Intro video
[2] : “Why we created Rhythmiq” – the vision
Rhythmiq Tutorials
[1] : Youtube playlist – 6 tutorials
About Accusonus
We are a team of engineers, musicians and audio experts who believe that sound design and audio repair should be fast, simple and accessible to everyone. We believe that computers are ideal tools for creating, inspiring the content creators of the future. That’s why we developed our own patented Machine Learning and Artificial Intelligence technology in order to enable previously unimaginable sound processing workflows. Accusonus is based in Massachusetts (USA) and in Athens/Patras Greece. For more information, please visit www.accusonus.com.
Accusonus Summer Sale 2019 – up to 65% off
(Starts 6th August 2019 – Ends 26th August 2019)
August 2019 – Accusonus Inc., developers of critically-acclaimed human-friendly audio technology, are running a unique Summer Sale starting on the 6th of August 2019. Until the 26th of August, Accusonus’ beat making & drum mixing bundles and individual plug-ins will be available at a discounted price of up to 65% off. To learn more, please visit the Accusonus site.
Product Videos:
[1] Regroover Pro
[2] Beatformer
[3] drumatom²
Price and Availability
| MSRP | Summer Sale | |
| Regroover Pro | $219 | $149 |
| Beatformer | $99 | $79 |
| drumatom² | $299 | $149 |
| Beat Making Bundle (Regroover Pro, Beatformer, All Regroover Packs) | $563 | $199 |
| Drum Mixing Bundle (drumatom² + Beatformer) | $398 | $199 |
About Accusonus
Accusonus builds human-friendly audio software and our mission is to democratize content creation. Our sophisticated technology makes a difference because it’s integrated into elegant products with intuitive UIs. We’re one of the first companies that ever released commercial Machine Learning audio processing products. Our technology is licensed to some of the world’s biggest consumer media companies and they support the creativity of literally millions of content creators every day. Accusonus is based in Massachusetts (USA) and in Athens & Patras, Greece.
How to Get Rid Of Background Noise In Audacity
Want to know how to get rid of background noise in your audio recordings? Here is an easy and free way to do it using Audacity audio software.
Unless you are lucky enough to be able to record audio in a very quiet space, you will probably have some background noise in your audio recordings. The most common types of noise are computer fans, A/C or heater blowers, or hiss coming from the microphone itself.
If you are recording your voice all by itself, for a voiceover job, podcast, or video narration, any background noise will be distracting and make your recording sound less than professional.
The good news is that there is a quick and easy way to remove this background noise using Noise Reduction tools in just about any audio recording software program. Yes, you can get rid of noise AFTER you’ve already recorded it! That process is universally called “noise reduction.”
I’ll show you how to get rid of background noise using Audacity, which is free. But the process works pretty much the same way in any program.
For some information on the most current and much better noise reduction tool in Audacity, check out our post – New Noise Reduction Tool In Audacity.
Record Some Silence At The Beginning
In order for Audacity to remove noise from your voice recording, it needs to know what “noise” sounds like. So the very first thing you need to do is find a section of your recording where there is no voice, or breath, or anything EXCEPT noise. I recommend recording 3-5 seconds of silence at the beginning of your recording session so that you can record only noise.
During this few seconds before you start speaking, make sure you don’t take any audible breaths or make any other noises like lip-smacking or sniffing or bumping against the microphone, etc. It is crucial that you record a sample of the steady sound of the noise in your room and/or mic.
Choose a Sample of ONLY Noise
After you have finished recording, highlight (click and drag) at least half a second of JUST background noise. IMPORTANT: Make ABSOLUTELY sure you do not highlight any breaths or bumps or any sounds other than the steady noise in the room or mic. And the most important thing of all is to never, EVER (getting the idea? :-)) highlight any part of your voice during this step. This is where you are telling Audacity what you want removed. So if there are any breaths or voice traces in this selection, Audacity will try to remove those. And that would sound terrible.
Believe it or not, this is really common. It’s probably the most common mistake people make when trying to figure out how to get rid of background noise.
Feed Audacity The “Noise Profile”
Once you have at least half a second of ONLY background noise highlighted, it’s time to feed that to Audacity.
Click “Effect” in the Audacity Menu. In the drop-down, choose “Noise Reduction.” In the window that pops up, click on the button that says “Get Noise Profile.” See the picture below.
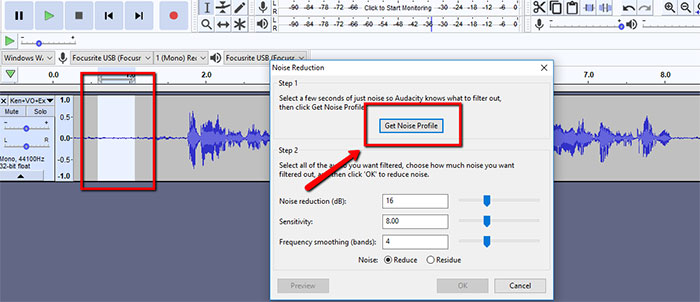
Once you click “Get Noise Profile” the Noise Reduction window will close. That means Audacity now knows what to remove from ALL your audio. You have defined “noise” for Audacity – at least for this recording.
Now Select Your Entire Recording
It’s time to apply noise reduction. But first you need to select all your audio. So click on “Select” in the Audacity menu, and then choose “All” from the menu. The standard “ctrl-A” (or cmd-A on a Mac) also works. You can also just double-click anywhere on your audio file.
However you do it, make sure all your audio is now selected.
Open Noise Reduction Effect Again
Now once again open Noise Reduction (Effect/Noise Reduction). But this time DO NOT CLICK “Get Noise Profile” again. This is very important. Simply click the OK button.
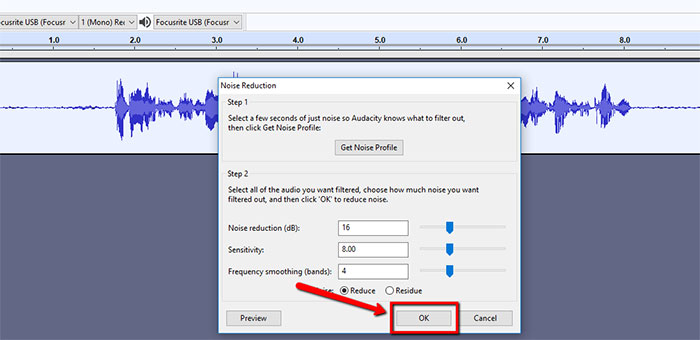
The Noise Should Now Be Gone!
Now Here Is a Video of the Process
Here is a video showing the whole process, which took a LOT longer to describe than it takes to actually do. Be sure to WEAR HEADPHONES when listening to this video so you can hear the background noise in the first part of the video (before it gets removed)!
Avoiding The “Swirlies”
For the best possible results, the noise should not be too loud to begin with. If there is too much noise, it will be very difficult for Audacity (or any software) to separate noise from the GOOD audio – your voice, or whatever you recorded. The usual result of trying to remove too much noise is that the audio left behind sounds weird. It often sounds like the audio is under water. So people often call this weird sound “the swirlies,” because it sounds a bit like swirling water. So try to minimize the noise before you record as much as possible.
Another potential cause of weird sounding after-effects of noise reduction is if you accidentally picked up some of your own voice in the noise profile sample at the beginning of this process. That is why I put so many warnings of why it was so important to make sure you highlight ONLY the steady background noise. No breaths, no vocal sounds, etc.
If the background noise is consistent and steady and not too loud compared to the voice, noise reduction should work perfectly.
