So it turns out not everyone can afford expensive software for recording. Maybe they had one decent microphone, maybe a USB mic to plug into their totally regular computer, but no more money left over to go to a recording studio or to purchase expensive software (not to mention expensive hardware) to record and then create something really awesome. Is it possible to still come up with something professional sounding using only free recording software and plug-ins?
If you are asking me, the answer is “yes.” But there are some qualifiers. As with many things, it is going to take you longer to get good results than it would if you were able to afford the paid versions of software and plugins. It’s the whole trading time for money thing and vice versa. Also, if you have some basic knowledge of audio recording, you will be more likely to achieve good results. Luckily that knowledge not terribly difficult (at least it doesn’t HAVE to be) and is something you can get from tutorials like our Newbies Guide to Audio Recording Awesomeness , but I digress.
Here is an article that shares my view that it is possible to get a great sounding mix with cheap/free software.
http://www.audiorecording.me/can-you-achieve-quality-audio-mix-using-only-free-plugins.html
Home Recording Equipment
M-Audio Fast Track C600 Desktop Audio Interface
 Here is the new M-Audio Fast Track C600 USB audio interface. Say hello to a new trend, the desktop audio interface. This is as opposed to the usual audio interface, which is designed to fit in a rack space. That makes them have to have all the controls and plugs, etc. on the front face with nothing on the top. The desktop interface like the M-Audio C600 utilizes the top as well as the sides, making it perfect for sitting on a desk or table top and very easily using the controls.
So what else is cool about the Fast Track C600? It has 4 microphone inputs, which is what I was most interested in. But there are some truly awesome features that I did not expect from an interface.
Several Speaker Outputs
There are 6 outputs set up as pairs A (output 1/2), B (outputs 3/4) and C (outputs 5/6). Each pair has an on/off button on the top of the unit so you can set up different speakers and easily switch between them to hear mixes on different speakers, which can help with monitoring.
MIDI Transport Controls
This is fantastic. There are physical controls for Play, Record, Stop, Fast-Forward and Rewind on the top of the unit. You can assign these controls, via MIDI, to your audio recording software program. The thing most people feel like they miss when doing computer audio recording is the physical controls. You either have to use a mouse to do everything, or you figure out keyboard shortcuts. Audio interfaces traditionally do not have these, probably because they have been traditionally designed to be in a rack and not on a desktop. But it makes total sense to have controls like this on an audio interface.
And The Rest
OK so what else is on this thing? Here’s the rest of the story. It has 6 inputs and 8 outputs, four mic preamps, digital I/O (input/output) (S/PDIF), MIDI I/O, and 24-bit/96KHz recording. It is also USB Bus powered, so you don’t have to deal with a wall-wart type power cable.
And you get all this for $399.99 at B&H PHto/Video/Pro Audio. Go check it out at that link back there to see more details, pictures and to purchase.
Cheers!
What is Ripple Editing?

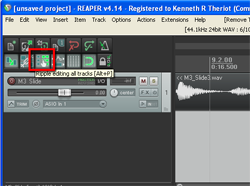
Ripple editing can be a very useful tool in both audio and video editing. But it’s one of those things you don’t want in the “on” position all the time. If you think it’s on and merrily go about editing audio items on your track, you’ll have caused quite a train wreck with your audio clips. Likewise, if you think ripple editing is turned off, and you start deleting or moving items on your track – train wreck.
Definition of a couple of terms
First, let me clarify a thing or two about two terms I’ll be using.
Track: A track is simply a container in audio and video software. It is usually displayed as a sort of swim-lane in horizontal stripes across the screen. You put media “items” into these tracks, where you can move them around (left for earlier in time and right for later in time).
Item: Any audio, video or MIDI file that you place on a track. The big source of potential confusion on this is that while the underlying media is a file (.wav, .mp3, .mid, etc.), once it’s placed into a track, the edits you make do not affect the underlying file. If you insert a wav audio file onto a track, it becomes an item on the track, which is sort of like a copy of file. If you slice that item into 5 pieces, the underlying file is still in one piece, for example. This is typically called non-destructive editing.
So what is ripple editing?

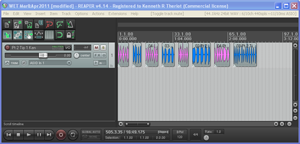
Where ripple editing comes into play is when you have multiple items on a track. See the picture on the left, where I have one track with 8 items in it. Now let’s say I want to slide one of the items (say, the 3rd item from left) to the right just a smidge. This could be because there wasn’t enough blank space (silence) between the blue item before it, and maybe you want it closer to the 4th item, the blue one after it. With ripple editing turned off, you simply left-mouse-click on the item, and drag it to the right. Only THAT item will move and none of the others will.
However, if you did this same thing with ripple editing turned on, not only would the 3rd item from the left move to the right, but every item to the right of it would move by the same amount. The first two items in the track would stay where they were.
Why would you use ripple editing?
Very often, when you have multiple items in a track, you want to maintain the spacing between each item. This would be really hard to do if you had to delete one of the items in the middle of the track without ripple editing. It would leave a huge gap where the deleted item used to be. You’d have to individually drag each of the items, that are on the right of the gap back to the left, one at a time, in order get everything correct again, which would not only be tedious, but the spacing between those items would have to be re-done. But if you have ripple editing turned on when you delete a middle item, all the items to the right immediately shift to the left, not only covering up the gap, but also maintaining the timing relationship between themselves.
Note that this is NOT the same thing as “grouping” all the items on a track, which is another option altogether. When ripple editing, everything you do (if it affects timing – like deleting, moving, lengthening or shortening) to an item affects that item and any item to the right of it, but not the items on the left, the ones that occur earlier in time to the item you are editing. If you group all the items, then every item is affected regardless of whether they are to the left or to the right of the item being edited.
Another useful use of ripple editing is when recording music. Frequently everything is aligned to a tempo grid in the audio software. If you realize that you put too many measures in your introduction (I’ve done this many times) you can easily delete a measure. But without ripple editing, you’ll just end up with a one-bar-long gap of silence in your song after you delete it. With ripple editing turned on, every measure to the right of the deletion will shift to the left, the beginning of the subsequent measure moving nicely into place (assuming you deleted exactly one measure).
This is all very like using a word processor. You type text onto the screen from left to right (in English). If you see a word you want to delete, you can highlight it and hit the “delete” key. What happens? All the text to the right of it shifts back to the left. What it you need to insert some text in the middle of a sentence? You just place your cursor and start typing. What happens to the text to the right? It moves to the right with every keystroke. THAT is just like ripple editing, which is turned on by default in most word/text processors. If you’ve ever turned it off by accident you’ll see how messed up things can get. If you try to insert a word into a sentence, you’ll start deleting everything to the right of it.
Hopefully that makes ripple editing more clear. If you’d like me to put up a video to help clarify it, let me know in the comments below!
Cheers!
Ken
Cool Audio Stuff – Online White Noise Generator
 Have you ever been trying to concentrate at your computer when something you hear around you keeps pulling your attention away or distracting you? This happened all the time when I worked in an office made up of cubicles and about 2 dozen other people. Sometimes it happens at home if I can hear the TV or the stereo. I’m easily distracted. But I recently found a very cool thing online that helps drown out all that distracting noise, and it is so simple and fast. Oh, and its totally free. It’s a site called “Simply Noise.” (http://simplynoise.com/) You simply (see what I did there:)) slide the volume control up or down to your correct level and leave that page running in the background while you work. It’s awesome. You actually can choose between white, pink, or brown noise, indicated by, what else, white, pink or brown buttons. Go check it out and discover another use of audio in your life.
Cheers!
Mastering a Song – What Does It Mean?
 I just read this question: What does mastering a song mean? That’s a great question, actually. Here’s the answer: nobody knows. Nobody, that is, but a small and exclusive cabal whose members are sworn to keep the sacred arts a secret until their dying days. Well that’s what it feels like to me sometimes. Interviews with members of the cabal, I mean professional audio mastering community, always seem to hint (or sometimes outright state) that mere mortals could never understand the complexities and subtleties involved in actual mastering. I say “actual” because it is also hinted that what we mortals call mastering is laughably over-simplified, likened to cave people banging flint together to make fire.
You know, now that I read the above paragraph out loud, I think it’s possible I underwent some sort of psychological trauma at the hands of a few non-representative individuals calling themselves mastering engineers several years ago. I’m led to understand that things are better now, and that they may never have been that bad even back then. OK, now that the air is cleared let’s talk about mastering a song.
A bit of history
In the old days before mp3 or CDs or even cassettes and 8-tracks, consumers pretty much had to rely on records to hear recorded music. Musicians would go to recording studios to record onto wide strips of magnetic tape that simply could not be played back on any consumer device (unless that consumer was someone like Les Paul…but that’s another story). So if the recording were ever to be heard by members of the public, the studio people had to have a way to make the audio go from those wide strips of tape onto a flat plastic (or rubber or shellac, depending on when we’re talking – see the wikipedia entry here) that normal people could play on their record players.
Actually, before there was magnetic tape, the recording engineers captured wound through recording “horns” which were hooked directly to a cutting stylus that would etch the disc directly. But when magnetic tape allowed the creation of a master disc (from which mass produced records were made) to occur at a time and place completely separated from the time and place of the recording, specialization began to occur. The recording studios focused on capturing the sound and separate facilities dedicated themselves to moving the audio on the non-consumer-playable tapes onto master discs, which were then used to create lots and lots of plastic discs people could play at home, and eventually in their cars, etc.
Much specialized equipment was used to optimize the audio from tapes for use on the master discs, which needed to be as fault-free as possible, since millions of records were going to made from this disc. Mastering engineers became experts at optimizing already-recorded audio such that it would sound its best when it reached consumer ears. That is why we still have mastering engineers today, and why mastering is still considered a separate process from recording and mixing.
Mastering engineers became experts at optimizing already-recorded audio such that it would sound its best when it reached consumer ears.
What kind of optimizing are we talking about here?
While recording and mixing is primarily concerned with capturing good tones and blending them properly, these processes are not always carried out in the most pristine of listening environments. And the ears of a mixing engineer are trained to make sure that the different sounds work and play well together. So these folks use effects like EQ, reverb, and compression, etc. to accomplish this. These engineers then send a mixed-down (see our article: What Does It Mean to Mix Down Audio?) version of the audio to a mastering house.
The mastering house has rooms that are designed to allow for totally unbiased listening, meaning that what the mastering engineer hears is as close as humanly possible to what is actually coming out of the speakers. Most regular listening spaces (especially the converted bedrooms of the intrepid home recordist) impart any number of changes to the sound so that what leaves the speakers (assuming they, themselves are reproducing what they get electronically) is not what reaches our ears.
So in addition to the finely tuned listening spaces, mastering facilities contain the best loud speakers and the best in equalization, compression and limiting tools. Armed with these tools in these rooms, engineers whose ears are as sensitive as the noses of wine connoisseur or perfume testers perform audio surgery to produce music that sounds good on as many devices in as many places as possible. They can make certain sounds or instruments be more easily heard, or do the opposite and make overbearing or undesirable frequencies less prominent. Remember, they aren’t working with a multi-track session, so they can’t just, say, turn the volume down on a bass guitar. The bass is already blended in with the kick drum, piano, voices, etc. They have to turn up or down these specific frequencies on the final mix using targeted EQ and multiple-band compression and other mastering tools.
At the end of the day
Sometimes, when the mix engineer is good, the mastering is minor surgery. But all to often they are sent audio that requires many hours of major surgery, or even miracles sometimes, to optimize audio for consumers. Such is the life of a mastering engineer.
In the end, a fully mastered version of the audio is, as it was in the old days, ready to be mass-produced and distributed.