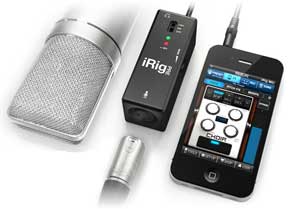
Meet the new iRig PRE from IK Multimedia, a microphone preamplifier (preamp) that works with the iPhone, iPad and iPod Touch. This thing is, as usual from IK Multimedia, awesome. It allows you to plug any microphone (I’ll say that again in case it didn’t sink in…”any microphone”) into your iOS device.
So how is this different from the iRig Mic (see our review of that product here: Review of iRig Mic)? the big difference is, in case you missed it above, that whereas the iRig Mic is a special microphone you get from IK Multimedia that can plug into your iOS device, the iRig PRE is a piece of hardware that allows you to plug any microphone into your iOS device. See the picture to the left. The iRig PRE is the thing in the middle, the little box that has an XLR (standard 3-pin mic connector) female receptacle on one side, and the cord that fits into your iOS device on the other. There is also (and this is ever so cool) a gain control knob/wheel on the iRig PRE.
It uses a 9-volt battery, which also serves as phantom power to condenser mics. The battery life is 40 hours with dynamic mics and 15 hours with condensers.
You can use it with the two free apps iRig Recorder and VocaLive by IK Multimedia. But you should also be able to use it with any app that accepts audio input.
Perhaps the best thing about the iRig Pre is its cost, which is only $39.99. To find out more, or to order your own, Click Here.
Home Recording Equipment
Tips for Vocal EQ
Here is a good article on vocal EQ tips. Whether you’re a voice-over person or you also record music, chances are good you’ll want to know a little something about vocal EQ (remember that EQ is short for equalization, which is one of the audio recording terms that don’t really describe what it means to the layman…sigh). If you want to brush up on what it is all about, check out our article here: What is Equalization, Usually Called EQ?
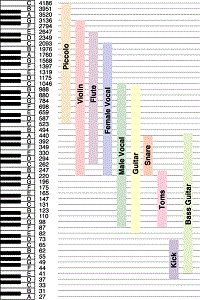 Anyway, the human voice tends to live in a very predictable place on the EQ spectrum. See the picture to the left, which should help describe this. Male and female voices overlap between 300 and 900 “hertz” (cycles-per-second or “HZ”).
In an ideal world, or more specifically, and ideal recording situation, you would not need to EQ the human voice at all. When doing voice-over work, I rarely use EQ (except to fix p-pops – see our article: www.homebrewaudio.com/how-to-fix-a-p-pop-in-your-audio-with-sound-editing-software). But we don’t live in a perfect world and few of us have that ideal recording set-up (great recording space, top-drawer gear, etc. so there are times when applying EQ to a vocal track is desirable or necessary.
Dev’s article explains those situations and gives you some ideas on how to deal with them using EQ.
Read his article here: http://www.hometracked.com/2008/02/07/vocal-eq-tips/
What Voice-Over Equipment Do I Need?
 There are lots of folks who set up their home recording studios simply to do voice-overs. One of the first questions they ask is “what voice-over equipment do I need?” This post and the article at the end will answer that question thoroughly.
One of the best uses of a home recording studio is to produce voice-overs. That’s because, as opposed to a full-blown music production studio, you won’t need as much gear (so you won’t need to spend as much) or as much space in order to produce high-end professional results.
In the article below, you’ll learn about the equipment you are going to need for a top-notch pro voice-over studio, including an explanation of the different kinds of microphones, how to connect them to your computer, how you can use voice-overs (podcasts, video narration, etc.), and tips on everything you’ll need from hardware (mics, interfaces, software, out-board gear, etc.). If you still have any questions after reading this article, please post them in a comment at the end of this post and I will address them immediately.
So if you’re ready to take it all in, read the full article here.
IK Multimedia Just Released the iRig MIX Mobile DJ Mixer
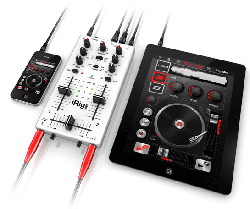 IK Multimedia, maker of many excellent audio products but most recently some fabulous iOS apps, have just announced that they have released not one but several new mobile music apps for iPhone, iPad, and iPod touch (I’ll just abbreviate that lat bit by saying “iOS” from here on out). One of these latest releases is called the iRig MIX. It is essentially a professional DJ mixer that you can stick in your pocket (if you have to). AS with many of the IK iOS products, this one combines a piece of hardware with an app that you can download – usually for free – sometimes with an option to upgrade to a paid version.
In this case the hardware part is a very small but powerful 2-channel mixer with crossfade, cue, EQ, panning and volume controls. You can use it with iOS apps for DJ mixing or with several other apps. It can also be used to mix ANY type of audio source, meaning mp3 players, CD player outputs, etc. with an iOS device and use the beat-syncing and tempo-matching capabilities.
It comes with 4 free apps that you can get from the iTunes app store: the DJ Rig mixing app, Amplitube (which I reviewed here: iRig Amplitube Review), VocalLive singer processing app, and GrooveMaker loop/groove/beat making app. So this thing is not just for DJs!
Get more information here: www.irigmix.com
Cheers!
Crossfade Meaning – What Does It Mean To Crossfade Audio?
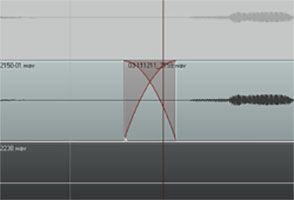 So what exactly does it mean to “crossfade audio”? Well before we talk about crossfading, we should probably first talk about just plain old regular fading. What is a fade?
Happily, this is one of those few audio terms that actually sounds like what it means. Whether you know the term or not, I’m fairly confident that you’ve at least experienced/heard fading going on before.
Pop songs used to end with a fadeout a lot back in the day. You see it on sheet music all the time. At the end it often says “repeat and fade.” It just means that instead of an abrupt or definite ending, the song would continue. The volume would just get lower and lower until it was inaudible, at which point it would end. It fades out.
Fades
Often on TV or movie soundtracks you hear the audio fade in (as opposed to the above example of fading out). The music (usually) or other audio will start out inaudible and rise in volume gradually until you can hear it at full volume.
This is the same idea for audio items in our recording projects. We use it as describe above sometimes, especially when producing voice overs or narrations that have background music.
The music frequently fades in before the narrator starts talking. If the music is not going to continue behind the voice for the duration of the program, as in a podcast or radio show intro perhaps, the music usually fades out just after the narrator starts speaking.
But the most common use of fading when doing multitrack recording projects is simply to allow audio items to start and finish more smoothly. If the edges of an audio item do not fade in or out at least a little bit, you get clicks and pops due to the sudden stops and starts of the item.
Crossfades

Now we know what fading is. So let’s talk the crossfading. It is when one bit of audio fades out at the exact time as another bit of audio is fading in (see the picture at the beginning of the article).
Let’s say you are recording a vocal track, and you mess up. What most of us do is wait a second while the program continues recording, and read/sing the part you messed up a second time, and then proceed with the recording.
Things often run more smoothly this way, as opposed to stopping and starting over all the time. However, doing it like this requires that when you have finished recording, you go back and cut out that messed up part. Crossfades to the rescue!
A common way to deal with mistakes is to simply highlight the screw-up, and cut it out. This leaves a blank space there (unless you have ripple editing turned on – see our post on THAT here: https://www.homebrewaudio.com/what-is-ripple-editing), creating 2 audio items, the part before the cut and the part after it. Now you’ll want to join these two items so you drag the later audio to the left to connect it up like a train section to the end of the earlier audio item (see figure 1).
Crossfades Are About Seamlessness
In order for the audio to sound seamless to the listener, you’ll usually want to slightly overlap the end of the earlier audio and the beginning of the later audio item. But that will still frequently give you an abrupt and unnatural sounding transition. So you want the end part of item 1 to be fading out exactly at the same time as the beginning part of audio 2 is fading in.

So most programs, including Reaper (shown in the pictures in this article), default to automatically crossfading any audio items that overlap. Take a look at Figure 2 where I have connected the same audio items shown in figure 1. I’ve drawn a box around where the item on the left is fading out as the item on the right is fading in. The red lines represent the volume of the items. It sort of looks like an “X.” I did not have to do anything extra because as soon as the items started overlap, Reaper automatically executed the crossfading.
This kind of crossfading is not done as an effect, where you’d hear something slowly fade in or out pleasantly. I had to zoom in pretty far to even see the red fade lines. That’s because the fades happen very quickly. This type of crossfading is used as a tool to help avoid the popping and clicking that frequently accompany the cutting and deleting of audio.
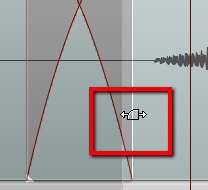
You can edit each fade if you wish. You could change the shape of the curve or make the fade longer or shorter. Do this by hovering your mouse over the edge of the audio item until the “fade” tool icon appears (Figure 3). Then right-mouse-click to change the shape of the fade. Or simply drag the edge of the item to change the length of the fade.
Items Do Not Have To Be On the Same Track To Crossfade Them
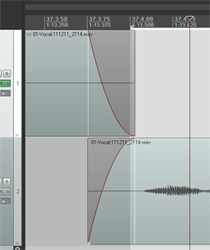
One last note – items do not have to be on the same track to use the crossfade idea. In Figure 4 I used the same two audio items, but I put the second one on a different track.
They still overlap in time. The end of the first one still fades out just as the beginning of the second one is fading in. The only difference is that they are on different tracks.
So now you know what crossfading means. And you know how you can use it to smooth out the transitions between audio items. Crossfading is a good tool to give you better audio recordings.
