 One of the themes of Home Brew Audio is “affordable pro audio.” And in that vein, I thought our readers would be very interested in this post by Audiofanzine – 12 Quality Plug-ins for $100 or Less.
Now when we say “plug-ins” in the audio world, we don’t just mean effects like reverb, EQ, compression, etc. The same technology that allows us to plug additional stuff into our recording software also encompasses virtual instruments. In fact, in Reaper (my favorite recording software), both virtual instruments AND effects are applied to tracks via the “FX” button. For Windows, the primary plug-in technology is “VST.” Others include DirectX, TDM, and MAS, to name a few.
I must admit that one reason I was attracted to this particular list of affordable plug-ins was that my current favorite reverb program – Valhalla – was on the list. So I figured the list must be decent:-P. Just kidding. Anything that comes from Audiofanzine is definitely worth a read. Other plug-ins on the list include EQs, compressors, delays, and filters.
Anyway – yes, the list! OK. Check out the article and list of plug-ins costing $100 or less at the following link:
http://en.audiofanzine.com/plugin-effects/editorial/articles/12-quality-plug-ins-for-100-or-less.html
Cheers!
Home Recording Equipment
Free Zoom H4n With Purchase of Sennheiser Wireless Mic System
(Update: This deal is no longer available from B&H. But keep reading for info about how to use this gear for awesome audio on your videos).
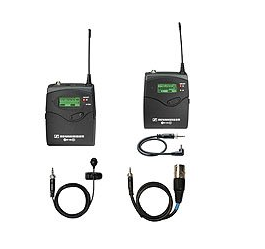
Initially, this article was about a deal where you could get a free mobile handheld audio recorder if you purchased a Sennheiser Wireless Mic System. that deal is no longer available. But you can obviously still buy these two products separately, which I recommend for getting the best sounding audio on you videos.
I’m always talking about how rare it is – in this day of easy HD video – to hear decent audio on otherwise great-looking videos. See our post How To Get Good Audio On Your Videos for several ways to to fix this problem.
Two of my suggestions involve using a lapel mic (to solve the all-important issue of getting the mic close to you mouth), and recording the audio separately from the video (since even when a camcorder DOES have an external mic input, it records pretty noisy audio).
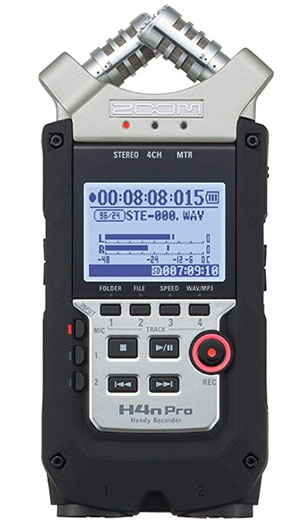
So in order to get the best quality audio, you record it onto a device that is specifically designed to record pro audio, such as a digital mobile recorder like the Zoom H4n. Then when you are editing/producing the video, you simply import the audio from the Zoom into the video program, just underneath the audio recorded by the camcorder’s built-in mic (which will almost certainly sound bad, with a far away, echo-y or reverb-y quality).
You can then sync the “good” audio up with the camcorder audio track and then mute/delete that camcorder audio, and presto! You’re left with a good video AND good audio.
With a wireless mic system combined with a Zoom H4N, you can do exactly as I describe above. The lapel mic will transmit to the wireless pack at the camera, which you then can record into the Zoom H4n. You won’t need to hunt for a camera with an external microphone input because you’ll have all you need to capture pro audio on all your videos.
Click here for more info on the Sennheiser wireless system and click here for the Zoom H4N.
Review Of The Pauly Ton Superscreen Pop Filter
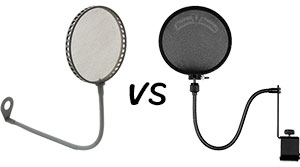 Recently I heard about a pop filter – that thing (usually round) that you see placed in front of microphones to helps prevent certain mouth sounds, mostly p-pops, from causing unpleasant sounds in a vocal recording – that actually DOES prevent p-pops. So I was eager to test it out for myself.
In my experience, if you are using a large diaphragm condenser (LDC) microphone, which is extremely sensitive, a pop-filter is a must. But though they usually help, they never completely prevent those explosive p-pops from finding their way into the recording. If we want pop-free recordings, we are forced to edit them out (see our article – How to Fix a “P-Pop” in Your Audio With Sound Editing Software) after the fact, which takes quite a long time.
Some folks (me included) try lining up 2 or even 3 pop-filters in a series in front of a mic in a desperate attempt to prevent p-pops altogether. These folks are usually disappointed.
But when I read about the Pauly Ton Superscreen Pop Filter, I was willing to pay the rather astoundingly high price (compared to the typical $20-$70) for one of my own if it actually did prevent p-pops at least 90 percent of the time. I would make up the extra cost in time savings after just a couple of voice-over jobs. So I ordered one and tested it. The results of my test are below, along with audio samples from recordings I made with both the Pauly Ton and a $33 Shure “Popper Stopper.”
The Good
First though, what did I like about the Paluy Ton? I have to say that I’ve never seen a sturdier or more “industrial” looking filter than this. It looks like it seriously means business – battleship gray and hefty. They say it’s built to last a lifetime and I believe that. Heck, it looks and feels like it would survive the apocalypse! The gooseneck is also amazing. It’s totally silent and moves so smoothly and effortlessly that it’s very clear you’re dealing with a well-designed and well-built piece of gear. It’s sturdy and pliable at the same time, which is no mean feat. The fabric is also different from most pop filters, soft and delicate, yet guaranteed to last, again, “for a lifetime.” It was designed to simultaneously prevent the bad sounds (p-pops caused by plosives) from the mouth, while leaving the quality of the rest of the audio untouched. Folks say that some pop filters remove some of the “airiness” or other desirable vocal qualities along with the p-pops, which is not a good thing. People pay good money for their microphones and recording rooms. So to reduce or prevent plosives at the expense of recording quality seems a bad trade-off.
The Not So Good
The price. This thing costs $300! Now if you think long-term, and realize that you’ll never have to buy another pop-filter again, it starts to make a bit more sense. And if it actually DOES stop p-pops dead, like advertised, then it would be worth it for sure. Like I said earlier, it would pay for itself in just 2 or 3 months in time-savings alone if it could prevent MY plosives from having to be edited out in post-production.
Now let me state right up front that everyone is different, which means that the severity/strength of a plosive will vary greatly from person to person. There are some folks who say they never need a pop filter AT ALL (!). In my world, that’s crazy talk. I can’t even imagine that world, because my plosive-foo is strong (and not in a good way). Also, there are those who say that the Pauly Ton has stopped all p-pops for them when no other pop filter would. That might be true for them. So I encourage you to try one out, in case you are one of those people. As you will shortly hear, I am most decidedly NOT one of those folks.
As you will hear below, the Pauly Ton Superscreen did not do much better than the Shure Popper Stopper at knocking down the p-pops for me.
The Test
I recorded three separate tracks of myself reciting the nursery rhyme, “Peter Piper,” which is full of plosives. That is probably no text in the universe that has so many “P” sounds so concentrated in just a few lines – perfect for a test like this.
The first recording was me reciting directly into my Rode NT2-A microphone (through a Focusrite Scarlett 2i2 interface), in cardioid mode, with no pop filter at all. Then I recorded the same thing, only with the Pauly Ton filter between my mouth and the mic. Finally, with everything else the same, I recorded myself with a different pop filter – a “Popper Stopper” – in the same position as the Pauly Ton had occupied.
The Results
Both pop filters reduced the p-pops by quite a lot. But neither one performed noticeably better than the other in this regard. The Pauly Ton is also supposed to result in better quality audio AFTER it reduces p-pops, as it supposedly allows the rest of the voice recording to come through, when cheaper filters do not. I gotta say, I didn’t hear any difference in audio quality either.
But that wouldn’t be a scientifically valid test, since I knew which was which. You need at least a “blind” test in order for it to mean anything. So I had the lovely Lisa Theriot (my wife and fellow voice-over actor and singer) come to the studio and put on the headphones (Audio-Technica ATH M50s). I played both samples for her several times, in pairs, asking if she could detect any difference in plosive reduction. She couldn’t. Then I asked if she could detect any difference in overall audio quality and tone. She couldn’t.
We repeated the test with her voice and came up with the same results.
So, for us at least, the Pauly Ton was not the answer. That isn’t to say it wouldn’t be for you or for someone else. That’s why I encourage you to test it for yourself. Everyone’s voice (and lips and tongue, etc.) are different.
Here are the audio samples of my voice. The first is obviously the one with no filter at all. The two that follow are the with the two filters. I won’t tell you which one before you hear them. You can find the answer in the text that follows these audio players. If you don’t want the spoiler, don’t scroll or read the answer before you listen. Use headphones if you can.
| Unfiltered | |
| Pop Filter A | |
| Pop Filter B |
Which Was Which (Spoiler)?
If you have not had a chance to listen and you don’t want to know which filter was which, then don’t read this yet. But if you want to know, then HERE IS THE SPOILER:
Pop Filter A was the Shure Popper Stopper ($33)
Pop Filter B was the Pauly Ton Superscreen ($300)
New Zoom Mid-Side Stereo iPhone Mic Now Available
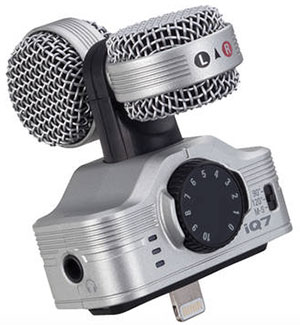
Just announced at the 2015 Winter NAMM (National Association of Music Merchants) trade show, the new mid-side stereo mic iPhone attachment – the Zoom iQ7 – is available as of today at B&H.
Why is this such a big deal? There are plenty of stereo mics out there that can attach to the iPhone these days. But this is the first mid-side stereo attachment mic that I’ve seen. And THAT is what makes it such a big deal.
Mid-Side Versus “Regular” Stereo
So what is so special about this thing I keep calling “mid-side (M/S)?” And what the heck does M/S mean anyway? In a nutshell (see our article “5 Audio Recording Tips For Newbies – Part 1: Stereo Or Not?” for a primer on stereo recording), stereo mics are usually set up to where two microphones are pointing in different directions toward the subject. The idea there is to try and mimic the way a human head (specifically the ear parts of the head) picks up sound naturally, that is from slightly different places in space (the left and right sides of your head). So two mics will theoretically provide timing cue differences which your brain will convert into a more spacious, more natural sound than a mono or “point’ sound source.
The problem with the traditional two-mics-pointing-in-slightly-different-directions method is that once it’s recorded, you have very little flexibility to change the stereo “image.” But with M/S, which is typically a bit more complicated to do (you need two different types of mics – a figure-8 mic and a cardioid mic – and they have to be set up in a very particular way), you not only get a wonderful stereo sound, but you can adjust the width of the stereo image after the fact! M/S is the preferred stereo technique for broadcast recording, mainly because when the two stereo channels are converted to mono (as is often done for radio), the audio doesn’t suffer. With standard stereo techniques, you often get phase cancelation problems (meaning “the audio sounds odd”) when converted from stereo to mono. M/S is also often used for live recording because of how much control you have over the stereo field in the mixing stage. There is a nice article about M/S stereo recording on the Universal Audio (UA) site here: http://www.uaudio.com/blog/mid-side-mic-recording/
So THAT is why I’m so excited about this brand new microphone attachment for the iPhone. The iQ7 works with the newer devices that use the lightning connector. And the price is fantastic at just $99.99 at B&H. CLICK HERE to find out more or to order one for your very own!
Craig Anderton's Six Favorite Home Recording Studio Accessories
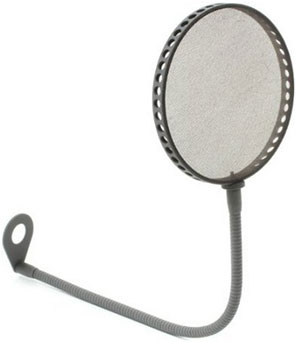 Craig Anderton, who is famous in the recording and electronic music making world for his books, articles and, of course, as a musician, just published an article about his six favorite home recording studio accessories. That definitely caught my eye as something our readers might be interested in. So I checked it out.
There are some very useful items on that list (which you can see for yourself at the link below), but the one that truly made me sit up and take notice was a pop filter. These are really common and usually pretty inexpensive – around 20 bucks – but I have never really had one that worked so well that it eliminated ALL of my vocal p-pops/plosives (see our article, How to Fix a “P-Pop” in Your Audio With Sound Editing Software for more on this topic). In the past, I have usually had to edit them out with audio software. I’ve even doubled up, using two pop screens when recording vocals, but some plosives still get through.
Well Craig swears he has finally found a pop filter that actually, REALLY works…and I hope so, because it’s expensive! Even so, I’ll be getting one to try out, and I’ll post the results of my review right here. This super pop filter is the Pauly Ton Superscreen pop filter.
Below is Crag Anderton’s full list. Enjoy!
http://blog.discmakers.com/2014/12/six-home-studio-accessories/