Neil Young (of Crosby, Stills, Nash, and Young fame) is on a crusade for better audio quality in our music. Specifically he laments the poor sound quality of internet digital audio files like MP3, AAC, etc., which are “lossy” formats. That means that they have been data-compressed in order to make them usable for both internet streaming /download, AND the ability to store thousands of songs on your iPod/iPhone. But these lossy audio formats are, by necessity, not high-quality audio (like their sopurce wav files) because a lot of the data has been removed to make the files smaller (usually about a tenth the size of the original wav version).
Since Neil Young comes from the age of the vinyl record, which was analog audio and technically capable of much more accurate audio, he is worried that an entire generation of folks won’t know what good quality audio is since they do most of their music listening via an iPod, or other portable music device.
So Neil is pushing something called the Pono Player, which uses a much higher quality audio file for music. Personally, I don’t think very many people could tell the difference between the wav version and the mp3 version these days (I know – heresy!), but anyway…
Here is an article about good ole Neil and his Pono Player: http://productionadvice.co.uk/neil-young-pono-pony/
Audio Recording
New Edition Of Hal Leonard's Engineering And Producing
There is a 5-volume series by Hal Leonard called The Hal Leonard Recording Method that has been around for 5 years (2007). There is now a new edition of volume 5 out – Engineering and Producing. The updates include information on how to use social media and make money through digital plays, internet radio and downloads, use of QR codes, etc.
Here is a bit more detail on the new edition: http://www.prosoundweb.com/article/hal_leonard_publishes_2nd_edition_of_engineering_producing/
What Is Phantom Power Really?
 Recently I posted something called Phantom Power – A Dizzying Description in which I called attention to the fact that audio recording terms like phantom power are often hard to describe if you try to get into the details. I had asked someone to put together a 400-word essay on it for me and was stunned with how academic (to put it euphemistically) it came across. My eyes glazed over halfway through.
I went ahead and posted those 400 words for those who are more academically and technically inclined, but promised a now-what-is-it-really-and-only-tell-me-what-I-need-to-know post on phantom power very soon afterward. This is that post.
Okay, so to cut right to the chase – there are basically 2 types of microphones, dynamic and condenser. Ribbon mics are sometimes called a 3rd category but really are a variant of the dynamic.
What you need to know:
Dynamic mics don’t need electric power. Assuming the thing you plug them into – a mixer or PA of some sort – is plugged in, all you have to do is poke the microphone cable from a dynamic mic into a mixer and you’re good to go. That type of mic works by the sound coming into it (your lovely voice, perhaps) physically moving the parts (magnet and wire coil) inside. Those movements are then converted to an audio signal.
Condenser mics DO require electricity beyond what a plain old mixer or other interface can provide. That’s because condenser mics convert air movement (caused by your lovely voice) to audio in a different way (changing capacitance if you must know, which you don’t;)). That different way needs about 48 volts of electricity just for the mic to work.
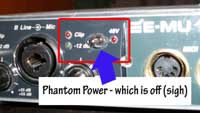
As you may have guessed by now, that 48 volts of extra juice is called phantom power, probably because it comes into the mic not via the way you power up most things, namely with a plug of some sort. Phantom power comes into the mic through a mixer or interface by flipping a switch on the mixer. Sometimes the switch is labeled “phantom power.” But often you’ll just see “48V” or something similar on the device, usually next to a switch and an indicator light (so you know if it’s on or off).
 It is not at all uncommon (meaning I do this all the time!!) to plug the condenser mic in and get all ready to record only to find there is no sound coming through the mic because someone (me) forgot to turn on phantom power. You have been warned.
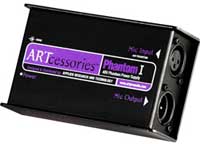
One other thing you should know. It is possible to carry your own phantom power, which is handy if you are a musician doing gigs. This just happened to me a few months ago. I was at a venue that used a condenser microphone on-stage. Their amp died and the owner came back with a combo mixer/amplifier thing that is very useful for live PA stuff. But since for live PA stuff, most people use dynamic mics, there was no phantom power on the mixer. We couldn’t use it for the venue.

But a musician friend of mine had a portable phantom power unit similar to the ART Phantom I unit pictured on the left. All you need then is an outlet and an extra mic cable. We just plugged the condenser mic into the ART, then plugged the extra mic cable into the output of the ART and into the mixer. Voila! Phantom power. The day was saved.
So that is all you really need to know about phantom power. Condenser mics need it. Dynamic mics don’t. If you are all set up to record (or play live) with your condenser mic and you are getting no sound, chances are good that you forgot to turn on the phantom power.
What Is Sampling Frequency?
 Sampling frequency in audio recording can perhaps best be described by first taking a look at your favorite Hollywood movie. Even though life happens continuously, movies show us fast chains of still images that our brains interpret as continuous movement. Usually the rate is around 24 frames per second. Sound is also continuous, but it takes a lot more than 24 “frames” of sound per second to sound decent. Although a film camera is taking pictures of people and real objects, audio equipment is taking “pictures” of sound waves. These pictures are called samples, and the most common rate is 44,100 sound samples per second, or 44.1 kHz.
You Don’t Remember Physics 101?
You might remember from a boring day in physics class that different speeds of sound waves produce different pitches. When taking samples of these sounds, the sampling frequency must be fast enough to not miss any of these exceptionally fast waves. Some really smart people in the 1920s and 1930s figured out what “fast enough” is when it comes to recording. It’s something known as the sampling theorem. To put it simply, your sampling frequency needs to be twice as fast as any of the sound you are recording in order to have all of the necessary samples to sound continuous when it’s played back. Knowing that the high end of human hearing stops at around 20 kHz, and that a little wiggle room is nice to have, we know why 44.1 kHz is used for most playback applications.
Sampling Frequencies Above 44.1
Of course there are more sampling frequencies than just 44.1 kHz. Despite what the sampling theorem suggests, some people claim to be able to hear an improvement in recordings with sampling frequencies much higher than 44.1 kHz. 48 kHz is popular in more video-related applications, and 88.2 and 96 kHz are both popular since they are double the frequency of what the end product will be, making the conversion down to 44.1 or 48 kHz easy for the computer. All of this is about as clear as mud. Is it worth it to record at a higher sampling frequency? That’s an ongoing debate, with some very passionate arguments on either side.
What it all comes down to is storage space. Storing 96,000 24-bit (see our post on 16-bit audio recording for more info on bit depth) samples per second of audio is going to take up a fair amount of space. If you do a lot of recording at home, or if you’re like Jimi Hendrix (or me) and love multi-track recording, you might end up running out of storage space faster than you anticipated. Big record companies might not bat an eyelash at using almost a gigabyte of storage for a multi-track song, but that sure seems wasteful to me.
The Real World – Can You Or Can’t You…Really?
If you want to hear the differences for yourself, record a short dialog twice: once at 44.1 kHz and once at 96 kHz. Have a friend or family member rename the two files so that only they know which is which. Listen to each of them and try your best to figure it out by how each one sounds. If you can’t tell a difference (“the dog barked in the 44.1 kHz recording” doesn’t count!), then your listeners probably won’t be able to either.
One parting note: be careful not to confuse sampling frequency with bit depth when moving through the digital audio universe. It is a pretty common thing.
What Does Broadcast Wave Format Mean?
 You are probably familiar with WAV files. They are pretty much the default audio file for computers. They are uncompressed, non-lossy audio files, which means that they are typically large in size – mainly because WAVs are high-quality files. This is in contrast to MP3 and other audio file types you see on the internet, which have had audio information removed and compressed and otherwise mangled to make the file size small enough to work on the internet. Technically MP3s are not as as good as WAV files for audio quality.
But besides being so darned convenient (not to mention the basis for on-line music), MP3s are also useful in another way. You’ve probably noticed that these files show all kinds of information (like song name, artist name, etc.) when you load them up in iTunes, on your ipod, or even in the properties field in Windows Explorer. That’s pretty handy isn’t it? Standard WAV files don’t usually have this information available.
But there is an enhanced kind of WAV file out there called the Brodcast WAV Format (BWF) that allows users to add that kind information. Reaper audio software (which I am always talking about because it is so awesome – see our post here – www.homebrewaudio.com/reaper-tutorial-video/) uses BWF as it’s default format. You can edit the info in Reaper or in several other programs as well (Adobe Audition comes to mind). BWFs contain really useful information specifically to aid in sharing the file between computers, projects, and audio engineers – information like what the start time for the file is in context to a multi-track recording project, how the file was encoded (bit depth, sampling frequency, etc.), project name, etc.
Here is a good article with more detail on BWF: http://www.audiorecording.me/what-is-broadcast-wave-format-bwf-how-to-use-it-in-your-daw.html