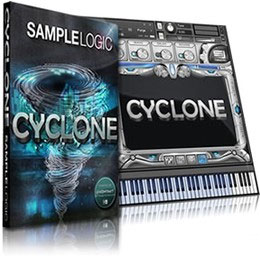
 Sample Logic, makers of excellent virtual instruments and synthesizers such as The Elements Exp Virtual Instrument Library Software
 and a lot more besides, has announced the release of their latest synth called Cyclone.
From the description on their website, it will use Native Instruments Kontakt (Cyclone will come with Kontakt player with 64-bit support) and be a combo instrument in that it plays sampled instruments (325 different types) as well as having the capability to act as a synthesizer, meaning you can alter the sounds with Sample Logic’s sequencer, arpeggiator and LFO (low-frequency oscillator), as well as the new Kontakt additive synthesis engine called “Wave.”
The kinds of instruments and sounds described, namely single instruments and multis giving you motion pads, cinematic instruments, dub-step type basses, electronic leads and much more. It sounded a lot to me like Omnisphere, by Spectrasonics. But Cyclone will be a bit a bit less expensive than Omnisphere’s $479, coming in at just under $300.
It’s scheduled to be released on April 22nd, 2013. So be ready if you’ve been looking for a great all-around virtual synth.
Elektron Octatrack Video – Using It As A Drum Machine
Here is a video from YouTube user, sbookholt, that shows how to load single-hit drum samples into the amazing Octatrack, by Elektron, which is a hardware sampler and sequencer. In the video, he shows you how he was able to dispense with the other Elektron product, Machinedrum, which is another programmable sequencer/synthesizer, but specializing in drums (you might have guessed that by the name of the product:)). Both products are pricey ($1,240 and $990, respectively), so it one can truly do the job of two in yhour particular rig/gig purposes, then you can save hundreds of dollars.
See the tutorial video below:
Obsessive In The Mixing Stage Of Recording
 There has been a lot of attention in the online audio recording space about mixing lately. It’s as if two things pervade the rest of the folks teaching and talking about home recording: the idea that music is the only thing people are doing (voice-over recording rarely involves much in the way of mixing – maybe background music and that’s usually it), and that if you are recording music, mixing is the most important part of doing it.
Here are Home Brew Audio, we talk about both music AND voice-over recording. I know there is a very large proportion of the home recording space devoted to voice-over recording. Plus I am a voice-over actor. So we devote a significant percentage of our content to VO stuff.
The second seemingly pervasive presupposition is that between the mixing and record phases of a music recording project, it’s the mixing that is the most important. It follows, then, that a majority of producing time, assuming you do all your own recording (tracking), mixing and mastering (see our article on these three phases of a recording project – Recording Engineer, Mix Engineer and Mastering Engineer – Oh My), a majority of the time spent on the project should be mixing, as opposed to recording/tracking. I actually agree with that. It’s certainly true for me anyway.
My music niche – the renaissance re-enactors and medieval re-creation folks (mainly SCA) – has a LOT of musicians writing and recording songs. Most of them have the same basic equipment – a decent computer audio interface and a few decent mics along with some recording software. But (and this is going to sound a bit like boasting, but its true) so many people ask me what my secret is to getting such a professional sound compared to a majority of the other recordings out there in my niche. And you know what the answer is? OCD! OK, well that may be over-stating things a bit (no it isn’t!), but I spend a LOT more time mixing than recording. My recording to mix ratio is like 1:10.
I truly believe this is where the difference is made. Since I mix in a converted bedroom like most home recordists, I don’t have an ideal mixing space. So to get a good portable mix (one that will sound just as good in the car, on an iPod or on a large entertainment system), I have to literally mix for each of those playback systems. I start out with a draft mix, then take it with me in the car. It will have several balance problems – bass to loud or not loud enough, lead vocal uneven, can’t hear the drum, etc. So I take copious notes and go back to the computer and make adjustments. Then I take it with me in the car again. This repeats at least 3 or 4 times.
Then I will listen in headphones on an iPod. I’ll notice some problems that didn’t come across in the car, usually excess sibilance (SSS sounds) and maybe some more vocal mix issues. So I repeat the process until it now sounds good on both a car stereo and in the headphones with an iPod.
Finally, I’ll listen on the big stereo in the living room (CD player). I’ll notice some more problems there – typically to do with the way the lead vocal sits in the mix, but also problems in the high frequencies are usually revealed here, along with issues with reverb. So I go back and remix and repeat the same way as earlier until it sounds great on the big speakers. Then I listen to THAT mix in the car and on the iPod until it sounds great in all three places.
If I were wealthy and could afford to build an awesome acoustically ideal mixing/mastering listening space, along with a pair of high-end mixing loudspeakers (actually two or three different pair of monitors), I could save a lot of time in the mixing stage. But I can’t afford that yet. And until I do, I am going to get comfortable with my OCD in the mixing stage.
What Is Multiband Compression?
 Multiband compression is an incredible audio tool if you can get past the fact that it, like many other terms in audio, is a bit scary and technical sounding. It’s mainly used when mastering a song (see our article Mastering a Song – What Does It Mean? for a review of what mastering means), when everything is all mixed together and you only have one audio file. To understand what multiband compression is, you should first have a good idea what regular old compression is.
In two previous articles, I wrote about compression basics – Improve Or Ruin Your Audio With an Effect Called Compression and Should You Use Compression In Audio Recording? So if you’re feeling a little rusty on your understanding, give those a quick read.
So back to our question – what is multiband compression? Assuming we know that compression means “turning down” audio loudness ONLY when it gets louder than a certain volume (i.e. the singer’s voice goes happily along with no volume reduction; but during that part in the chorus where he screams, it gets louder than the “threshold” you set on the compressor. So just during the screaming parts, the compressor turns the volume down), multiband compression does the same thing, but we get more control over which frequencies get compressed. Simple right?
Multiband Compression Versus EQ
OK, how about an example? If we have already mixed a song down (so it’s just one file now with all the instruments blended together), and it sounds fabulous except the bass sounds too loud for the song, we have two choices. We can try to use an equalizer effect to lower only certain frequencies (see our post What is Equalization, Usually Called EQ? for more on that). But equalizers turn down (or up) the volume at a targeted frequency or set of frequencies (or “band” or frequencies) regardless of how loud they are. Remember that a compressor won’t turn something down until it gets to a certain volume that you deem to be the place it should be turned down (called a “threshold”). So maybe the EQ isn’t controlling the bass, the low frequency parts of the song as much as you want. So now what?
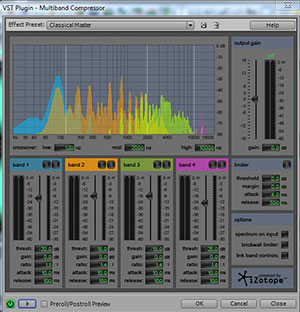
Well, if you have a multiband compressor (like the one pictured above, which is the iZotope multiband compression plugin that came with Adobe Audition 3), you can apply compression to JUST the low frequency, bass-y frequencies (most compressors operate across the entire frequency spectrum). Unlike an EQ, a compressor will allow everything to play with no volume reduction until it goes past the threshold volume level. So maybe your bass is all good except for one note that keeps popping out of the mix. Or maybe 80 percent of the song has a good bass mix, but during the pre-choruses, things start swimming in bass. A multiband compressor that is ONLY targeting bass frequencies will not do anything until those pre-choruses, which trigger the compression to start reducing bass. Then when the pre-chorus is over, and the bass drops back below the threshold, the compressor stops compressing; that is until the next time some bass notes get too loud, and then it kicks in again, etc. So in a way, a multiband compressor is sort of like EQ in that you can target certain frequency bands (more like a graphic EQ than a parametric EQ in that way). But since compression is different in that it only affects the audio above a specified loudness threshold, it may well be able to solve a problem that EQ cannot.
The multiband compressor plugin shown in the picture above allows you to set 4 different bands. You can just drag the lines on the graph that determine the border between two bands to select how you want to divide things up. Once you do that, you have all the normal compressor controls (threshold, ratio, etc.) available for each band, which you can now set individually and independently of the others. So you could apply a lot of compression in the bass range, say everything from 150 Hz down, while applying no compression at all to a mid-range band of 150 to 800 Hz, mildly compressing high mids of 800Hz to 2KHz, and not compressing anything above 2KHz – all simultaneously with one effect.
Mainly Used While Mastering
When a song is in the mixing stage, each instrument has its own track. So if the bass is too uneven, you can simply stick a compressor on the bass guitar track to even it out. And if the kick drum is interfering with the bass guitar, you can compress and/or EQ just the kick drum track. The same is true for every other frequency range. Maybe there is excess sibilance on the lead vocal. OK, just put an EQ on the lead vocal track and subtract loudness in the sibilance range, typically 4-8 KHz (for a review on sibilance and how to treat it, see our post How to Fix SSS-Sibilance in Your Audio With Sound Editing Software). If a guitar (or any instrument) is harsh and grating on your ears, you can put an EQ or compressor on the guitar track and treat that problem on that track. The point is that you can isolate the problem audio sources and treat them surgically on their own tracks.
 However, a mastering engineer receives “mixed down” audio (see our post What Does It Mean to Mix Down Audio?), all the instruments are already blended together into one file, so you cannot treat JUST the bass guitar, or JUST the lead vocal anymore. It’s like making a cake. Once everything is done and frosted, if you notice there was too much almond extract used in the recipe, well it’s too late to do anything about that. But a mastering engineer can come close to isolating elements of a mixed-down song (cake) using EQ and multiband compression, and may actually be able to reduce the almond extract flavor even after the cake is baked – to stretch that metaphor a little:).
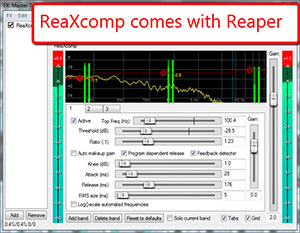
If you would like to try a multiband compressor, and you already have Reaper recording software, you’re in luck! One of the many effects plug-ins that come with Reaper is ReaXcomp, a multiband compressor. Most 3rd party MBC plug-ins cost at least $200 and go up from there. So the fact that you get one free with Reaper is pretty amazing. If you don’t already have Reaper, go download it now for free (http://www.cockos.com/reaper/download.php). They have a 60-day trial that is fully functional. And when the trial is done, you only pay $60 for the license. Then if you make $20,000 per year using their software, you pay for the commercial license for $250. And it’s all on the honor system! All versions of the software – trial, personal license, and commercial license – are identical and fully functional.
So now you know. Multiband compression is just a compressor that lets you apply different settings to different frequencies all at the same time. Go forth and create better music.
Cheers!
Ken
Phoenix on Saturday Night Live – Double-Tracking The Lead Vocal
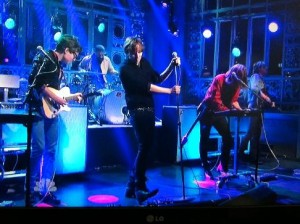 Did you notice the sound of the lead vocalist, Thomas Mars, on Saturday Night Live (April 6th, 2013)? That is the sound of double-tracking, or since it was a live performance, it would just be called “vocal doubling.”
Double-tracking a lead vocal is a really common technique used mostly in recording. You probably never heard a Beatles song without it. But when performing live, it’s much less common.
There are two primary ways to get the sound of a double-tracked vocal. You can either have the lead singer actually sing the part twice, which is actually more common these days when recording (obviously impossible live, at least without some creative vocal surgery;)). Or you can do it electronically with an effect box. The Beatles actually started with the singing-the-part-twice method, then moved to an automated way to do it (artificial double tracking – ADT), since John Lennon did not like singing his part twice, or so the story goes. See my article What The Beatles Can Teach Us About Mixing Music for more on this.
The reason for even doing the double-tracking thing is to create a nice, thick sort of chorus-y sound on the voice. That sound is very distinctive once you know what to listen for. And I most definitely heard it from Thomas Mars last night. It could have been the automated effect being used. But there may have also been an actual recorded version of the lead vocal coming over the PA that Thomas Mars sang along with to create the effect. I have no evidence one way or the other. However, as you can see in the picture above, Thomas had a bank of effect pedals that he is stepping on, which I strongly suspect were for chorusing and/or double-tracking. But even if he did have a pre-recorded version to sing along with, I need to point out that this is NOT the same thing as lip-syncing, where the recording is all the audience hears while the singer fakes the actual singing. With double-tracking, you actually hear the live vocal as the singer sings. It’s just that it is augmented by a recorded version as well.
Either way, I have no problem with it at all as long as the performer is actually performing live.
So if you didn’t know what double-tracking sounded like, now you do. And if you need to thicken up the sound of a lead vocal, you know how to do it.
There are tutorials on double-tracking in our home recording course, The Newbies Guide To Audio Recording Awesomeness.