
Back when I was a kid, the LP (which stands for “long play”) was the king of music. There was no internet (well, not for the public anyway), no streaming, no iTunes. When we went shopping for music, we went to Music Plus (the big record store chain near where I lived) and buy albums in LP format – we bought “records.”
But then along came the CD, and internet music. People pretty much forgot about records. DJs kept them alive for a long time, using them for scratching, stabbing, etc. But did you know that the music industry sells 7 or 8 million LPs a year? And not just for DJs. They are big with classic rock reissues, classical music, audiophiles and others.
It is generally agreed by certain audiophiles that vinyl records are capable of reproducing audio better than CDs – part of the analog-vs-digital argument. That argument will probably never end.
Anyway, the reason I bring any of this up is that my old frequent lunch buddy from when I lived in Virginia, Scott Dorsey, just wrote an article for Recording Magazine about LPs – what they are and how they are made. It’s really fascinating stuff.
Read Scott’s article here: http://www.recordingmag.com/resources/resourceDetail/113.html
USB Mic Versus Condenser Mic And Interface For Home Recording
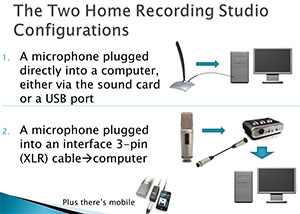 In part 3 of our 5-part post series, How To Build A Home Recording Studio, I mention two ways to set up a recording studio on your computer:
Configuration 1 is a microphone plugged directly into a computer. This can really only be done using either an old-style computer microphone – the kind with the 1/8th-inch plug that you can insert into a computer’s built-in sound card, or a USB microphone (which, as the name suggests, plugs directly into a computer through a USB port).
Configuration 2 is a condenser microphone plugged into an audio interface unit, which is then plugged into a computer, usually via USB.
I recently received a request from the Home Brew Audio YouTube Channel to provide a comparison of a recording made with configuration 1 versus a recording made with configuration 2. So I did just that. Both recordings below were made using Reaper recording software.
Configuration 1 Recording
To demonstrate a configuration 1 recording, I used a Samson Q1U USB microphone plugged directly into one of my my Windows 7 computer’s USB ports. This is just a voice recording. Use headphones to get the full effect of the difference between these two recordings. Pay particular attention to the hissy background noise in the USB mic recording. Here is that recording:
Configuration 2 Recording
For the demo of configuration 2, I used a large diaphragm condenser mic – a Rode NT2-A, plugged into a Focusrite Scarlett 2i2 audio interface, which was plugged into my computer via USB. That recording is below:
When comparing the two, listen not only for the noise, but for the overall quality of the sound. Both recordings were normalized to the same average volume so that loudness would not be a factor. Also, neither sample received any noise reduction treatment.
Speaking of noise reduction, most USB mics benefit greatly from the application of noise reduction or removal effects. USB mics tend to have a steady hiss in the background, which is easily reduced without doing much, if any, harm to the audio. Just to demonstrate this, I added a 3rd recording. This one is the same audio used in the configuration 1 demo, using a Samson Q1U USB mic. But I’ve applied noise reduction using a built-in effect in Reaper called ReaFIR. See our article on using ReaFIR here – ReaFIR Madness – The Hidden Noise Reduction Tool in Reaper. Below is the USB mic with ReaFIR applied:
Notice how much better that audio sounds with some noise reduction? And it wasn’t some fancy (and costly) noise-reduction program. It was an effect that is built right into Reaper. If you don’t know much about Reaper, check out the details at their site here: http://reaper.fm. They have a 60-day free trial. Then when you want to buy (cuz you will;)), it’s only $60! Then if/when you start making $25 grand a year with it, you’ll want to pay for the commercial license, which is $225. But the software is the same! It’s based on the honor system. Yeah, I know. That’s pretty amazing.
So there is a short comparison of two home recording studio setups – one with a USB mic (configuration 1), and one with a condenser mic going through an audio interface which is plugged into the computer via USB.
Mixing Tips For Creating More Headroom In Your Recordings
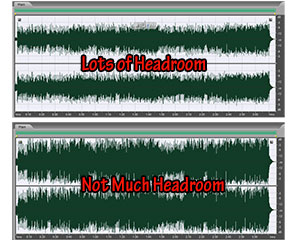 Headroom in your recordings is the amount of “space” (a useful visual metaphor for an audio thing) between the peak of an audio waveform (or as I like to call them – “blobs”), and the maximum available loudness, which in digital audio is zero decibels.
If you’re not familiar with “dee-bees,” another way to refer to decibels or “dBs,” the main thing to grasp is that for digital audio (what you get when you record audio on your computer), the topmost unit is 0 dB. I know, I know. It’s backwards isn’t it? But it is what it is. Everything else is expressed in negative numbers. Remember how fun those were in school? Anyway, if there is any signal above 0 dB, it “clips” the waveform, which causes a nasty awful buzzing distorted sound. So basically, 0 dB is the ceiling. You don’t want anything to get clipped.
So back to headroom. When music has a decent amount of space above the tops of the waveforms, it has room to breathe, as they say. It allows for more dynamic range, clarity and expression in the music.
The opposite is actually more common though, especially in pop music. You typically have very little headroom, especially when heard over the radio, because producers and bands want the audio to be loud. They squish and flatten the audio – using compression and limiting (extreme compression, basically) – so they can turn it way up for a very loud average volume. Then radio stations further compress things, so basically the music is flattened out and turned all the way up so there is not much headroom at all.
So if you want your music to have any life in it, you should treat headroom as a good thing. Desire it. OK, good. Now that you have the desire for headroom, you’ll want to know how to get some.
Graham Cochrane, over at Recording Revolution, wrote a great post giving you 3 ways to create more headroom in your mix. They focus on things you can do while mixing, mainly using EQ and track volume. Check them out here: http://therecordingrevolution.com/2013/07/12/3-ways-to-create-more-headroom-in-your-mix/
Creating Recordings With More Space and Depth
 One major goal of most audio recording projects is to create a natural sounding product for the listener – in much the same way that video seems to look better to us, less “flat,” when it has more depth and dimension. Note how popular it is to see movies in 3D. But even without 3D movie effects and glasses, film makers started using focus and blur, light and shadow, forced perspective, etc. to help create a more realistic space for the viewer. You can do similar things in audio.
One way this can be done, especially when recording music (since there are usually many sound sources), is to provide the listener with cues that give the audio some space – in multiple dimensions – as they are used to hearing it in real life.
Left-to-right
Most listening devices are stereo or better (surround, for example) these days. So you should take advantage of that. Multi-track recording software (DAWs) allow you to “pan” each track to the left or right by as much as you want. So you can spread things out from left to right to make them sound to the listener like the instruments are spread out as they would be in real life.
Sometimes you might want to widen a single sound. For example, a piano almost always sounds best when it is recorded in stereo. The instrument is large and wide in real life and people typically expect to hear it that way on a recording too. But what if you only have a mono recording of a piano? How can you widen it? Well, you can use a technique that plays a trick on the listener’s brain – called the Haas Effect. You can read more detail about this in our post The Haas Effect, but basically you can make a copy of a mono track, delay it slightly in time, and then pan both versions apart.
Of course certain things may be recorded in stereo – either with two mics or a stereo mic – and others in mono. Then you space things out across the horizontal spectrum to give them a more natural feel.
Front-to-back
Another thing people are used to is natural reverberation. You may not notice it in real life, when speaking to someone. But if somehow the voice of the person your were talking to were to suddenly lose all room reverberation (which is what happens when the sound bounces off the walls, ceilings, and everything around it), it would sound very odd. So in your recordings, in order to make something sound more natural (assuming that’s what you want – which you may not. For example, some kinds of voice-overs intentionally sound a bit unnatural – deep and in-your-face like it’s coming from inside your brain), it helps to add some front-to-back space using reverb effects. For example, if a voice or other instrument sounds too “up-front,” you can give the illusion of pushing it back and further away by adding some reverb.
Another way to make things sound further away is by turning them down. In real life, things that are farther away have less volume than the same sound up close. This is one of the most basic things you do when mixing sounds together.
Bottom-to-top
This idea may be more applicable to making a music mix sound more full, rather than more natural. But it does help to fill out a sound pallet for a listener. Try to provide sound that covers the frequency spectrum from low/deep sounds like bass guitar, kick drum, tympani, bass fiddle, etc. all the way to high sounds like cymbals, high-hats, tambourines, piccolos, guitars capo’d way up, etc. The middle frequencies can be filled with voices, guitars, pianos, violins, violas, etc.
The way we use this in our music recordings is to listen to a mix and decide if there is a hole somewhere, or if we are missing highs or lows. For example, we were working on a song that had a guitar with no capo, a bass, a bodhran hand drum and a male voice with male harmony. It was decidedly “low-heavy.” That told us we needed to add some higher frequency stuff to help balance it out. So we added a guitar with a capo on the 5th and/or 7th fret, a female harmony, and a tambourine. We might also have added a mandolin, flute, high fiddle, etc. Doing that really helped to provide a full and rich sound that was balanced.
So to sum up, you can really improve your audio recordings by adding more depth and dimension using several pretty common recording techniques.
Hope that gives you some tips to make your audio sound awesome!
How To Create The Most Common TV Show Sound Effect
 If you’ve watched TV in the last few years, you’ve heard it. There is a sound effect, usually in cop dramas (though I heard it in an episode of Dr. Who recently!), that always comes in just after a character says something dramatic, almost always at the end of a scene. I think I first noticed it on the CSI shows. Then I started hearing it everywhere! It seems like every TV show producer feels they need to have this effect in their show about 10 times per episode nowadays. It sounds like this:
It’s a really easy sound effect to create using any recording software. I used Reaper. Here is how I did it.
Record a Single Piano Chord
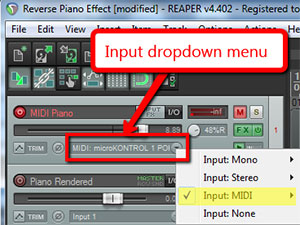 I started out with a single track in Reaper. I used a virtual instrument – a piano – using MIDI. To do that, simply choose “Input: MIDI” from the Input drop-down menu on the track control panel (see the illustration on the right). You can use any VSTi piano plug-in. I used the one in The Garritan Personal Orchestra. Of course, you can also do this by actually recording a REAL piano:).
Anyway, just record a single hit of any chord. A minor chord works best since they always use this sound effect to increase suspense and drama. Let the sound of the piano die away naturally. If you use MIDI to do this, like I did, you’ll want to render the track, so you have an actual audio file rather than a MIDI file. Then import that back into your Reaper session on a second track. Next, you’ll want to mute the MIDI track so that you are only working withe the audio track from here on in.
Reverse the audio
Now you’ll need to reverse the audio. The reason it sounds so cool and works so well as a suspenseful sound is that the audio is backwards. That allows it to rapidly build from a quiet sound into a loud crescendo, and then just stop suddenly. To reverse an audio track in Reaper, right-mouse-click on the audio item (the blob in the track), and select Item Properties. Then put a check mark in the “Reverse” box at the bottom left of the Item Properties menu and click OK.
That will create your backwards audio. Then all you have to do is drag the left edge (left-mouse-click and hold) of the audio item to shorten it to the desired length. This effect usually only takes about 3-5 seconds.
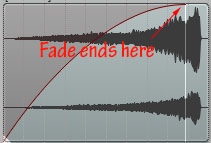 Finally, all you have to do is create a long fade-in. Just hover your mouse over the top left corner of the audio item until the cursor changes into the “fade” icon. Then just click and drag to the right to make the fade end just before the last bit of audio.
And that’s it! I did this in Reaper, but the same steps will work in any audio software. All together, it took me about 5 minutes to do. Now you know how to create a cool sound effect for your videos if you have something suspenseful to say:). Or maybe a video producer will ask you if you know where to get this sound effect. Then you could start a whole new sound-design business with your audio recording chops. Stranger things have happened.
Cheers!
Ken