 The term “deEss” or “de-ess” refers to editing an audio recording – usually of a voice – when the “S” (and sometimes “sh” and “th,” etc.) sounds (technically called “sibilance”) seem much too loud in relation to to rest of the vocal. It involves trying to reduce the volume or energy of JUST the S sound while leaving the rest of the vocal alone. There is a specific kind of audio editing tool for this, called a “DeEsser.” See my article How to Fix SSS-Sibilance in Your Audio With Sound Editing Software for the basics on sibilance and deEssers.
But there are other ways to tame those sibilant sounds. Below is a post from Audio Geek Zine with some ideas on several different ways to do it. This article is extra cool since it uses Reaper for the examples. Our course, The Newbies Guide To Audio Recording Awesomeness 2: Pro Recording With Reaper, shows you how to use Reaper to record and produce professional audio projects. I used Reaper in that course because that is my go-to recording software. The concepts taught, however, are certainly just as applicable to any other recording program.
Anyway, I digress. The article I mentioned about different ways to de-ess (deEss, whatever) a vocal is here:
http://audiogeekzine.com/2013/07/advanced-deessing-techniques/
The Snap Tool In Reaper: The Benefits And Possible Pitfalls
 We have a video on YouTube showing how to use a built-in tool in Reaper (ReaFir) as an excellent noise removal tool (that video is here: Hidden Noise Reduction Tool in Reaper). Interestingly, we received a comment on that video today that said “Dude – I didn’t even come here for the snap and select thing but that helped me soooo much thank you.”
That got me thinking that if the commenter felt the snap tool comments in the video, which were just there to help the viewer more accurately select part of the audio containing ONLY noise, were that valuable, maybe we should dedicate a post to just that. So that’s what’s happening right now…even as you read this:).
Snaps and Grids
The reason for a Snap tool in software that uses grids – such as graphics programs, video and audio programs, etc. – is to enable a user to accurately place a cursor onto a grid line. You literally cannot place the cursor between two grid lines. Whichever grid line your cursor is closest to is the one that it will snap to. This can be a great help in lining up multiple media items. In audio programs like Reaper, it also allows you to select audio that starts and stops exactly on the grid lines, which – when set to “bars and beats” – makes it super easy to select exactly one measure of music (assuming that music was recorded to a click-track/metronome). That, in turn, allows you to cut or copy entire bars of music, paste them somewhere else in the song, and have them be musically correct.
Of course there are tons of other uses. One such is demonstrated in our video on how to copy/paste instead of “punching in” when you need to fix mistakes while recording. See that post and video here: Quickly Fix Audio Recording Mistakes by Overdubbing.
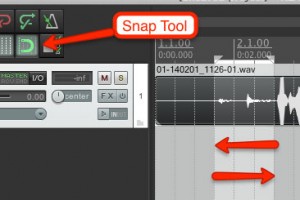
However, the downside of having the Snap tool enabled is that you give up some control. You may want (or NEED) to select audio whose edges are between grid lines. Or you may just want total control over where you put the cursor. But both of those things are impossible when snapping is enabled. Wouldn’t it be great if you could toggle snapping on and off whenever you wanted? Well you can in Reaper. It’s in the default tool panel – a button that looks like a magnet. See the picture at the top left. Also, of course, there is the video below that shows you how to use it about half-way through.
New Audio Recording Gear
Brand new inventory arrived today (August 14th, 2014) at B&H Photo-Video-Audio! I love new stuff:). Below are the new goodies:
| Sanken CSR-2 Rear Rejection Shotgun Microphone |
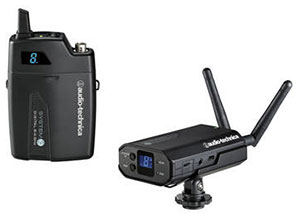 |
| Audio-Technica System 10 – Camera-Mount Digital Wireless Microphone System |
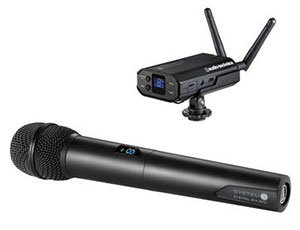 |
| Audio-Technica System 10 – Camera-Mount Digital Wireless Microphone System with Handheld Mic |
 |
| Mackie Thump18S 1200 W 18″ Powered Subwoofer |
New iOS and USB Microphone From Apogee Electronics
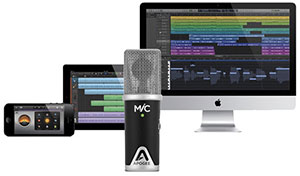
In 2011, Apogee Electronics was one of the first companies to come out with a microphone designed specifically for iOS devices – iPhones, iPads, etc. The microphone was the Apogee MiC. It could record studio quality (24 bit up to 44.1/48kHz) audio on an iPad, iPhone or Mac computer (via USB) without having to use Apple camera connection kit. You just plugged it right into your device with the 30-pin connector (or USB cable for the Mac) and could start recording immediately.
Now in July, 20214, comes the new version of the Mic: The MiC 96K. It comes with a Lightning Cable for the new generation of iOS devices. and as the name suggests, it can record at a higher sample rate (how many times per second the built-in converter sample audio) of 96KHz. The new version also comes with a mic stand adapter (the original only had a desk stand).
The Apogee MiC 96K is now available! Find out more about this fabulous microphone – or buy one for yourself – by CLICKING HERE.
Filter The Mourning Dove Hoot Out Of The Voiceover Recording
 I was working on a long voiceover recording job last week. After it was all recorded, I began the long process of editing it for the client. That involved not only optimizing the volume and minimizing the noise, but also creating 27 separate files. Things were progressing nicely, but then I heard an odd sound behind the voice at one point. You can probably guess by the title of the post what that sound was. Sigh.
Keep in mind that most voiceover jobs do not involve multitrack recording. That is to say, there is only one single track of audio being recorded. So if you hear a bird’s hoot AND your voice together on the recording, you can’t just “delete” the bird sound. In multitrack recording – such as you would use for most music recording – you purposely put different sounds on their own tracks so you can adjust the volume of each sound until it all mixes together nicely. THEN you render (mix down) the result to a single file. But I did not have the luxury of simply turning down the bird hoot. How in the world do I get rid of it?
OK, sure. I could just re-record that part when the bird is NOT outside my window. But that smacks of effort. I like to do things the easy way if I can. Yes, you may substitute the word “lazy” into that last sentence:-P. Anyway, there are some audio editing tools that you can use to reduce (or even eliminate) one type of sound, while leaving the desired audio alone. One of the best of these tools is EQ (short for “equalization”).
If the undesired audio has a much different frequency than the desired audio, then EQ can help filter out what you don’t want to hear. Sadly, this is not always the case. Sometimes, in order to remove one sound, you end up removing some or most of the sound you want to keep. But in this case, I was in luck.
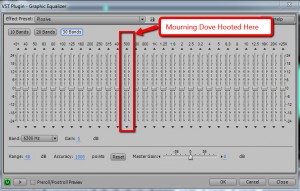
One other piece of good fortune was that a small amount of the dove noise was sounding during a section when the voice was not talking. It wasn’t enough to sample into a noise-reduction effect (unfortunately – because that is another good way to filter out the bad while leaving the good). So I highlighted the small bit of audio that had ONLY the mourning dove hoot in it. Then I opened the Graphic Equalizer tool in Adobe Audition (I still use version 3, but Audition is also part of Adobe CC – Adobe Audition CC [Digital Membership]). While listening to the hooting on a loop, I just started dragging down sliders (each slider is set to a specific frequency). If it didn’t silence the bird, I reset the sliders and tried the next one. It only took me about 10 seconds to locate the right frequency, which happened to be 500 Hz.
Awesome. Now that I knew that this particular mourning dove hooted at 500 Hz, I went back to the audio with both the voice AND the bird hooting in it, and highlighted that section. Then I just opened the Graphic Equalizer and started moving the slider at 500 Hz down, which turns down the volume at just that frequency. Now voices also produce sound at 500 Hz, so it I turned things down too much, the voice would also be affected. But in this case, by the time I moved the slider down enough to get rid of the dove, the voice still sounded fine. It probably helped that it was a female voice.
And the bird was gone! the entire process took about 60 seconds, which is a lot less time than it would have taken me to re-record the voice.
So the next time you have a bird outside your window threatening to ruin your recording session, remember this method. It might save you time and money. Of course, you could always build you own vocal isolation booth to record in. But that’s another topic altogether.