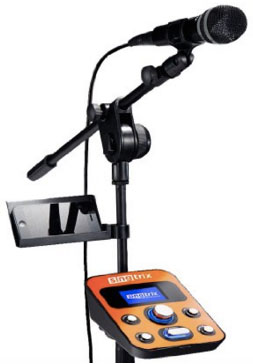
 I just saw a review of a fabulous bit of tech that would be a fabulous gift for singers who love karaoke. Heck, it would be awesome fun for any singer – even if you’re not a good singer:). It’s called Singtrix.
How is it different from the usual karaoke set-up? Well, usually the karaoke recordings have every harmony already recorded. And you just sing along into a microphone. And however good or bad you sing – that’s what people hear. With Singtrix, there are two major differences.
First, the vocal harmonies are not recorded, they are generated from your own voice. If you don’t sing, the harmonies don’t play. This is possible because each song is programmed to split the incoming voice into several copies and play them back at the right time in the song using the correct chords. so the harmony is always correct!
Second, the song in the Singrix system knows what the correct pitch is for the lead vocal and it will make sure that what is comes out is in tune. If you hit the notes correctly, that’s what will be heard. If you are flat or sharp when you sing into the mic, Singtrix will correct those notes for you automatically! So what comes out of the speakers will always be in tune.
It sounds like a heck of a lot of fun. I don’t have one yet. But I’d love to have one under the tree on christmas morning:).
CLICK HERE to find out more or order one for yourself (or family or friends).
The Buttons In Reaper's Tool Bar – What Do They Do?
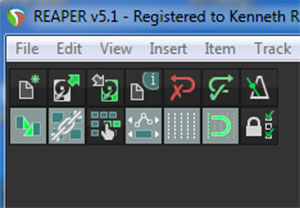
 We have put out several Reaper tutorial videos over the past few years. But apparently (no “apparently” about it:-P) none of them have ever explained ALL the tools in default Reaper tool bar. Somebody commented on a video in the Home Brew Audio YouTube Channel yesterday asking for a video explaining what all those buttons are in Reaper’s tool bar, and what they do. So I thought that would be a good idea for post and a video.
Reaper is an incredibly powerful audio recording software program – technically, a digital audio workstation or DAW, for short). And even though it is undeniably “professional” software, nothing beats their pricing plan. See the Reaper site for details. We use it to teach folks how to create professional recordings in our course the Newbies Guide To Audio Recording Awesomeness 2: Pro Recording With Reaper.

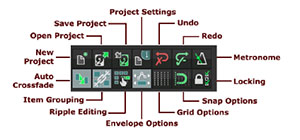
Okay, so about those buttons in the toolbar. Here is a summary of those buttons and their functions. But the video will demonstrate those functions in a “picture(or video, in this case)-paints-a-thousand-words” kind of way. For all the nitty-gritty, you can dig into the Reaper User Guide.
Button Names
New Project – What it sounds like.
Open Project – Again, pretty much what it sounds like.
Save Project – Yeah, again…..
Project Settings – This is where you set or change a bunch of settings for your project such as Beats Per Minute, Time Signature (those clearly for music recording), sample rate, what audio format to save new recordings in, where to save project and its media, and dozens more.
Undo – Self-explanatory
Redo – If you have an Undo, you gotta have a Redo, right?
Metronome – Let’s you listen to a click track, which plays according to your Project Settings. You can customize it in a lot of different ways, such as to change its volume, the relative vlume of the downbeat versus other beats, what sound to use, etc.
Auto Crossfade – If/when two or more media items (I am using the term “media” because these actions apply to both audio and MIDI items) overlap on a a track, their edges will automatically crossfade. This just means that the first audio will fade out as the second audio fades in so that it sounds like a smooth transition.
Item Grouping – This give you options for putting multiple media items (even across multiple tracks) into a single group. This way you can apply edits to the entire group in one action.
Ripple Editing – This is a fairly common video and audio track-based function. When enabled, moving one media item left or right ALSO moves every item downstream (occurring later) in the same way. Be careful with this one. Make sure you know when it is on or off, or you could accidentally move audio and MIDI items around unintentionally.
Envelope Options – Envelopes are points and lines that you can make appear under a track to automate things like panning, volume, effect parameters, etc. This action allows you to connect the envelope edits to the media item so that if you move that item, the envelope edit points move with it. The default is “off.” So if you use envelopes, you should know about this or you could lose you edits.
Grid Options – Reaper displays a vertical grid according to the Project settings, depicting either beats and bars or time intervals like minutes and seconds. This button can turn the grid off or on. The default is on.
Snap Options – If you’ve ever used a graphics program, you might be familiar with the Snap (or Snap to) function. It locks your cursor and/or the edges of media items to the grid and/or to each other. This can be super helpful when recording music. I use it all the time, turning it off and on a lot. You need to have it turned off to do fine tuning, trimming, media time-shifting, etc.
Locking – This allows you to lock any of several different aspects of your projects so that you won’t accidentally shift it. The video shows an example of locking and unlocking a time selection.
Here is the video.
http://homebrewaudio.wistia.com/medias/7u6ey67uh9?embedType=async&videoWidth=700

Gain, Volume, Loudness and Levels – What Does It All Mean?
 I recently wrote an article for the Disc Makers blog, Echoes – Insights For Independent Artists, called “What is the difference between loudness, volume and gain?” The main focus of the article is along the lines of my constant harangue about audio terminology and how its often confusing and sometimes overly technical jargon can make it difficult for regular people (i.e. NOT engineers or other techie types) to learn audio recording concepts. This particular time, I wanted to shed some light on the terms: gain, volume, loudness and levels.
Read the article here if you want to know more about this stuff: Recording Studio Difference Between Loudness, Volume And Gain http://blog.discmakers.com/2015/11/difference-between-loudness-volume-and-gain/#ixzz3siuq6Vad
Now Available: Primacoustic Paintables Clouds – Cirrus, Hexus, and Altos
Primacoustic is one of the top suppliers of acoustic treatment materials around. Typically, companies who provide these panels (or blocks or baffles, etc.) have a limited color choice – usually black, gray, or white. Sometimes you can get really wild choices like burgundy, or orange. It makes sense. I mean the primary purpose of these things is to control the audio acoustics in your room. But Priamacoustic started offering a line of paintable products called (would you believe it?) “Paintables.” But these were still only for the standard rectangular panels or “clouds” that you put on the ceiling. However, they just made available some different shapes to help spice things up. Plus these will give you more choices in placing acoustic treatment in your particular space.
The new lines in the Primacoustic Paintables Clouds are called Cirrus (circular), Hexus (Hexagonal) and Altos (square).
Here is a good article from AudioFanZine with more details about the new Paintables products:
http://en.audiofanzine.com/modular-sound-isolation/primacoustic/paintables-clouds-cirrus/news/a.play,n.21116.html
What Is A Noise Gate?
 In audio recording, there are a LOT of terms that don’t seem to describe the thing they are actually trying to describe. At least not to “audio civilians” who are not techies or engineers. But today’s audio tool actually sounds like what it does! Will wonders never cease?:). I’m referring to something called a noise gate.
What Does Any Gate Do?
That’s pretty simple, right? A gate is something that opens or closes to let someone (or something) in, or keep it out. And in this case, we are trying to keep out noise, and let in whatever thing we want to hear, like a voice or an instrument. If you like audio terms, tuck these away: something you DON’T want heard is called “noise.” And something you DO want heard is called a “signal.” And if you like math also, knowing this will suddenly cause terms like “signal-to-noise ratio” make sense.
Then What Does A Noise Gate Do?
A noise gate is an automatic gate used to keep out as much noise as possible. Automatic is good since it means we don’t need gate keepers, who can be expensive and eat a lot of your food. The two settings for any gate are “open” or “closed.” The default setting for a noise gate is closed, so only total silence can be heard or recorded when the gate is closed. But whenever a signal is heard (the thing we WANT to hear or record, like a voice, etc.), the gate opens. Simple, right?
Well……
As simple as it sounds, and as great a tool as a noise gate is, you should be aware of what can happen when you use one. As I said, when the gate detects a signal, it opens. But an open gate allows ALL sounds in! that means the voice (or whatever signal) will come through, yes. But all the noise that is in the room (or electronics, or outside mowing the lawn, etc.) with the voice will also come through the open gate.
The best scenario is to have the noise level be low enough that it really can’t be heard as long as the voice is talking or singing. So the voice would mask the noise in that case. You’d have total silence in between the vocal phrases. And you’d have some noise that you wouldn’t even notice when the voice was audible.
However, when the noise is loud enough that the voice does not drown it out, a gate can actually accentuate the noise! In college, I had a few classes in large lecture halls where the professor had to use a sound system (PA). That system had a LOT of electronic noise, so they used a noise gate. When the professor was not talking, all was quiet. But when he did speak, you’d get this flood of hissing and buzzing along with his voice. It was super distracting to have that noise come in and out like that. It would likely have been better to NOT have the noise gate in that situation because the noise would have been steady and constant, and our brains would have filtered it out to some degree. It would have become part of the ambiance. That way, when the professor spoke, it would not have ALSO heralded an onslaught of noise ever single time, whose contrast with the silence in between. You can hear an example of this below in the “High Background Noise” sample audio treated with a gate (2nd audio sample).
That’s just one potential unwanted side effect of using a noise gate. It will help to understand how gates work to avoid these side effects.
How Do Noise Gates Work?
They have to be able to tell the difference between signal and noise so they know when to open. This is done by giving a noise gate a volume level – called a theshold. The assumption is that any audio softer (less loud) than the set threshold level is considered noise. Any audio that is louder than the threshold will cause the gate to open, the assumption being that loud sounds are the ones you want – the signals. You’ll have to experiment with the threshold setting so that, ideally, it always opens when the voice sounds, and never opens when there’s just noise.
Noise gates have several other adjustable settings also. You have to tell it how quickly to open and close the gate. Here is another area where things can go wrong if you are not careful. The gate has to open quickly enough that the very first part of the voice is allowed through. If the gate opens too slowly, some of the initial vocal can be cut off.
The same is true in reverse when the gate closes. In fact this is where it normally causes problems if the noise is too loud. Audio usually fades out when it’s done. For example, the final word in a phrase will not usually stop abruptly, but rather get quiet over a period of a few milliseconds before total silence. So you need to make sure the gate does not close too quickly. Yes, you want to shut the door on the noise as soon as you can. But do it too soon, and you’ll cut off the endings – the “tails” of the signal.
Another common problem is caused by the kind of noise you are trying to stop at the gate. the assumption is that the noise is steady and fairly consistent. But if you have intermittent noise like the occasional cat crying to get into the studio, a loud vehicle driving by, something falling on the floor, etc., those can easily exceed the threshold and open the gate by themselves. There isn’t much you can do about these “gate-crashers” (my term), except record that phrase again, or maybe try to filter it out after the fact. It’s always best to prevent noise if you can. But sometimes, noise just happens.
Side Effects as … Effects?
I mentioned earlier that if you don’t have your settings just right, the gate can close too quickly on the signal, causing it to cut off the end of the sound. this can sound unnatural and clipped. But often, these extreme settings can make certain musical instruments sound different and interesting. In fact noise gates are often used (mis-used?) to enhance sounds – usually percussion and drum sounds. You can make drum hits sound more explosive or punchy using gates. Play around with them. You may discover some new sounds that way!
So how do I apply a noise gate?
Many audio recording software programs come with a noise gate effect built right in. Audacity doesn’t have one right out of the box, but you can download one from their site here: http://wiki.audacityteam.org/wiki/Download_Nyquist_Plug-ins. In Reaper it’s called ReaGate.
To use the noise gate effect, record your audio. Then go the Effect menu and select the Noise Gate effect. It’s just that easy.
Below are some audio samples of a noise gate in action. I used Reaper for these. In the first pair, the background noise was pretty loud, which you can hear with no gate in the first audio. The 2nd audio is what it sounds like to use a gate on very noise audio.
High Background Noise
This one is the noisy audio with no gate applied:
This has a noise gate on it:
Low Background Noise
This one has much less noise with no gate applied. It’s much more noticeable if you wear headphones:
Here is that lower-noise sample with a gate applied. Note how much better a gate works when the noise is lower: